1. Introduction
The Topargee Flush Mount Water Tank Gauge H2F-FM provides real-time, accurate water level monitoring for your RV, caravan, or boat. This innovative system eliminates the guesswork of traditional 'full/half/empty' gauges by counting down water usage in liters or gallons from a pre-set capacity. Its sleek design and backlit LCD display offer superior visibility and a modern aesthetic.

Image: The Topargee Flush Mount Water Tank Gauge display unit and its accompanying water flow sender unit.
Key features include:
- Real-time Water Usage Display: Large, backlit LCD screen illuminates during water use, providing instant updates.
- Precise Countdown: Monitors water flow by the liter or gallon, offering accurate remaining capacity.
- Memory Storage: Retains pre-set water capacity, ensuring you always know your remaining supply.
- Sleek Flush Mount Design: Integrates seamlessly into modern vehicle interiors.

Image: Diagram highlighting the gauge's features: stores water capacity, simple installation, compatibility with multiple tanks, real-time monitoring, and a large backlit digital display.
2. Setup and Installation
The Topargee H2F-FM gauge is designed for straightforward installation without requiring modifications to your water tank. The sender unit is fitted directly into the water line.
2.1 Components Included
- H2F-FM Flush Mount Water Tank Gauge Display Unit
- Water Flow Sender Unit
- Wiring Harness
2.2 Installation Steps
Follow these steps for proper installation:
- Cut Hose: Using a hose cutter, make a clean cut in your water line where the sender unit will be installed.
- Attach Hose Fittings: Securely attach appropriate hose fittings to the sender unit. Ensure a watertight seal.
- Install Sender After Pump: For optimal accuracy, install the sender unit in the water line after your water pump. Best results are achieved when the sender is approximately 200mm from the pump and any 90-degree elbows.
- Connect Sender to Gauge: Connect the sender unit's wiring harness to the display unit.
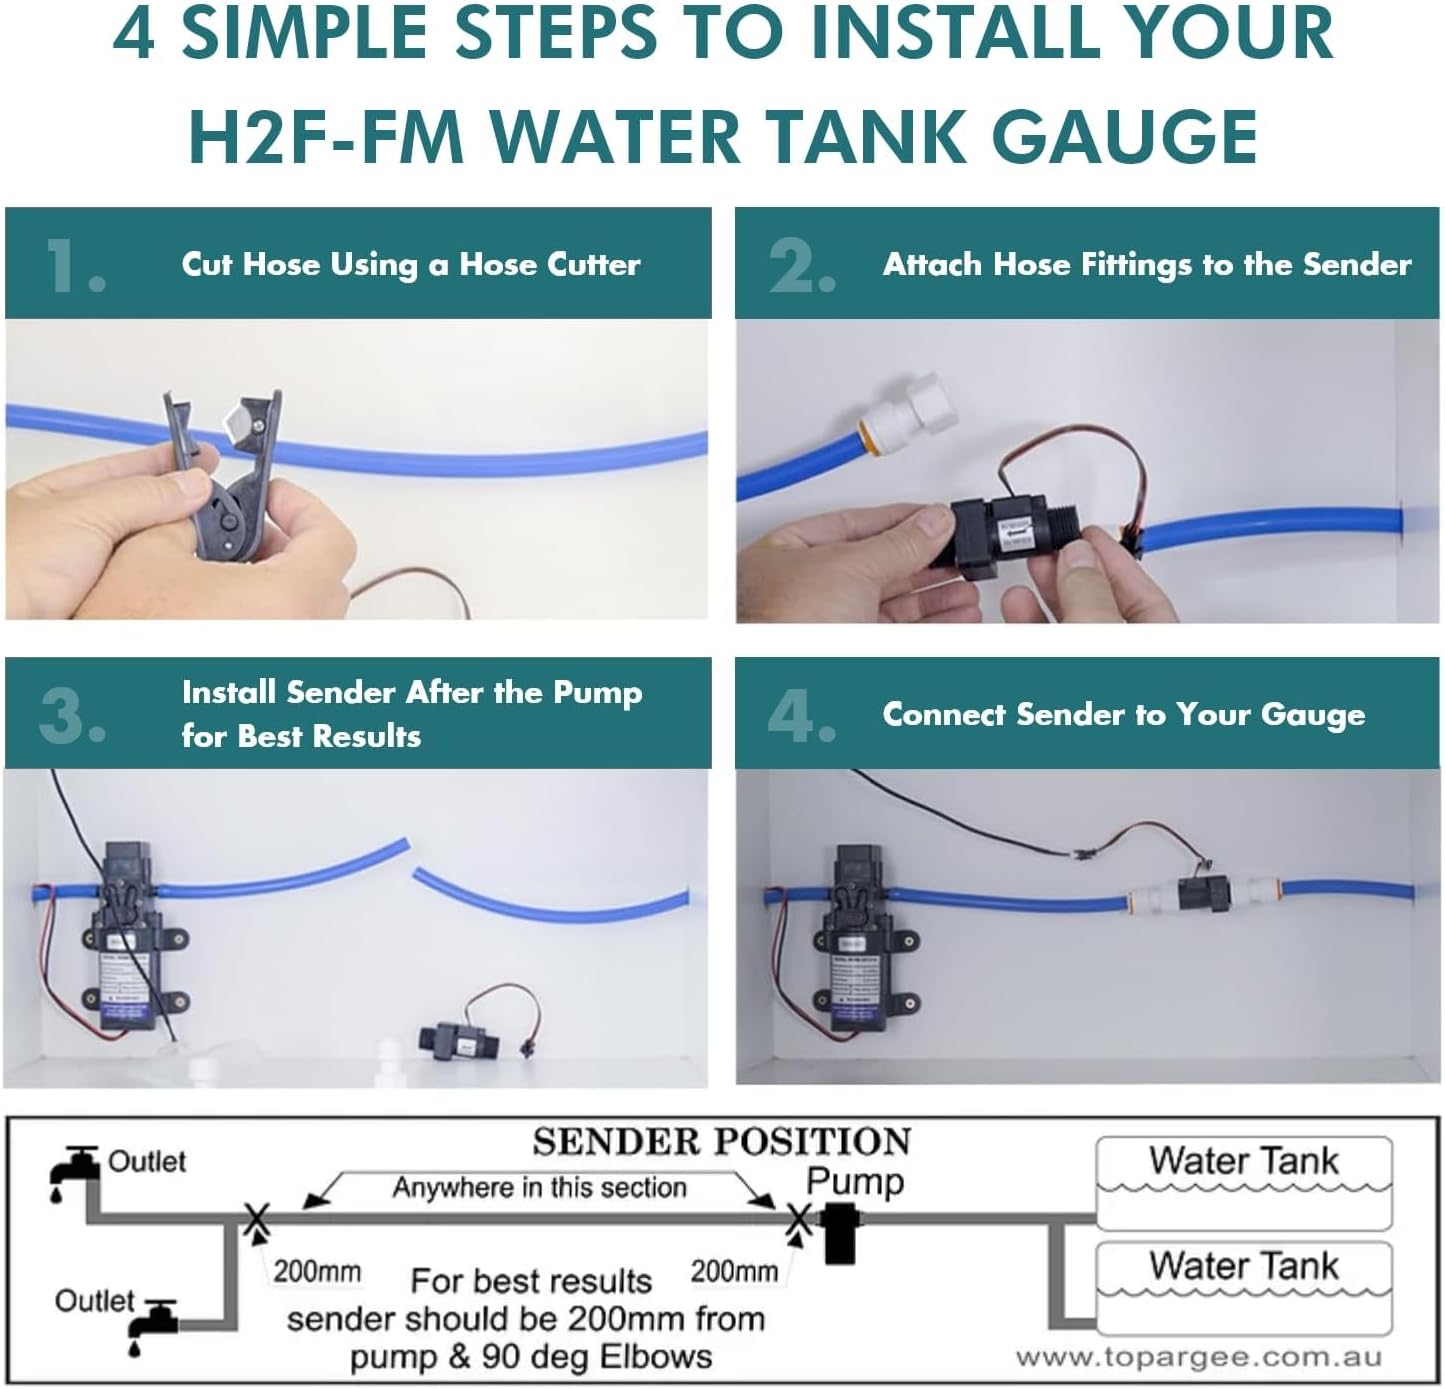
Image: Visual guide for the four-step installation process, including a diagram for optimal sender placement relative to the pump and tank.
2.3 Important Considerations
- Thread Compatibility: The sender unit typically uses 1/2" male BSP threads. If your plumbing uses NPT threads (common in the US), you will need appropriate NPT adapters (not included). Verify thread types before installation.
- Wiring Harness Length: The provided wiring harness from the sender unit to the display is of a fixed length. It cannot be extended with standard wires. If a longer connection is required, specific fixed-length harness extenders must be purchased to maintain warranty and functionality.
- Power Connection: The unit requires a 12V power supply. It is recommended to connect power to the pump supply, but it can also be wired to a constant-on power supply.
- Multiple Tanks: This system can monitor multiple tanks as long as they connect to a single pump. If you have multiple pumps, a separate gauge will be needed for each pump.
3. Operating Instructions
The Topargee H2F-FM gauge is designed for simple operation to provide accurate water level information.
3.1 Initial Setup and Programming
- Power On: Ensure the gauge is connected to a 12V power source. The backlit LCD screen will activate.
- Set Initial Capacity: When your water tank is full, press and hold the 'PROG (P)' button to enter programming mode. Use the 'DISPLAY RESET (D)' button to adjust the displayed value to your tank's total capacity in liters or gallons. Press 'PROG (P)' again to save the setting. This capacity will be stored in memory.
- Unit Selection: The gauge can display in liters or gallons. Refer to the full product manual for specific instructions on switching between units if needed.
3.2 Monitoring Water Usage
- As water is used, the gauge will automatically detect flow and count down the remaining volume in real-time. The LCD screen will light up to show the current reading.
- The display provides a precise numerical value, eliminating the ambiguity of traditional 'full', 'half', or 'empty' indicators.

Image: A person refilling an RV water tank, with the Topargee gauge visible, illustrating practical water management.
3.3 Resetting the Gauge
- When refilling your water tank, press the 'DISPLAY RESET (D)' button to reset the gauge to its pre-set full capacity. This ensures accurate tracking for the next cycle.
4. Maintenance
The Topargee Flush Mount Water Tank Gauge requires minimal maintenance to ensure continued performance.
- Cleaning: Wipe the display screen with a soft, damp cloth. Avoid abrasive cleaners or solvents that could damage the screen or casing.
- Connections: Periodically check all plumbing and electrical connections for tightness and signs of wear or corrosion.
- Winterization: If your vehicle is subject to freezing temperatures, ensure the water lines and sender unit are properly drained and protected according to your vehicle's winterization procedures to prevent damage.
5. Troubleshooting
If you encounter issues with your Topargee Water Tank Gauge, refer to the following common problems and solutions:
| Problem | Possible Cause | Solution |
|---|---|---|
| Gauge not displaying or powering on. | No power supply or loose connection. | Check 12V power connection and ensure all wiring is secure. |
| Inaccurate water readings. | Incorrect initial capacity setting; sender unit not optimally placed; air in the line. | Re-program the initial capacity; ensure sender is installed after the pump and away from elbows (approx. 200mm); bleed air from the water system. |
| Display difficult to read from certain angles. | Limited viewing angle of the LCD display. | Mount the display unit at an optimal eye-level or angle for your primary viewing position. Consider mounting in a less prominent location if the bright backlight is distracting. |
| Wiring harness is too short. | Standard harness length is insufficient for desired mounting location. | Purchase and use official Topargee fixed-length harness extenders. Do not attempt to extend with standard wires as this may void the warranty. |
| Incompatible plumbing threads. | Sender unit uses BSP threads, while vehicle uses NPT. | Obtain appropriate BSP to NPT adapters before installation. |
| Display lights up bright blue when water flows, no dimmer. | This is a design characteristic of the unit. | No adjustment available. Consider mounting location to minimize distraction if desired. |
6. Specifications
Detailed specifications for the Topargee Flush Mount Water Tank Gauge H2F-FM:
| Feature | Specification |
|---|---|
| Model | H2F-FM |
| Manufacturer Part Number | DF083L-44TM-TA12 |
| Display Dimensions (W x D x H) | 87mm x 30mm x 80mm (approx. 3.43 x 1.18 x 3.15 inches) |
| Item Weight | 0.04 Kilograms (approx. 1.44 ounces) |
| Material | Metal, Plastic |
| Power | 12 Volt DC only |
| Mounting | Recessed Mount (Flush Mount) |
| Screen Type | Large Backlit LCD Screen |
| Sender Lead Length | 1.4 Meter / 3 Meter options (check specific package) |
| Measurement Units | Liters or Gallons |
| Max Capacity Tracking | Up to 99,999 liters/gallons total |

Image: Topargee Water Tank Gauge Model Comparison Table, showing key differences between models including the Flush Mount (H2F-FM).
7. Warranty and Support
Topargee is committed to providing quality products. For specific warranty details, please refer to the documentation included with your purchase or visit the official Topargee website.
7.1 Customer Support
For technical assistance, troubleshooting, or product inquiries, please contact Topargee customer support through their official channels. You can find more information and contact details on the Topargee Amazon Store.