1. Introduction
This manual provides comprehensive instructions for the installation, operation, and maintenance of the Mintu Electronic Control Board. This component serves as a direct replacement for the original control board in various GE dishwasher models. Please read this manual thoroughly before attempting any installation or repair to ensure safe and correct procedures.
The Mintu Electronic Control Board is designed to restore the functionality of your dishwasher by replacing a faulty or damaged original control board. Proper installation is crucial for the correct operation of your appliance.
2. Safety Information
WARNING: Electrical shock hazard. Disconnect power to the dishwasher before servicing. Failure to do so may result in serious injury or death.
- Always disconnect the dishwasher from its power source before beginning any repair or installation.
- Wear appropriate personal protective equipment, such as gloves and safety glasses.
- If you are not comfortable performing electrical repairs, it is highly recommended to seek assistance from a qualified appliance technician.
- Ensure all connections are secure and correctly re-established after installation.
- Keep children and pets away from the work area during installation.
3. Compatibility
The Mintu Electronic Control Board is compatible with a wide range of GE dishwasher models. Please verify your dishwasher's model number against the list below to ensure compatibility. The model number is typically located on a label inside the dishwasher door or on the side of the tub.
Compatible GE Dishwasher Models:
- ADT521PGJ2BS, ADT521PGJ2WS
- GDF520PGJ2BB, GDF520PGJ2CC, GDF520PGJ2WW, GDF520PGJ4BB, GDF520PGJ4CC, GDF520PGJ4WW, GDF520PMJ2ES, GDF520PMJ4ES, GDF520PSJ2SS, GDF520PSJ4SS
- GDF610PGJ2BB, GDF610PGJ2WW, GDF610PGJ4BB, GDF610PGJ4WW, GDF610PMJ2ES, GDF610PMJ4ES, GDF610PSJ2SS, GDF610PSJ4SS
- GDF620HGJ2BB, GDF620HGJ2WW, GDF620HGJ4BB, GDF620HGJ4WW, GDF620HMJ2ES, GDF620HMJ4ES, GDF620HSJ2SS, GDF620HSJ4SS
- GDT535PGJ2BB, GDT535PGJ2WW, GDT535PGJ4BB, GDT535PGJ4WW, GDT535PGJ5BB, GDT535PGJ5WW, GDT535PSJ2SS, GDT535PSJ4SS, GDT535PSJ5SS
- GDT545PGJ2BB, GDT545PGJ2WW, GDT545PGJ4BB, GDT545PGJ4WW, GDT545PSJ2SS, GDT545PSJ4SS
- GDT625PGJ2BB, GDT625PGJ2WW, GDT625PGJ4BB, GDT625PGJ4WW, GDT625PSJ2SS, GDT625PSJ4SS
- GDT635HGJ2BB, GDT635HGJ2WW, GDT635HGJ4BB, GDT635HGJ4WW, GDT635HMJ2ES, GDT635HMJ4ES, GDT635HSJ2SS, GDT635HSJ4SS
4. Product Overview
The Mintu Electronic Control Board is a critical component responsible for managing various functions of your dishwasher. Below are images illustrating the board from different perspectives.

Figure 1: Top view of the Mintu Electronic Control Board, showing various integrated circuits, capacitors, and relays. This is the primary side with most of the active components.

Figure 2: Angled view of the control board, highlighting the various white and black connectors where wiring harnesses from the dishwasher attach. Proper connection of these harnesses is essential for functionality.
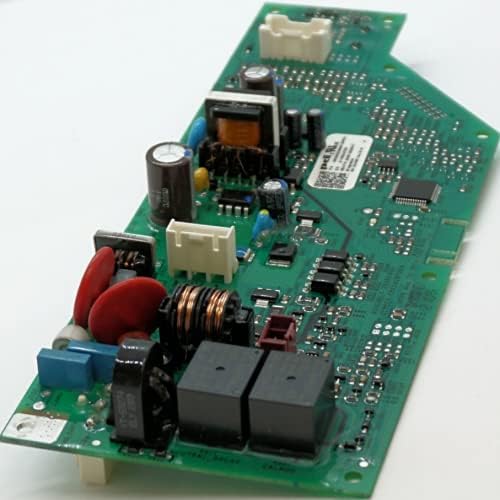
Figure 3: A different angled perspective of the control board, providing a clearer view of the larger components such as transformers and additional relays, which manage power distribution and operational cycles.
5. Setup and Installation
Replacing a dishwasher control board requires careful attention to detail. If you are unsure about any step, consult a professional appliance technician.
Required Tools (May Vary):
- Screwdrivers (Phillips and flathead)
- Nut drivers or wrenches
- Needle-nose pliers
- Multimeter (for testing, optional)
Installation Steps:
- Disconnect Power: Locate the circuit breaker for your dishwasher and turn off the power. Verify power is off using a non-contact voltage tester or by attempting to start the dishwasher.
- Access the Control Board: Depending on your GE dishwasher model, the control board may be located behind the kick plate at the bottom front, or within the control panel at the top of the door. Refer to your specific dishwasher's service manual for exact access instructions.
- Document Wiring: Before disconnecting any wires, take clear photos of all wire connections to the old control board. This will serve as a reference for reconnecting wires to the new board.
- Disconnect Wires: Carefully disconnect all wiring harnesses and individual wires from the old control board. Note any clips or locking mechanisms.
- Remove Old Board: Unscrew or unclip the old control board from its mounting brackets.
- Install New Board: Position the Mintu Electronic Control Board in the same location as the old board and secure it with the original screws or clips.
- Reconnect Wires: Using your photos as a guide, carefully reconnect all wiring harnesses and individual wires to the corresponding terminals on the new control board. Ensure all connections are firm and secure.
- Reassemble Dishwasher: Reattach any panels or covers that were removed to access the control board.
- Restore Power: Turn the circuit breaker back on to restore power to the dishwasher.
6. Operating (Post-Installation Checks)
After installing the new control board, perform the following checks to ensure proper operation:
- Power On: Confirm that the dishwasher powers on and the display (if applicable) illuminates.
- Cycle Selection: Attempt to select different wash cycles and options to ensure the buttons and controls respond correctly.
- Start a Cycle: Initiate a short wash cycle (e.g., Rinse Only) and observe if the dishwasher begins to fill with water and operate as expected. Listen for unusual noises.
- Check for Error Codes: If any error codes appear on the display, refer to your dishwasher's user manual for troubleshooting specific codes.
7. Maintenance
The electronic control board itself requires no routine maintenance. However, to ensure its longevity and the overall health of your dishwasher:
- Keep the area around the dishwasher clean and free of debris.
- Ensure proper ventilation for the dishwasher to prevent overheating of internal components.
- Address any leaks promptly to prevent moisture from reaching electrical components.
8. Troubleshooting
If your dishwasher does not function correctly after installing the new control board, consider the following troubleshooting steps:
- No Power: Check the circuit breaker. Ensure all wiring connections to the control board are secure.
- Incorrect Function/Error Codes: Double-check all wiring connections against your reference photos. A loose or incorrect connection can cause various issues.
- Partial Functionality: This often indicates a specific component or circuit is not receiving power or signal. Re-verify connections for the affected function.
- Board Failure: While rare for a new part, if all connections are correct and the issue persists, the new board may be faulty. Contact the seller for support.
If troubleshooting steps do not resolve the issue, it is advisable to contact a qualified appliance repair technician for further diagnosis and repair.
9. Specifications
| Brand | Mintu |
| Part Number (Model) | GDF620HGJ4BB |
| ASIN | B09DY3YQ71 |
| Date First Available | August 30, 2021 |
10. Warranty and Support
Specific warranty information for the Mintu Electronic Control Board is not provided in the product data. For details regarding warranty coverage, return policies, or technical support, please contact the seller directly through your purchase platform or refer to any documentation included with your product.
For general inquiries or assistance, you may also visit the Mintu Store on Amazon.