1. Product Overview
The FLTXNY POWER 1000W 48V Horizontal Wind Generator Kit is designed for efficient wind energy utilization, providing a reliable power source for residential applications. This kit includes a 3-blade wind turbine and an MPPT charge controller, optimized for performance and safety.

Image 1.1: FLTXNY POWER 1000W 48V Horizontal Wind Generator Kit with MPPT charge controller installed by a body of water.
Key Features:
- Low Start-Up Speed: Designed to begin generating power at low wind speeds.
- Efficient Blades: Three 85cm nylon blades with optimized aerodynamic shape for high wind energy utilization.
- Durable Construction: Body made of casting aluminum alloy with two bearings for enhanced durability and safety in strong winds.
- MPPT Charge Controller: Included for efficient power management and battery charging.
- Patented Generator: Permanent magnet AC generator with a special stator effectively reduces torque, ensuring optimal performance.
2. Safety Information
Please read and understand all safety instructions before installation and operation. Failure to follow these instructions may result in serious injury or property damage.
General Safety Precautions:
- Professional Installation: Installation should be performed by qualified personnel with knowledge of electrical systems and wind turbine installation.
- High Voltage: The system operates at 48V. Always disconnect power before performing any maintenance or installation tasks.
- Rotating Blades: Wind turbine blades rotate at high speeds. Keep clear of the turbine when it is operating.
- Fall Hazard: Installation often requires working at heights. Use appropriate safety equipment, including harnesses and fall protection.
- Weather Conditions: Do not install or service the turbine during adverse weather conditions such as high winds, lightning, or heavy rain.
- Grounding: Ensure the wind turbine and all associated electrical components are properly grounded according to local electrical codes.
- Component Integrity: Regularly inspect all components for wear, damage, or loose connections. Do not operate with damaged parts.
3. Components List
The FLTXNY POWER 1000W 48V Horizontal Wind Generator Kit includes the following main components:
- Wind Turbine Generator Body
- 3 Nylon Blades
- Tail Fin
- Nose Cone
- MPPT Charge Controller
- Mounting Hardware (bolts, wrench)

Image 3.1: Individual components of the wind turbine kit, showing blades, generator, nose cone, and assembly tools.
4. Setup and Installation
Proper installation is crucial for the safe and efficient operation of your wind generator. Refer to the diagrams and instructions carefully.
4.1 Site Selection
Choose a location with unobstructed wind flow. Avoid areas with significant turbulence caused by buildings, trees, or other obstacles. The turbine should ideally be mounted at a height that clears surrounding obstacles by at least 20 feet (6 meters) or 10 times the height of the nearest obstacle.

Image 4.1: Wind Turbine Installation Height Diagram, showing optimal placement for maximum wind exposure.
4.2 Assembly Steps
- Mounting Pole Preparation: Securely install a sturdy mounting pole (not included) at the chosen site. Ensure it is capable of supporting the turbine's weight and resisting wind forces. The connection can be via tube or flange.
- Attach Generator Body: Mount the wind generator body onto the top of the pole. Ensure all bolts are tightened securely.
- Install Blades: Attach the three nylon blades to the generator hub. Ensure they are balanced and securely fastened with the provided hardware.
- Attach Tail Fin: Secure the tail fin to the rear of the generator body. This helps orient the turbine into the wind.
- Install Nose Cone: Place the nose cone over the blade hub for aerodynamic efficiency and protection.

Image 4.2: Detailed view of the blade attachment mechanism.

Image 4.3: Generator body and tail fin assembly.
4.3 Electrical Connections
Connect the wind turbine to the MPPT charge controller, and then connect the charge controller to your battery bank and inverter system. Refer to the wiring diagram below.
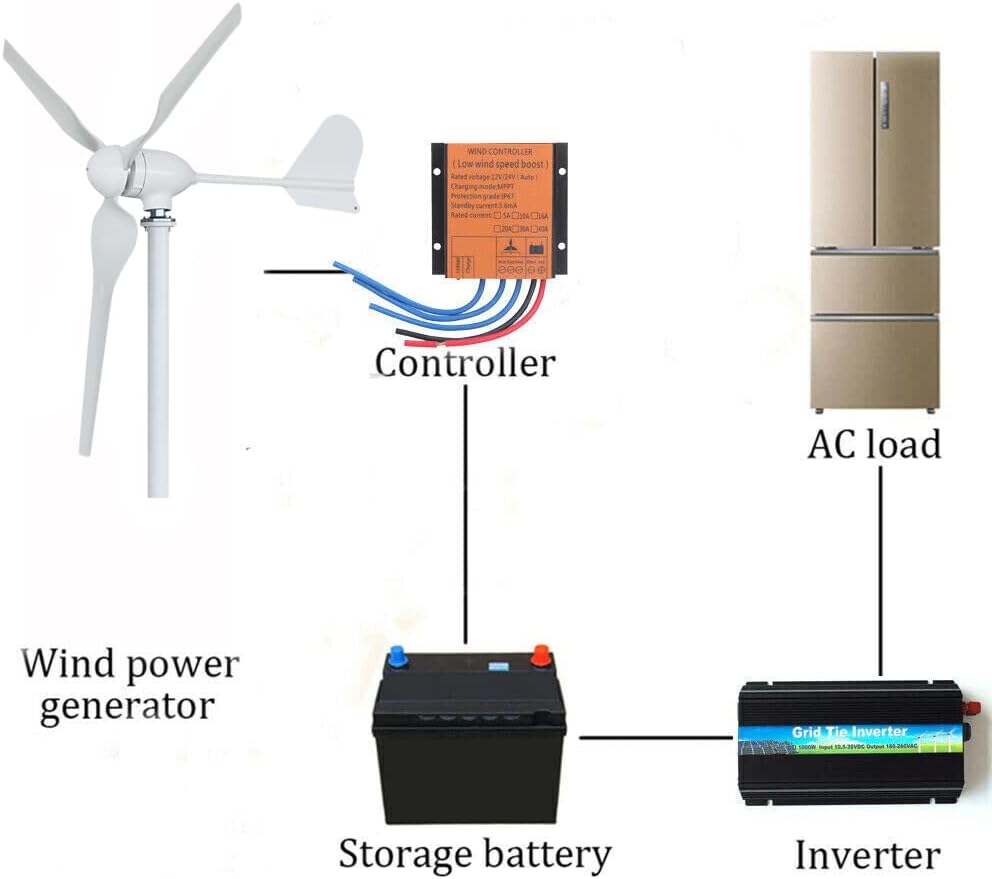
Image 4.4: System wiring diagram for the wind generator, charge controller, battery, and inverter.
- Connect Turbine to Controller: Connect the three wires from the wind turbine generator to the corresponding input terminals on the MPPT charge controller. Ensure correct polarity if applicable (though AC output from turbine is typically three-phase).
- Connect Controller to Battery: Connect the output terminals of the MPPT charge controller to your 48V battery bank. Observe correct positive and negative connections.
- Connect Battery to Inverter: Connect the battery bank to your inverter (if using AC loads).
- Grounding: Ensure all components, including the turbine tower and controller, are properly grounded.
5. Operating Instructions
Once installed and wired correctly, the wind generator system operates largely automatically. The MPPT charge controller manages the power flow to the batteries.
5.1 Initial Start-Up
- Ensure all electrical connections are secure and correct.
- Verify that the battery bank is connected to the charge controller.
- In sufficient wind, the turbine blades will begin to rotate, and the generator will start producing power.
- Monitor the charge controller display (if available) to confirm power generation and battery charging status.
5.2 Normal Operation
The wind turbine will generate electricity whenever wind speeds are above its cut-in speed. The MPPT controller will optimize power transfer to the battery bank, preventing overcharging and managing output.
5.3 Shutting Down the System (Emergency/Maintenance)
To safely shut down the system for maintenance or in emergency situations:
- Brake the Turbine: If your turbine has a manual brake or short-circuit switch on the controller, activate it to stop the blades from rotating.
- Disconnect Battery: Disconnect the battery bank from the charge controller.
- Disconnect Turbine: Disconnect the wind turbine from the charge controller.
6. Maintenance
Regular maintenance ensures the longevity and optimal performance of your wind generator.
6.1 Routine Checks (Monthly)
- Visual Inspection: Check blades, tail fin, and generator body for any visible damage, cracks, or loose parts.
- Mounting Security: Verify that all mounting bolts and connections are tight and secure.
- Cable Integrity: Inspect all electrical cables for fraying, cuts, or signs of wear. Ensure connections are clean and corrosion-free.
- Controller Check: Ensure the MPPT charge controller is operating normally and its display (if any) shows expected values.
6.2 Annual Maintenance
- Blade Cleaning: Clean the blades to remove dirt, debris, or ice buildup that could affect aerodynamic efficiency.
- Bearing Lubrication: Consult the manufacturer for specific lubrication requirements for the generator bearings.
- Electrical System Check: Have a qualified electrician inspect the entire electrical system, including grounding, for optimal safety and performance.
7. Troubleshooting
This section addresses common issues you might encounter with your wind generator.
7.1 Turbine Not Rotating or Low Output
- No Wind: Check local wind conditions. The turbine requires sufficient wind speed to operate.
- Obstructions: Ensure there are no new obstructions blocking wind flow to the turbine.
- Brake Engaged: Check if the manual brake or short-circuit switch on the controller is activated.
- Damaged Blades: Inspect blades for damage that could impede rotation or efficiency.
- Loose Connections: Verify all electrical connections from the turbine to the controller are secure.
7.2 No Power to Batteries
- Controller Fault: Check the MPPT charge controller for error codes or indicators.
- Battery Connection: Ensure the battery bank is correctly connected to the controller with proper polarity.
- Blown Fuse/Breaker: Check for any tripped breakers or blown fuses in the system.
- Turbine Output: Confirm the turbine is rotating and generating AC power (requires specialized tools to measure).
7.3 Unusual Noise or Vibration
- Loose Components: Check all bolts and fasteners on the turbine and mounting pole.
- Blade Damage: Inspect blades for cracks, chips, or imbalance.
- Bearing Wear: Worn bearings in the generator can cause noise. This may require professional servicing.
8. Specifications
| Specification | Detail |
|---|---|
| Brand | FLTXNY POWER |
| Model Name | M3 |
| Item Model Number | FLTXNYPOWER-M3-48 |
| Rated Wattage | 1000 Watts |
| Voltage | 48 Volts |
| Fuel Type | Wind |
| Power Source | Wind Powered |
| Recommended Uses | Residential |
| Item Weight | 20 Pounds |
| Special Feature | Overload Protection |
| Included Components | Charge Controller |
| Material | Nylon Fiber (Blades) |
| UPC | 710891258427 |
| Manufacturer | FLYTWINDENERGY |
| Package Dimensions | 38.58 x 15.75 x 9.06 inches |
9. Warranty and Support
For warranty information and technical support, please contact FLTXNY POWER directly or refer to the documentation provided with your purchase. You can also visit the official FLTXNY POWER store on Amazon for more information: