1. Product Overview
These Sanooer Towing Mirrors are designed to enhance visibility and safety when towing, offering a wider field of view compared to standard mirrors. They are equipped with multiple features for convenience and functionality.

Image 1.1: Front and rear view of the Sanooer Towing Mirrors, showcasing the white painted finish and integrated lighting.
Key features include adjustable power glass, dual mirror design (flat and convex), LED turn signals, heated glass, puddle lamps, and a temperature sensor. The mirrors also feature manual flip-up and folding capabilities for various driving conditions.
2. Compatibility
These towing mirrors are specifically designed for the following vehicle models:
- 2009-2018 Dodge Ram 1500
- 2010-2018 Dodge Ram 2500
- 2010-2018 Dodge Ram 3500
- 2019-2024 Dodge Ram Classic
It is crucial to verify your vehicle's make, model, and year to ensure proper fitment and functionality. If your vehicle does not possess the necessary wiring or options for all listed features (e.g., turn signals, puddle lights, heating), some functions of the mirror may not operate.

Image 2.1: Visual representation of compatible Dodge Ram models.

Image 2.2: Guide on how to confirm product suitability for your vehicle.
3. Product Features
These mirrors integrate several advanced functions to improve your driving and towing experience:

Image 3.1: Detailed diagram illustrating the various components and functions of the towing mirror.
- Adjustable Power Glass: The large, flat mirror can be adjusted electronically from inside the vehicle, allowing for optimal rearward visibility.
- Dual Glass Design:
- The large mirror is a flat mirror, providing a true-to-life perspective and is power-adjustable.
- The small mirror is a convex mirror, offering a wider field of view to minimize blind spots. This mirror is manually adjustable.

Image 3.2: Explanation of the plane (flat) and convex mirror functionalities.
- LED Turn Signal Light: Integrated LED lights on the mirror housing provide clear turn indications to other drivers, enhancing safety.

Image 3.3: Close-up of the integrated turn signal light and puddle light.
- Heated Function: The larger mirror glass includes a heating element to quickly clear away moisture, fog, and frost, ensuring a clear view in adverse weather conditions.

Image 3.4: Illustration of the heated mirror function effectively removing moisture and frost.
- Puddle Light: A downward-facing light illuminates the ground near the vehicle's door, assisting with visibility when entering or exiting the vehicle in low light.
Image 3.5: Close-up of the integrated puddle light and turn signal light.
- Temperature Sensor: Located on the driver's side mirror, this sensor provides external air temperature readings.

Image 3.6: Illustration of the heated mirror function and the temperature sensor.
- Manual Flip-Up and Folding: The mirrors can be manually flipped up for extended towing width and folded in for tight spaces or parking.
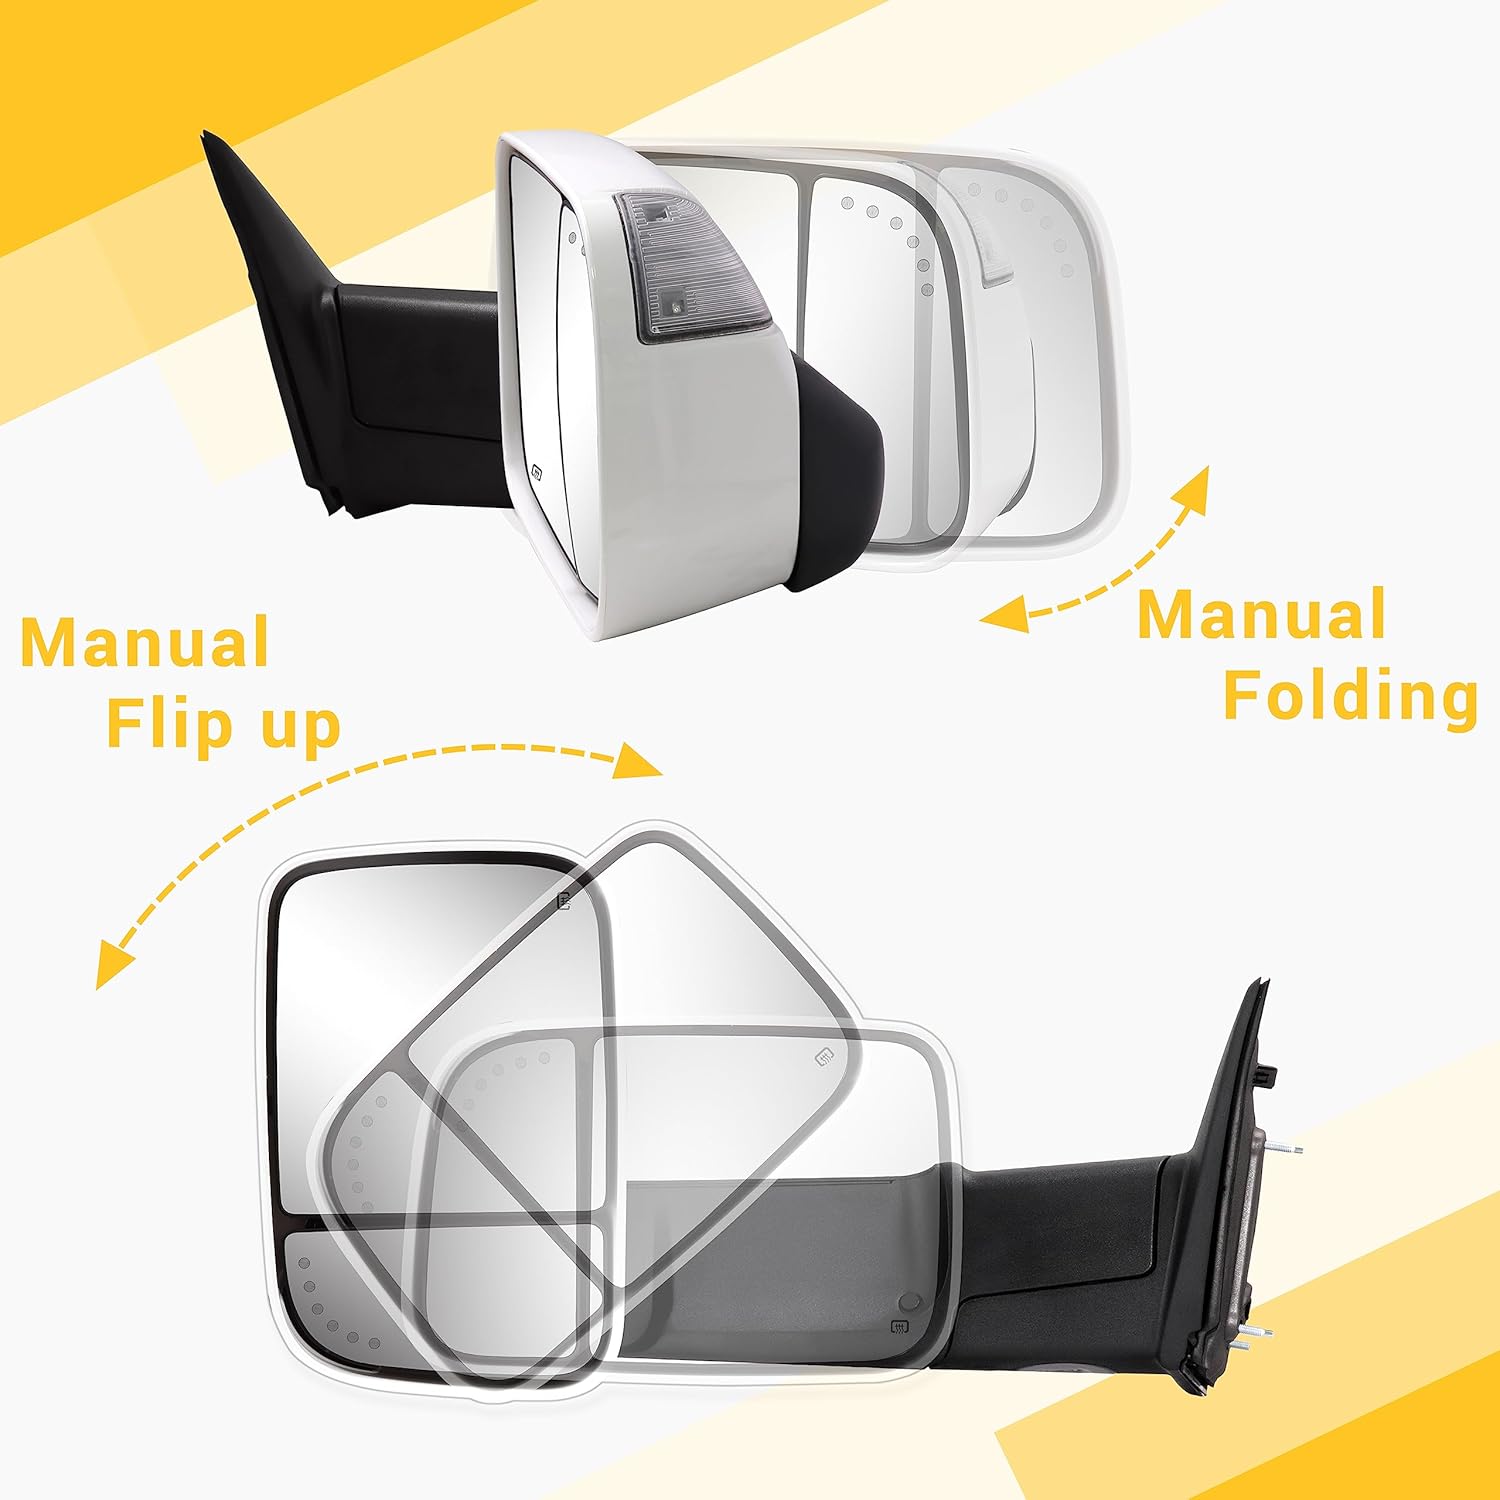
Image 3.7: Visual guide for manually flipping up and folding the mirrors.

Image 3.8: Comparison illustrating the expanded field of view when mirrors are flipped up for towing.
4. Setup and Installation
Installation of these towing mirrors typically involves removing the existing mirrors and connecting the new units. While the process is generally considered straightforward for those with mechanical experience, professional installation is recommended if you are unfamiliar with automotive electrical systems or body panel removal.
4.1. Tools and Materials (Not Included):
- Basic hand tools (sockets, wrenches, screwdrivers)
- Trim panel removal tools (plastic pry tools)
- Wire strippers/crimpers (if custom wiring is needed for certain features)
- Electrical tape or heat shrink tubing
4.2. General Installation Steps:
- Safety First: Disconnect the vehicle's battery before beginning any electrical work.
- Remove Door Panel: Carefully remove the interior door panel to access the mirror mounting bolts and electrical connectors. Refer to your vehicle's service manual for specific instructions on door panel removal.
- Disconnect Old Mirror: Unplug the electrical connector(s) from the existing mirror and unbolt it from the door frame.
- Install New Mirror: Position the new Sanooer towing mirror onto the door frame, ensuring proper alignment. Secure it with the mounting bolts.
- Connect Wiring: Plug in the electrical connector(s) from the new mirror to the vehicle's wiring harness. Ensure all connections are secure. If your vehicle did not originally have certain features (e.g., turn signals, puddle lights), additional wiring or programming (e.g., with tools like Alpha OBD) may be required for these functions to operate.
- Test Functions: Reconnect the vehicle's battery. Before reattaching the door panel, test all mirror functions: power adjustment, heating, turn signals, puddle lights, and temperature sensor display (if applicable).
- Reassemble: Once all functions are verified, reattach the interior door panel.
Note: Some vehicle models may require programming or activation of certain features via the vehicle's onboard computer system for full functionality. Consult a qualified technician if you encounter issues.
5. Operating Instructions
5.1. Power Glass Adjustment:
Use the vehicle's standard mirror control switch to adjust the angle of the large, flat mirror glass. This allows you to fine-tune your rearward view for driving and towing.
5.2. Convex Glass Adjustment:
The smaller, convex mirror is manually adjustable. Gently push on the mirror surface to position it for optimal blind spot coverage.
5.3. Heated Mirror Function:
Activate the heated mirror function using your vehicle's defroster controls (typically linked with the rear window defroster). This will clear moisture, fog, and ice from the large mirror surface.
5.4. Manual Flip-Up for Towing:
To extend the mirrors for a wider view when towing, manually grasp the mirror housing and rotate it upwards until it locks into the extended position. This provides a significantly wider field of view, as shown in Image 3.8.
5.5. Manual Folding:
To fold the mirrors inward for parking or navigating tight spaces, manually push the mirror housing towards the vehicle body until it is flush. This helps prevent damage in confined areas.
6. Maintenance
Proper maintenance ensures the longevity and optimal performance of your Sanooer Towing Mirrors.
- Cleaning: Clean the mirror glass and housing regularly with a mild automotive glass cleaner and a soft cloth. Avoid abrasive cleaners or harsh chemicals that could damage the finish or mirror surface.
- Inspection: Periodically inspect the mirrors for any signs of damage, loose components, or wiring issues. Ensure the manual flip-up and folding mechanisms operate smoothly.
- Electrical Connections: If you experience intermittent issues with electrical functions (e.g., heating, lights), check the wiring connections behind the door panel for corrosion or looseness.
7. Troubleshooting
If you encounter issues with your Sanooer Towing Mirrors, refer to the following troubleshooting guide:
| Problem | Possible Cause | Solution |
|---|---|---|
| Power glass does not adjust. |
|
|
| Heated function not working. |
|
|
| Turn signals or puddle lights do not illuminate. |
|
|
| Mirror vibrates excessively at speed. |
|
|
For issues not covered here, or if troubleshooting steps do not resolve the problem, contact Sanooer customer support or a certified automotive technician.
8. Specifications
| Feature | Detail |
|---|---|
| Model Number | SA-PWC8509 |
| Compatibility | 2009-2018 Dodge Ram 1500, 2010-2018 Dodge Ram 2500/3500, 2019-2024 Dodge Ram Classic |
| Color | White (Painted PW7) |
| Auto Part Position | Left & Right (Pair) |
| Mounting Type | Door Mount |
| Mirror Adjustment | Power (Flat Glass), Manual (Convex Glass) |
| Special Features | Heated, LED Turn Signal, Puddle Light, Temperature Sensor, Manual Flip-Up, Manual Folding |
| Lens Curvature | Flat (Main), Convex (Lower) |
| Item Weight | Approximately 22.3 pounds (Pair) |
| Package Dimensions | Approximately 24 x 15 x 11 inches |
| Included Components | Towing Mirrors (Pair) |
9. Warranty and Support
Sanooer products are manufactured to high standards. For specific warranty information, please refer to the documentation included with your purchase or contact Sanooer customer support directly. Keep your proof of purchase for any warranty claims.
For technical assistance, installation questions, or troubleshooting beyond this manual, please reach out to Sanooer customer service. Contact information can typically be found on the product packaging or the official Sanooer website.