1. Product Overview
The Neewer 31.5"/80cm Motorized Camera Slider is a versatile tool designed for professional video production and time-lapse photography. It features a carbon fiber rail system, 2.4G wireless control, and multiple shooting modes including video, time-lapse, horizontal tracking, and 120° panoramic shooting.

Image: The Neewer motorized camera slider with a camera mounted and the wireless remote control displaying its interface.
1.1 Package Contents
Verify that all items listed below are included in your package. If any items are missing or damaged, please contact customer support.
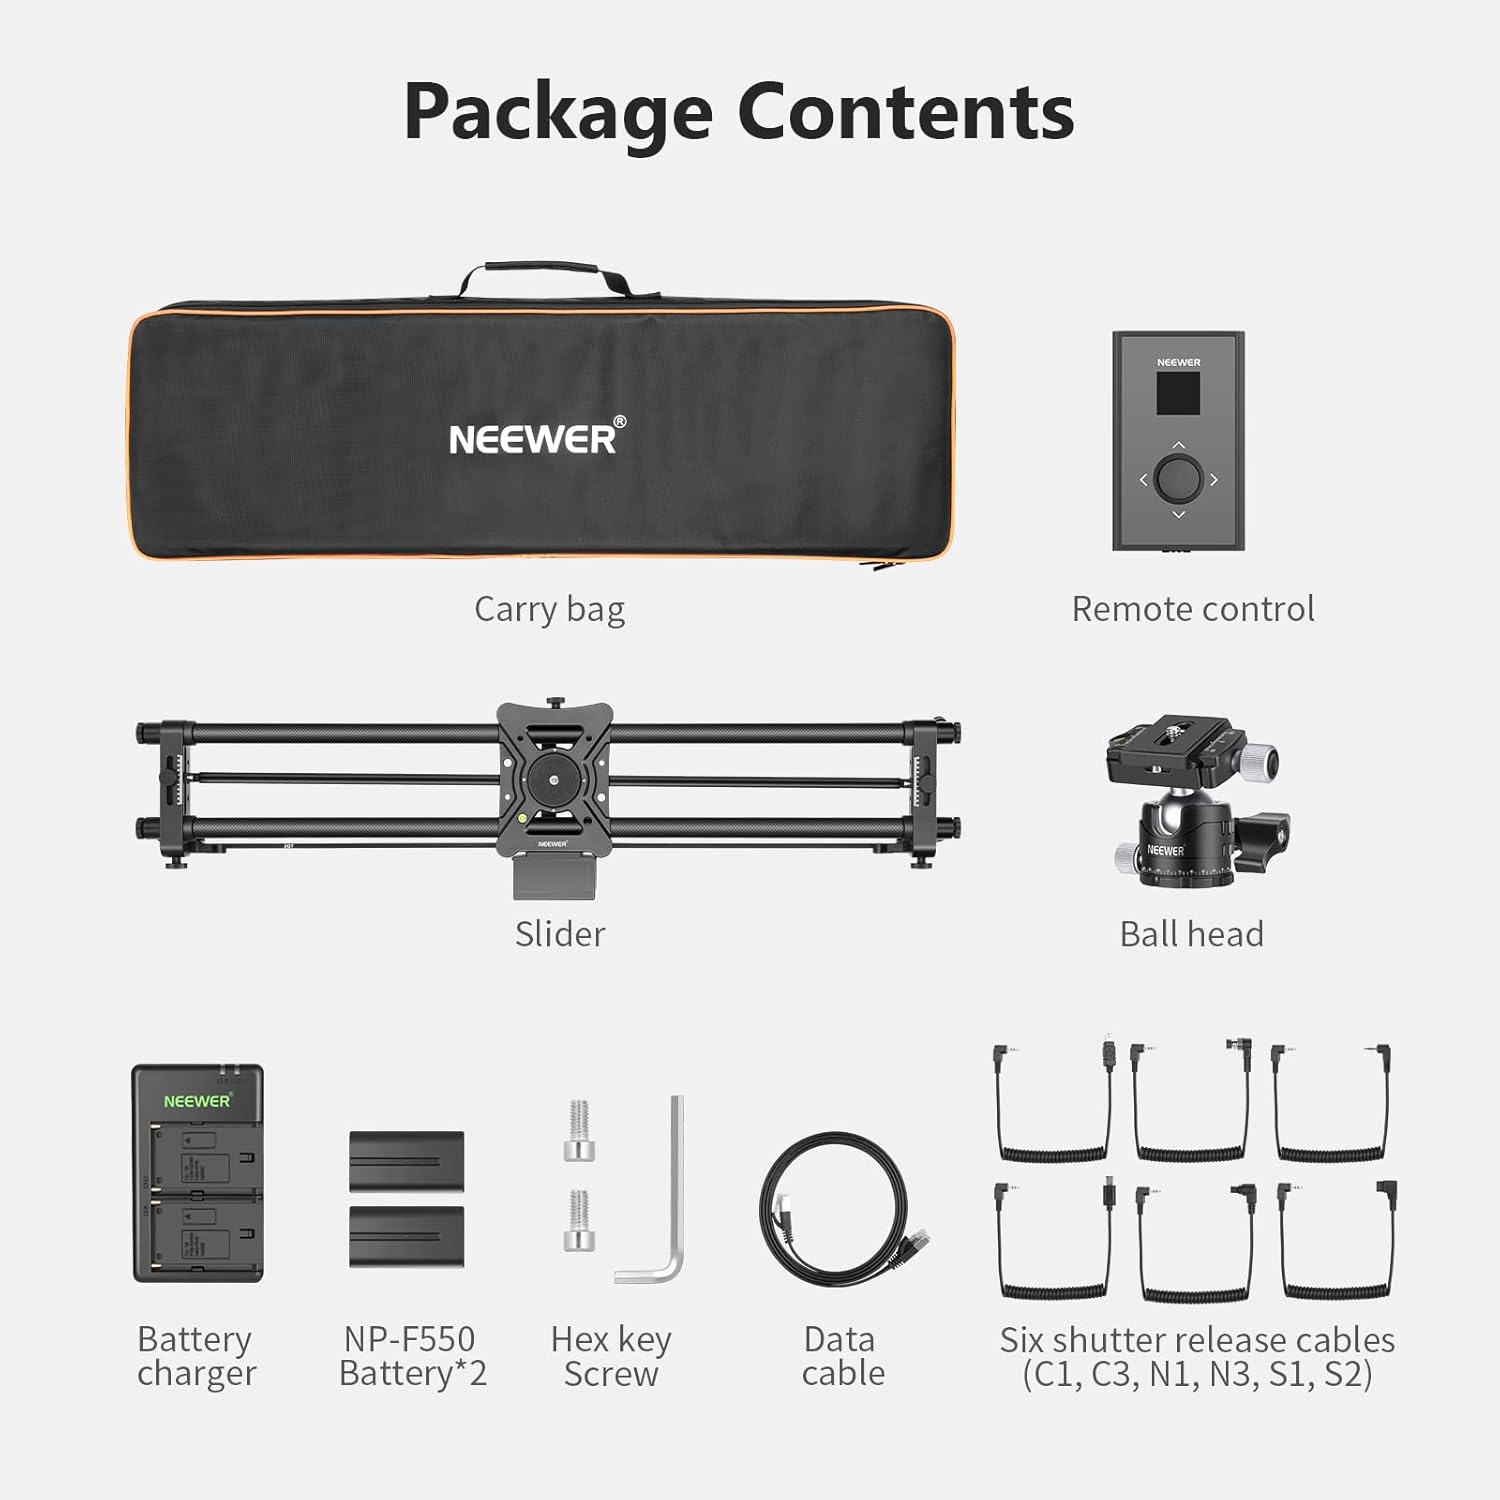
Image: A visual representation of the package contents, including the carry bag, remote control, slider, ball head, battery charger, two NP-F550 batteries, hex key, data cable, and six shutter release cables (C1, C3, N1, N3, S1, S2).
- 1 x Neewer 31.5"/80cm Motorized Camera Slider
- 1 x Wireless Remote Control
- 1 x Ball Head
- 1 x Carry Bag
- 1 x Battery Charger
- 2 x NP-F550 Batteries
- 1 x Hex Key
- 1 x Data Cable
- 6 x Shutter Release Cables (C1, C3, N1, N3, S1, S2)
1.2 Key Features
- Motorized Control: Precise and smooth movement for video and time-lapse.
- 2.4G Wireless Remote: Convenient control from a distance.
- Carbon Fiber Construction: Lightweight yet durable design.
- Multiple Modes: Supports Video Mode, Time-Lapse Photography, Horizontal Tracking, and 120° Panoramic Shooting.
- Ultra-Silent Step Motor: Ensures minimal noise during operation.
- Adjustable Feet: Multi-angle adjustable feet for leveling on uneven surfaces.

Image: The ultra-silent step motor feature of the slider, indicating noise levels below 30dB for quiet operation.
2. Safety Information
- Do not expose the device to water or excessive humidity.
- Avoid dropping or subjecting the slider to strong impacts.
- Ensure the slider is placed on a stable surface or tripod before mounting a camera.
- Do not exceed the maximum load capacity (11lb/5kg for horizontal, 5.5lb/2.5kg for 45° angle).
- Keep out of reach of children.
- Use only specified batteries and chargers.
3. Setup Guide
3.1 Initial Assembly
Follow these steps to assemble your camera slider:
- Loosen the Knob: Loosen the knob on the slide rail.
- Insert Gearbelt: The 'L' on the slide rail corresponds to the 'L' on the gear belt. Insert the gear belt into the card slot.
- Position Gearbelt: Ensure the tooth end of the gearbelt faces outwards. Tighten the gear belt.
- Tighten Knobs: Tighten the knobs on both ends of the slide rail ('L' end and 'R' end).
- Install Gimbal and Camera: Install the ball head (gimbal) onto the slider carriage, then mount your camera onto the ball head.
- Insert Shutter Release Cable: Insert one end of the appropriate shutter release cable into the slider's port.
- Connect to Camera: Insert the other end of the shutter release cable into your camera's remote port.
- Power On: Turn on the slider.
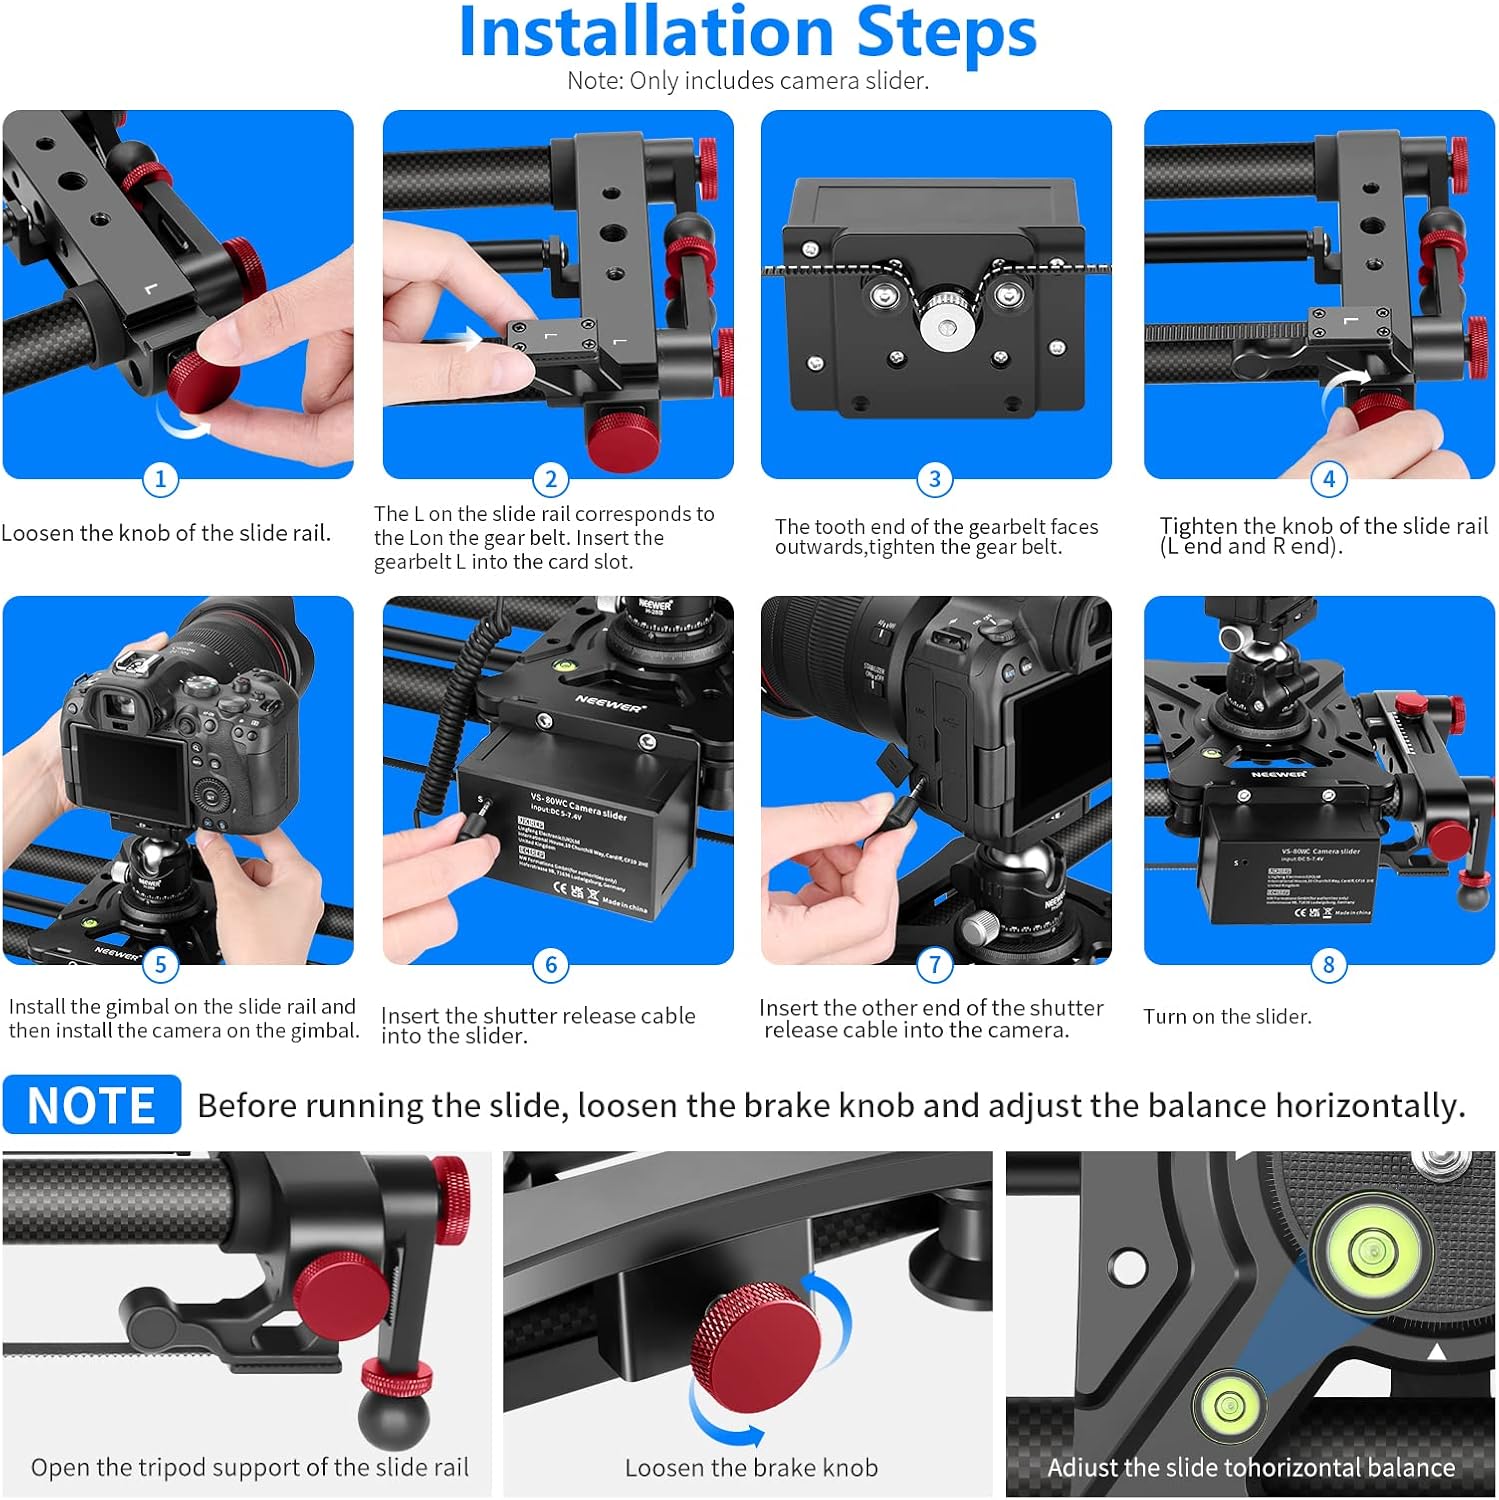
Image: A step-by-step visual guide demonstrating the assembly process of the camera slider, including attaching the belt, mounting the camera, and connecting the shutter release cable.
3.2 Pairing the Remote Control
To establish a wireless connection between the slider and the remote control:
- Turn on Remote: Slide the switch to the "ON" position on the remote while pressing the joystick.
- Remote Searching: The LCD panel will display "Neewer" then "Pairing...". The remote is now searching for devices.
- Turn on Slider: Press the power switch on the camera slider for 2 seconds. The power indicator will blink, then stay on.
- Pairing Complete: When the LCD panel shows "Finding AB point", the pairing is complete.

Image: A four-panel visual guide illustrating the steps to pair the camera slider with its wireless remote control, showing the remote's display during the process.
3.3 Adjusting Feet and Leveling
Before operation, ensure the slider is stable and level.
- Open Tripod Support: Extend the tripod support feet of the slide rail.
- Loosen Brake Knob: Loosen the brake knob to allow adjustment.
- Adjust Level: Use the multi-angle adjustable feet to level the slide horizontally. The integrated bubble level can assist in achieving a perfectly level setup.

Image: Detail showing the height and angle adjustable feet of the slider, allowing for stable positioning on various surfaces.
3.4 Mounting Options
The slider supports various mounting configurations:

Image: Illustrations of the slider mounted horizontally and at a 45-degree angle on tripods, demonstrating its versatility and maximum load capacities for each orientation.
- Horizontal Shooting: Maximum load capacity of 11lb/5kg.
- Shooting at a 45° Angle: Maximum load capacity of 5.5lb/2.5kg.
- The slider features 1/4" and 3/8" threads for compatibility with various tripods and accessories.
4. Operating Modes
The remote control allows selection of different operating modes:
4.1 Video Mode (Live Motion)
For smooth, continuous video recording. Use the remote to control speed and direction.
4.2 Time-Lapse Photography
Program the slider to move incrementally for time-lapse sequences. Adjust interval, exposure time, and number of frames via the remote.
4.3 Horizontal Tracking
This mode allows the camera to track a subject while moving along the slider. The camera's angle will adjust automatically to keep the subject in frame.
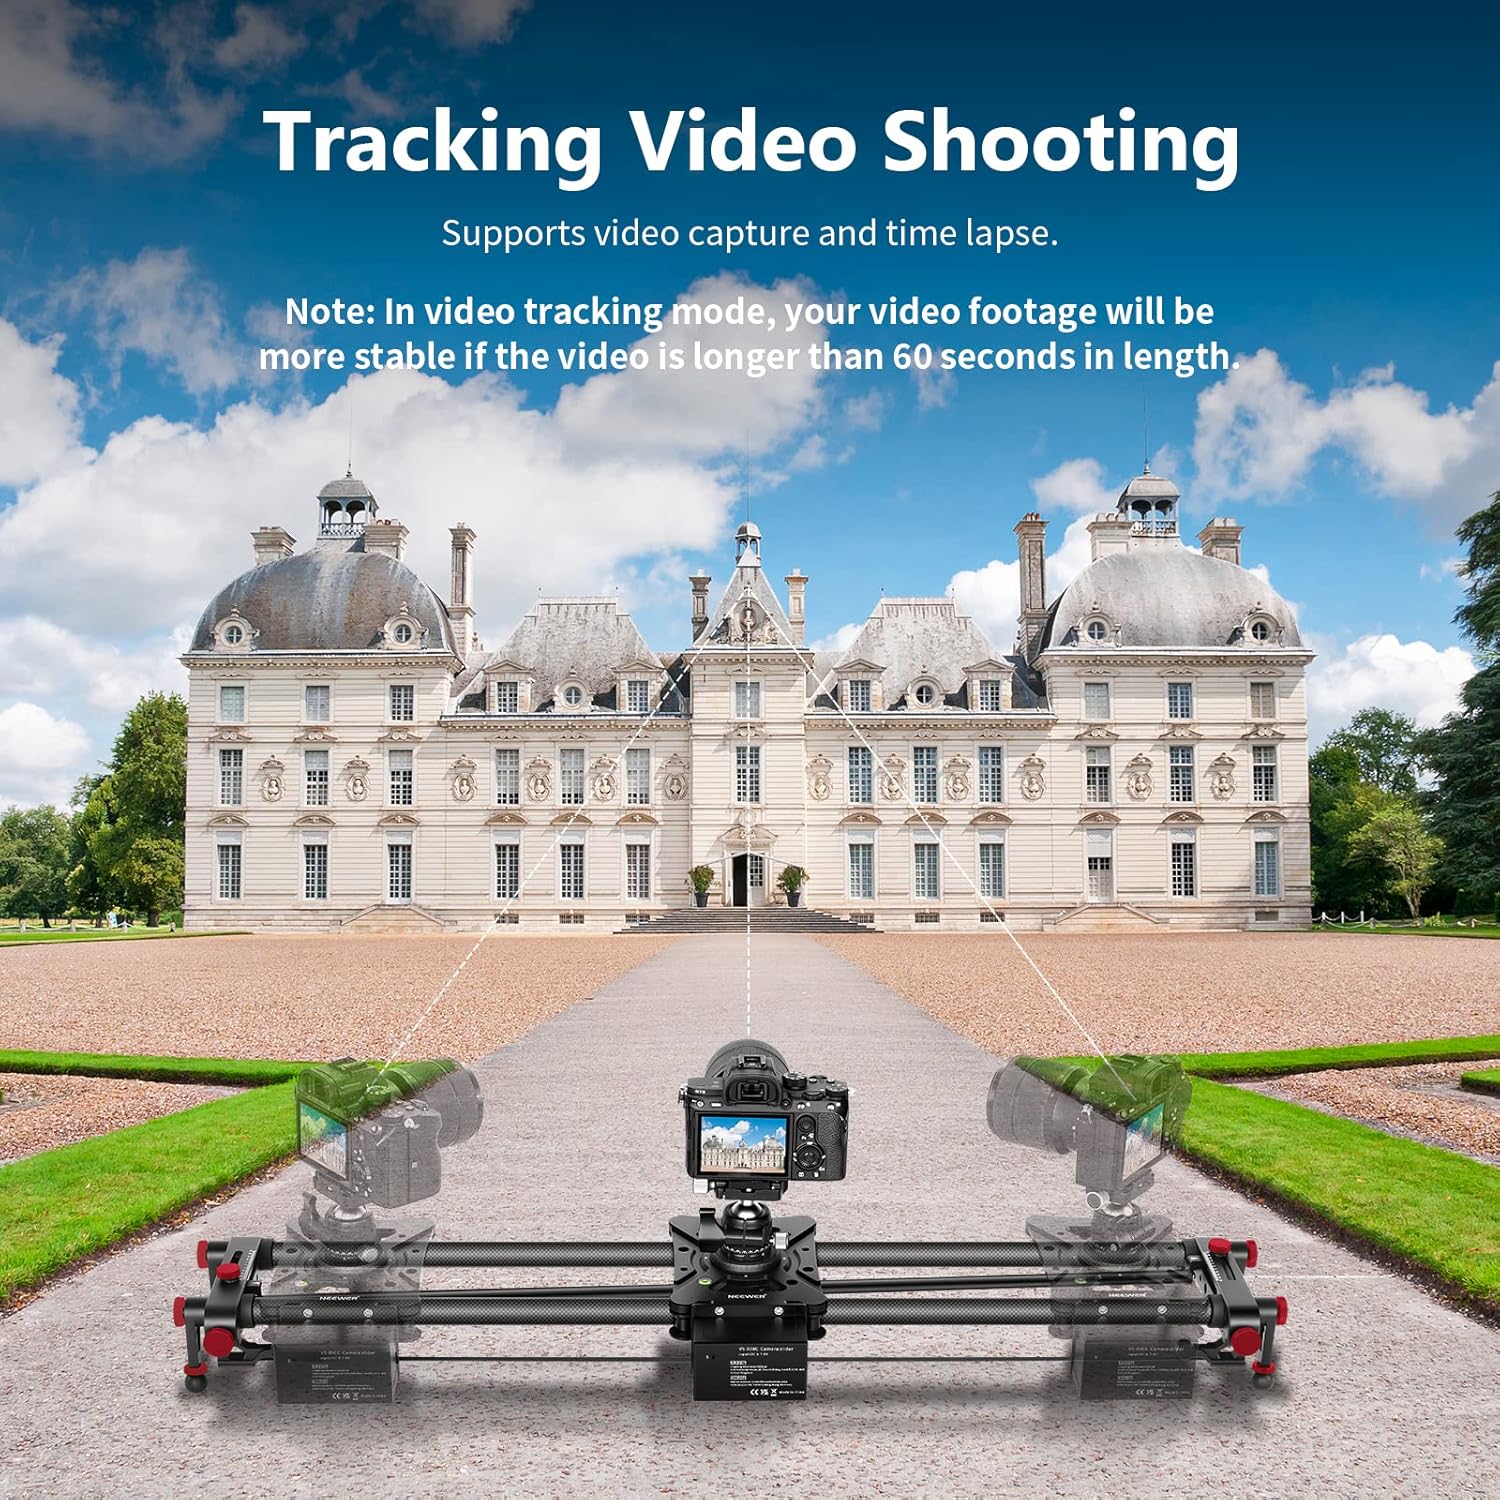
Image: The slider set up for tracking video shooting, demonstrating how the camera maintains focus on a central point while moving. For stable footage, videos longer than 60 seconds are recommended.
4.4 120° Panoramic Shooting
Capture wide panoramic shots by setting the slider to rotate the camera up to 120 degrees during its movement.

Image: The slider configured for 120-degree panoramic shooting, showing the camera's rotation during movement. For stable footage, videos longer than 60 seconds are recommended.
4.5 Setting A/B Points
Define start (A) and end (B) points for automated movements. The slider can automatically track a round trip between these points.

Image: A diagram illustrating the automatic round trip tracking feature, where the slider moves between a defined start point (A) and end point (B).
5. Maintenance
5.1 Cleaning
- Wipe the carbon fiber rails and other surfaces with a soft, dry cloth.
- Avoid using harsh chemicals or abrasive materials that could damage the finish.
- Periodically check the gear belt for debris and clean if necessary.
5.2 Storage
- Store the slider in its provided carry bag to protect it from dust and impacts.
- Keep the slider in a cool, dry place away from direct sunlight and extreme temperatures.
- Remove batteries from the remote control and slider if storing for extended periods.
6. Troubleshooting
| Problem | Possible Cause | Solution |
|---|---|---|
| Slider not moving | Low battery; Not powered on; Remote not paired; Brake knob engaged. | Charge/replace batteries; Ensure power switch is ON; Pair remote control (Section 3.2); Loosen brake knob. |
| Remote control not responding | Low battery; Out of range; Interference. | Charge/replace remote batteries; Move closer to slider; Avoid areas with strong wireless interference. |
| Unstable or jerky movement | Slider not level; Overload; Debris on rails/belt. | Level the slider (Section 3.3); Reduce camera/accessory weight; Clean rails and belt (Section 5.1). |
| Camera not triggering during time-lapse | Incorrect shutter release cable; Cable not properly connected; Camera settings. | Ensure correct cable for your camera model; Reconnect cable securely; Check camera's remote trigger settings. |
7. Specifications
| Feature | Detail |
|---|---|
| Model Number | 10100335 (VS-80WC) |
| Length | 31.5 inches (80 cm) |
| Material | Carbon Fiber |
| Control | 2.4G Wireless Remote Control |
| Motor Type | Ultra-Silent Step Motor |
| Horizontal Load Capacity | 11 lb (5 kg) |
| 45° Angle Load Capacity | 5.5 lb (2.5 kg) |
| Power Source | NP-F550 Batteries (2 included) |
| Product Dimensions | 6.3"D x 31.5"W x 3.15"H |
| Item Weight | 5.28 pounds (2.4 kg) |
| Compatible Devices | Camcorder, Camera (requires appropriate shutter release cable) |
8. Warranty and Support
NEEWER products typically come with a standard manufacturer's warranty. Please refer to the warranty card included in your package or visit the official NEEWER website for detailed warranty terms and conditions.
For technical support, troubleshooting assistance, or to inquire about replacement parts, please contact NEEWER customer service through their official channels. You can often find contact information on the NEEWER website or within the product packaging.
Online Resources: For additional guides, FAQs, and software updates, visit the NEEWER Store on Amazon or the official NEEWER website.