1. Introduction
Thank you for choosing SALCAR Christmas Tree Lights. This manual provides essential information for the safe and effective installation, operation, and maintenance of your new lighting set. These 9-foot lights feature 10 strands with 350 ultra-bright LEDs, designed for easy installation on Christmas trees ranging from 7 to 12 feet. They include 8 lighting modes, a memory function, and a timer, all powered by a UL-certified 29V safety power supply.
2. Safety Information
- UL Certified: The power supply is UL certified, ensuring compliance with safety standards.
- Low Voltage: The lights operate at a safe 29V, which is below the human body's safe voltage, making them safe to touch.
- Waterproof Design: The light strands are made with waterproof material suitable for indoor and outdoor use. However, the power adapter must be kept away from water to prevent damage and ensure safety.
- Individual LED Function: If one LED fails, the rest of the string will remain lit.
- Power Source: Use only the provided 29V safety power supply. Do not attempt to connect these lights to a different voltage source.
3. Package Contents
Verify that all components are present upon unpacking:
- 1 set of SALCAR Christmas Tree Lights (9ft x 10 strands, 350 LEDs)
- 1 x 29V Safety Power Supply
- 1 x 16.4ft Power Cable

Image 1: Overview of SALCAR Christmas Tree Lights components, including the light strands, power adapter, and an example tree.
4. Setup Instructions
4.1. Unpacking
Carefully remove the lights from their packaging. Untangle the 10 individual strands, ensuring they are not knotted before installation.
4.2. Placement
Position your Christmas tree in its desired location. Ensure the power outlet is within reach of the 16.4ft power cable.
4.3. Installation on Tree
- Locate the circular ring at the top of the light set where all 10 strands converge.
- Place this ring securely over the top branch or tip of your Christmas tree. The design allows for easy integration with the tree's structure.
- Gently let the 10 individual light strands hang down naturally, distributing them evenly around the tree. Adjust the position of each strand to cover the tree as desired.
- Connect the power cable to the light strands and then plug the 29V safety power supply into a suitable electrical outlet.
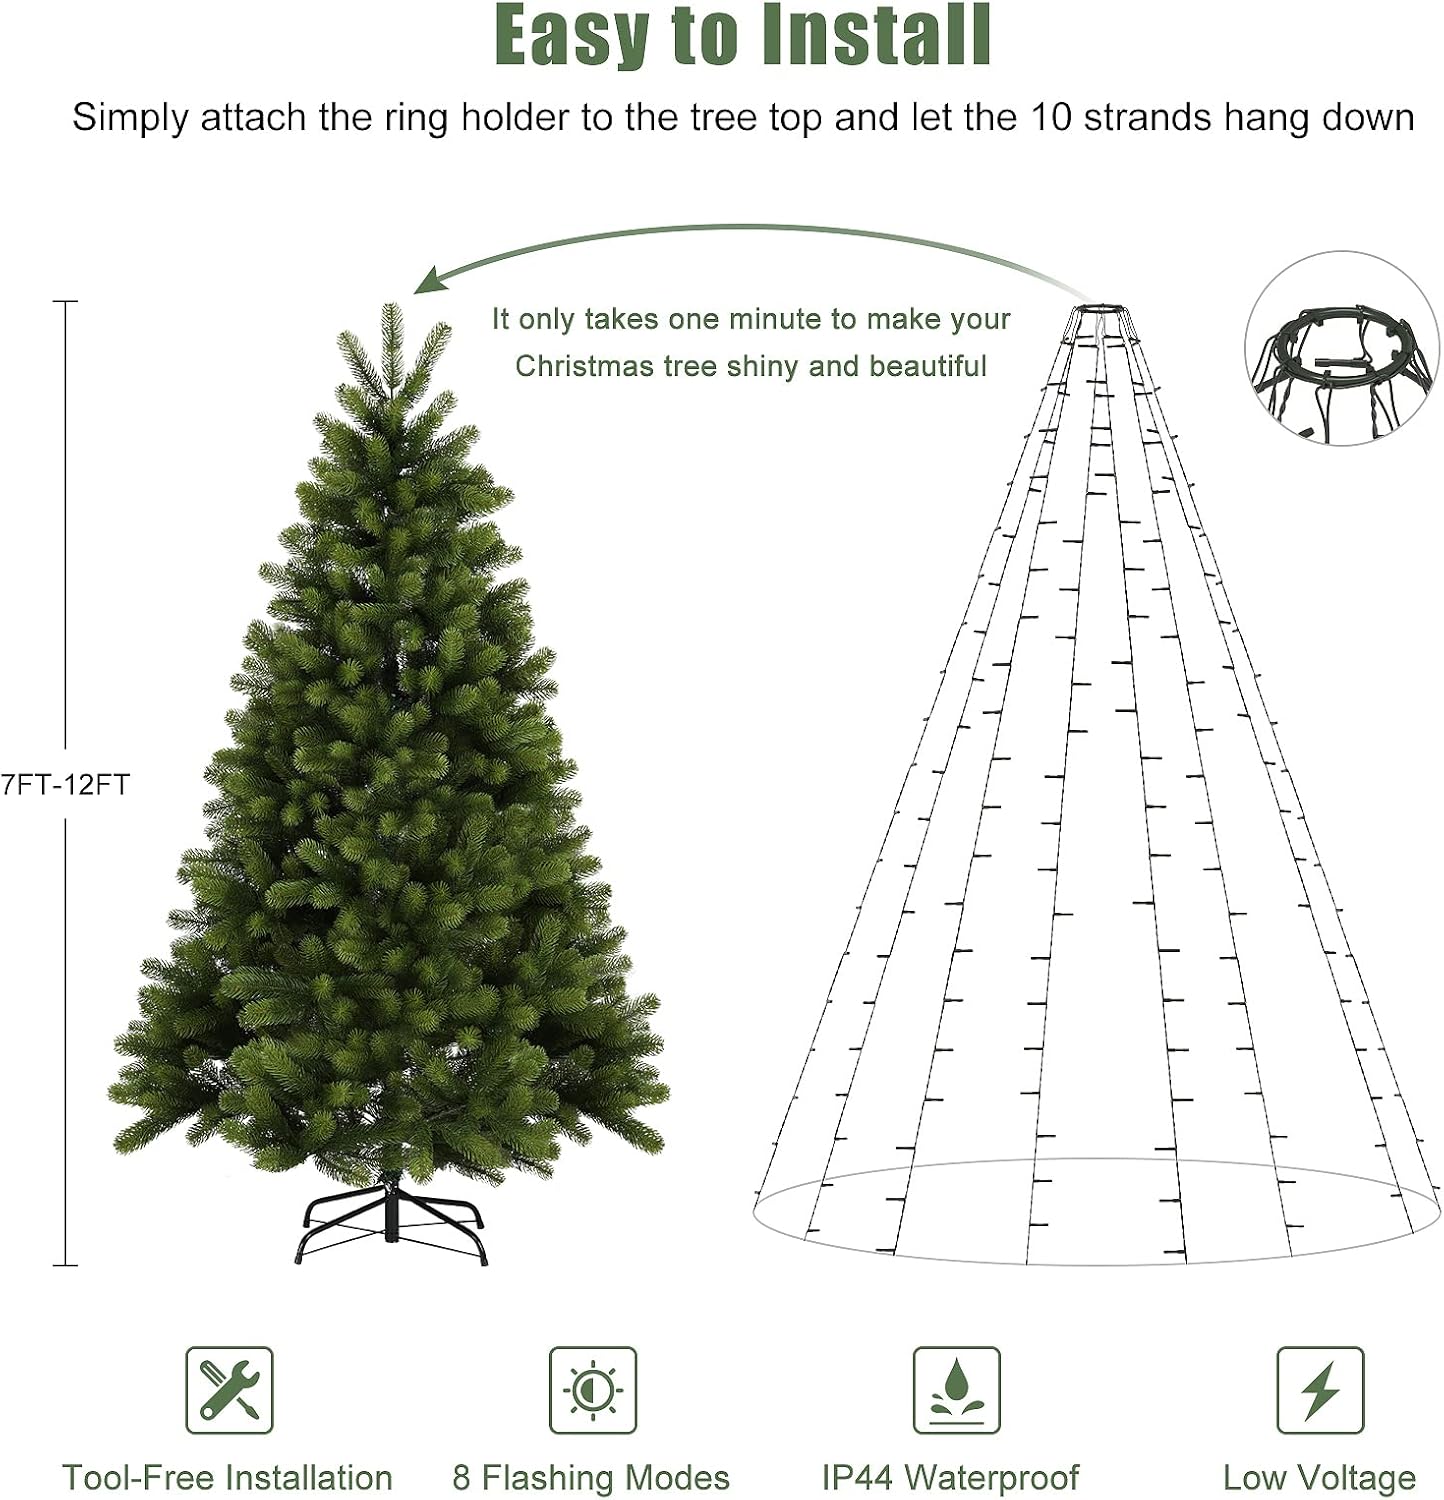
Image 2: Visual guide for attaching the light ring to the tree top and letting the strands drape.

Image 3: Detail showing the integrated design of the light ring at the tree's apex.

Image 4: Example of the SALCAR Christmas Tree Lights installed and illuminating a decorated tree.
5. Operating Instructions
5.1. Lighting Modes
The SALCAR Christmas Lights offer 8 distinct lighting modes. To cycle through these modes, press the button located on the power adapter. Each press will switch to the next mode in sequence:
- Comb
- In Wave
- Sequential
- Slo-glo
- Chasing/Flash
- Slow Fade
- Twinkle/Flash
- Steady On
Memory Function: The lights are equipped with a memory function that remembers the last selected mode even after the power is turned off. This eliminates the need to reset your preferred mode each time the lights are powered on.

Image 5: Diagram showing the 8 lighting modes and the control button on the adapter.
5.2. Timer Function
To activate the timer function, press and hold the button on the power adapter for 2 seconds until the indicator light turns green. Once activated, the lights will automatically turn on for 6 hours and then off for 18 hours, repeating this cycle daily.
6. Maintenance
- Cleaning: To clean the lights, ensure they are unplugged. Gently wipe the strands with a soft, dry cloth. Avoid using harsh chemicals or abrasive materials.
- Storage: When not in use, carefully remove the lights from the tree. It is recommended to coil each strand individually and secure them with twist ties or rubber bands to prevent tangling. Store the lights in a cool, dry place, away from direct sunlight and extreme temperatures.
- Water Resistance: The light strands are waterproof (IP44 rated) and designed for outdoor use. However, the power adapter is not fully waterproof and should be protected from rain, snow, and excessive moisture.

Image 6: Illustration of the waterproof design of the LED lights, suitable for various weather conditions.
7. Troubleshooting
- Lights Not Turning On:
- Ensure the power adapter is securely plugged into a working electrical outlet.
- Check all connections between the light strands and the power cable.
- Verify that the power outlet itself is functional by testing it with another device.
- Lights Flickering or Dim:
- Check for loose connections.
- Ensure the power supply is not overloaded (though unlikely with the provided adapter).
- If only a small section is affected, inspect for any visible damage to the wiring in that area.
- Timer Function Not Working:
- Ensure the timer was activated correctly by pressing and holding the button until the indicator light turned green.
- If power was interrupted, the timer may need to be reset.
- Mode Not Changing:
- Press the button on the adapter firmly to cycle through modes.
- If the button is unresponsive, ensure the adapter is not damaged.
8. Specifications
| Feature | Detail |
|---|---|
| Brand | SALCAR |
| Model Number | RCJ-29V-350LED-b-WW-c |
| Light Type | LED |
| Light Color | Warm White |
| Number of LEDs | 350 |
| Light Length | 9 feet (per strand) |
| Number of Strands | 10 |
| Power Cable Length | 16.4 feet |
| Input Voltage | 29V (Safety Power Supply) |
| Special Features | 8 Lighting Modes, Memory Function, Timer (6h On/18h Off), Waterproof (Lights) |
| Indoor/Outdoor Usage | Indoor, Outdoor |
| Material | Copper |
| Item Weight | 1.26 pounds |
9. Warranty and Support
SALCAR is committed to customer satisfaction. If your SALCAR string lights experience any quality problems, please contact us directly. We are dedicated to providing a satisfactory solution.
For support, please refer to the contact information provided with your purchase or visit the official SALCAR website.


