1. Introduction
The ANDELI TIG-250PE is a versatile and powerful AC/DC TIG welding machine designed for a wide range of welding applications. It integrates AC/DC TIG, PULSE TIG, and MMA (Stick) welding functions, making it suitable for various materials including aluminum, stainless steel, carbon steel, and other thinner metals. This manual provides essential information for the safe and effective operation, setup, maintenance, and troubleshooting of your TIG-250PE welder.

Figure 1.1: ANDELI TIG-250PE Welder with included accessories.
2. Safety Information
Welding operations involve significant risks. Always adhere to safety precautions to prevent injury or damage. This machine is CE certified, indicating compliance with European safety standards. However, user vigilance is paramount.
- Electric Shock: Welding current can cause fatal electric shock. Ensure proper grounding. Do not touch live electrical parts. Wear dry welding gloves and protective clothing.
- Fumes and Gases: Welding fumes and gases can be hazardous to health. Work in a well-ventilated area. Use local exhaust ventilation or a respirator if necessary.
- Arc Rays: Arc rays can burn eyes and skin. Wear a welding helmet with appropriate filter shade and protective clothing. Protect bystanders with non-flammable screens.
- Fire and Explosion: Welding sparks and hot materials can cause fire or explosion. Keep flammable materials away from the welding area. Have a fire extinguisher readily available.
- Hot Parts: Welded parts and equipment can be hot. Allow them to cool before handling or wear insulated gloves.
- Noise: Excessive noise can damage hearing. Wear ear protection if noise levels are high.
- Power Supply: Ensure the power supply matches the machine's requirements (220V). The unit may come with a Euro Schuko connector; ensure proper adapter or cable replacement for your region if needed, as noted in some user experiences.
3. Product Overview
3.1 Key Features
- Multi-Process Capability: AC/DC TIG, PULSE TIG, and MMA (Stick) welding.
- Digital Control: Precise adjustment of welding parameters including start and end amps, upslope, downslope, fully adjustable pulse, AC balance, and AC frequency.
- 2T/4T Functionality: Provides options for manual (2T) and semi-automatic (4T) torch control.
- High Frequency (HF) TIG: Ensures non-contact arc ignition for clean starts.
- LIFT TIG: Offers an alternative arc starting method for sensitive applications.
- Applicable Materials: Ideal for aluminum, stainless steel, carbon steel, and other thin metals.
- Compact Design: Portable and easy to move.
3.2 Components and Controls
Familiarize yourself with the main components and control panel of the TIG-250PE welder.

Figure 3.1: Front Angled View of the Welder.

Figure 3.2: Detailed View of the Control Panel.

Figure 3.3: Control Panel Diagram with Parameter Explanations.
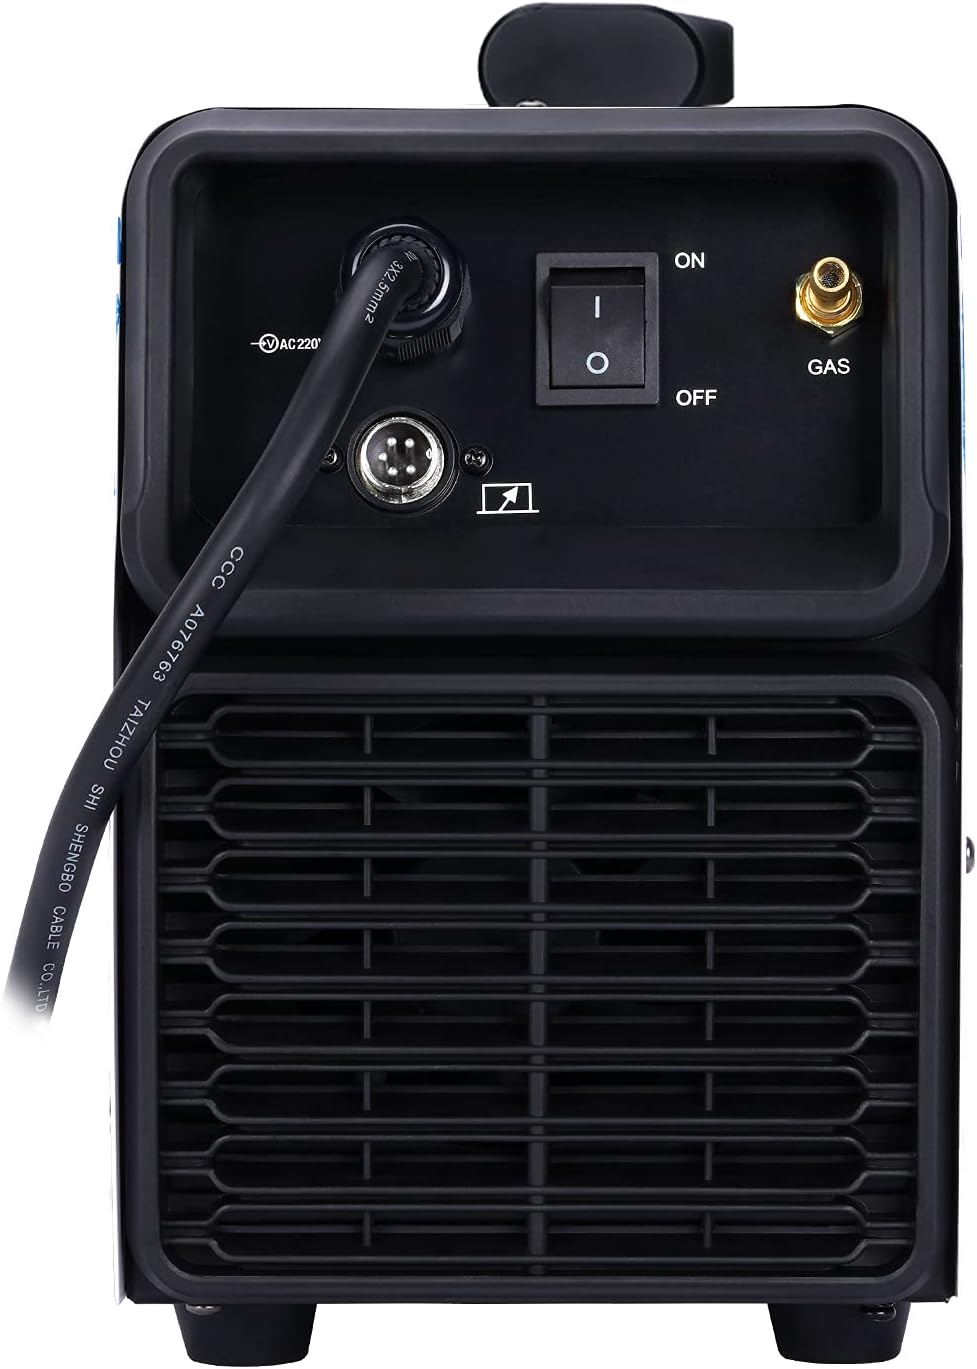
Figure 3.4: Rear View of the Welder.
3.3 Package Contents
The standard delivery package for the TIG-250PE includes:
- TIG-250PE Welder with American plug (note: some units may ship with Euro plug, verify upon receipt).
- Ground Clamp (2m cable).
- WP-26 TIG Torch (4m cable).
- Air Pipe (3m).
- Chuck (10 pieces).
- Nozzle (10 pieces).
- Tungsten Needle (20 pieces).
- Foot Pedal (5PIN).
4. Setup
Proper setup is crucial for safe and effective welding. Follow these steps carefully:
- Power Connection:
- Ensure the welder is switched OFF.
- Connect the power cord to a dedicated 220V power outlet. The machine is rated for 240 Volts. Verify your power supply can handle the maximum input current (up to 37A for TIG, 49A for MMA).
- If the provided plug is not compatible with your region's outlets, consult a qualified electrician for proper adapter or cable replacement.
- Gas Connection:
- Connect the gas hose from your inert gas cylinder (e.g., Argon for TIG) to the gas inlet on the rear of the welder (refer to Figure 3.4).
- Ensure all gas connections are secure and leak-free.
- Set the gas flow rate using a flowmeter attached to your gas cylinder.
- Ground Clamp Connection:
- Connect the ground clamp cable to the appropriate terminal on the front panel of the welder (usually marked with a negative (-) symbol for DC TIG, or as specified for AC).
- Securely attach the ground clamp to the workpiece or welding table, ensuring good electrical contact.
- TIG Torch Connection:
- Connect the WP-26 TIG torch cable to the designated TIG torch connector on the front panel.
- Ensure the gas line from the torch is also connected to the welder's gas output.
- Insert a suitable tungsten electrode into the torch collet and tighten the cap. The type and size of tungsten depend on the material and current.
- Foot Pedal Connection (Optional):
- If using the foot pedal for current control, connect its 5-pin connector to the corresponding port on the welder's front panel.
- Ensure the pedal is placed in a stable and comfortable position.
5. Operating Instructions
The TIG-250PE offers multiple welding modes and precise parameter control. Refer to Figure 3.3 for control panel layout.
5.1 Powering On and Mode Selection
- Switch the main power button on the rear panel to the 'ON' position.
- The digital display will illuminate.
- Select your desired welding mode using the dedicated buttons on the control panel:
- HF TIG: High Frequency TIG welding.
- LIFT TIG: Lift Arc TIG welding.
- MMA: Manual Metal Arc (Stick) welding.
- SMART: A mode that triggers gas flow without current for testing.
- Select AC or DC current type using the AC/DC buttons. AC is typically used for aluminum, while DC is used for stainless steel and carbon steel.
- Choose between 2T (manual trigger) or 4T (latching trigger) torch control.
5.2 Parameter Adjustment
Use the main control knob and associated buttons to adjust welding parameters. The digital display will show the current value.
- Peak Current / Welding Amperage: Adjust the main welding current.
- Pulse Function (ON/OFF): Activate or deactivate pulse welding. When ON, further parameters become adjustable:
- Pulse Frequency (Hz): Number of pulses per second.
- Pulse Width (%): Duration of the peak current within a pulse cycle.
- Base Current (A): The lower current level during a pulse cycle.
- Upslope Time (S): Time taken for the current to rise from start current to peak current.
- Downslope Time (S): Time taken for the current to fall from peak current to end current.
- AC Frequency (Hz): (AC mode only) Controls the arc cone width and direction. Higher frequency results in a more focused arc.
- AC Balance (%): (AC mode only) Controls the cleaning action versus penetration. Higher balance provides more cleaning.
- Pre-Gas Time (S): Duration of gas flow before arc ignition.
- Post-Gas Time (S): Duration of gas flow after arc extinction to protect the weld puddle and tungsten.
- Hot Start (MMA): Provides an initial boost of current for easier arc ignition in MMA mode.
- Arc Force (MMA): Prevents the electrode from sticking in MMA mode.


Figure 5.1: Welding examples and material thickness guidelines.
6. Maintenance
Regular maintenance ensures the longevity and optimal performance of your welder.
- Cleaning: Regularly clean the exterior of the machine with a dry cloth. Use compressed air to blow out dust and debris from the cooling vents. Ensure the machine is unplugged before cleaning.
- Connections: Periodically check all electrical and gas connections for tightness and signs of wear. Loose connections can lead to poor performance or safety hazards.
- Torch and Consumables: Inspect the TIG torch, collets, collet bodies, and ceramic nozzles for damage or wear. Replace consumables as needed to maintain arc quality. Keep tungsten electrodes clean and properly sharpened.
- Ground Clamp: Ensure the ground clamp maintains good contact with the workpiece. Clean any rust or paint from the contact area.
- Storage: Store the welder in a clean, dry environment, away from excessive dust, moisture, and extreme temperatures.
7. Troubleshooting
This section addresses common issues you might encounter with your TIG-250PE welder.
| Problem | Possible Cause | Solution |
|---|---|---|
| Welder does not power on. | No power supply; main switch off; internal fuse blown. | Check power cord and outlet. Ensure main switch is ON. Consult service if fuse is suspected. |
| No arc ignition (HF TIG). | Poor ground connection; incorrect gas flow; contaminated tungsten; HF circuit issue. | Ensure good ground. Check gas cylinder and flowmeter. Clean/sharpen tungsten. |
| Poor weld quality / porosity. | Insufficient shielding gas; contaminated workpiece; incorrect parameters; worn consumables. | Increase gas flow. Clean workpiece thoroughly. Adjust current/pulse settings. Replace nozzle/collet. |
| Foot pedal not controlling current. | Pedal not connected; faulty pedal; incorrect mode selected. | Ensure pedal is securely connected. Verify 2T/4T mode is appropriate for pedal use. Some users report mechanical issues with the pedal; consider modifications or replacement if persistent. |
| Gas flow issues (e.g., stops during weld). | Gas solenoid malfunction; kinked gas line; low cylinder pressure. | Check gas line for obstructions. Verify cylinder pressure. Contact support if solenoid is suspected. |
8. Specifications
Detailed technical specifications for the ANDELI TIG-250PE welder.

Figure 8.1: TIG-250PE Technical Specifications Table.
| Specification | Value |
|---|---|
| Model Number | TIG-250PE |
| Functions | AC/DC TIG, PULSE TIG, MMA |
| Voltage | 220V (240 Volts) |
| Maximum Output Current | 180 AMP |
| Item Weight | 36.3 pounds (approx. 16.47 kg) |
| Product Dimensions | 13.39 x 14.96 x 20.87 inches (approx. 34 x 38 x 53 cm) |
| Cooling | Air |
| Protection Class | IP21S |
| Insulation Class | H |
| Duty Cycle (TIG) | 60% at 180A (approx.) |
| Duty Cycle (MMA) | 60% at 180A (approx.) |
9. Warranty and Support
ANDELI is committed to providing reliable products and excellent customer service.
- Warranty: The TIG-250PE welder comes with a two-year warranty from the date of purchase. This warranty covers manufacturing defects and provides for free replacement parts.
- Returns and Exchanges: Returns and exchanges are available within 30 days of receiving the goods, subject to terms and conditions.
- Customer Service: For any questions, technical assistance, or warranty claims, please contact the ANDELI customer service team. They are available to provide guidance and support. Refer to the product packaging or the official ANDELI website for contact information.
- CE Certification: This product holds CE certification, ensuring it meets health, safety, and environmental protection standards for products sold within the European Economic Area (EEA).