JISULIFE Portable Clip-on Oscillating Fan
JISULIFE Portable Clip-on Oscillating Fan User Manual
Model: Portable Clip-on Oscillating Fan
Introduction
Thank you for choosing the JISULIFE Portable Clip-on Oscillating Fan. This manual provides important information regarding the setup, operation, maintenance, and troubleshooting of your fan. Please read it thoroughly before use and retain it for future reference.
Safety Instructions
- Do not insert fingers or any objects into the fan grille.
- Keep the fan away from water or other liquids to prevent electric shock.
- Do not disassemble or modify the fan without authorization.
- Ensure the fan is placed on a stable surface or securely clipped before operation.
- Keep out of reach of children.
- Use only the provided USB cable for charging.
- Avoid exposing the battery to extreme temperatures or direct sunlight.
Package Contents
Please check the package for the following items:
- JISULIFE Portable Clip-on Oscillating Fan
- USB Charging Cable (Cord)
- User Manual
Product Overview
Familiarize yourself with the fan's components.
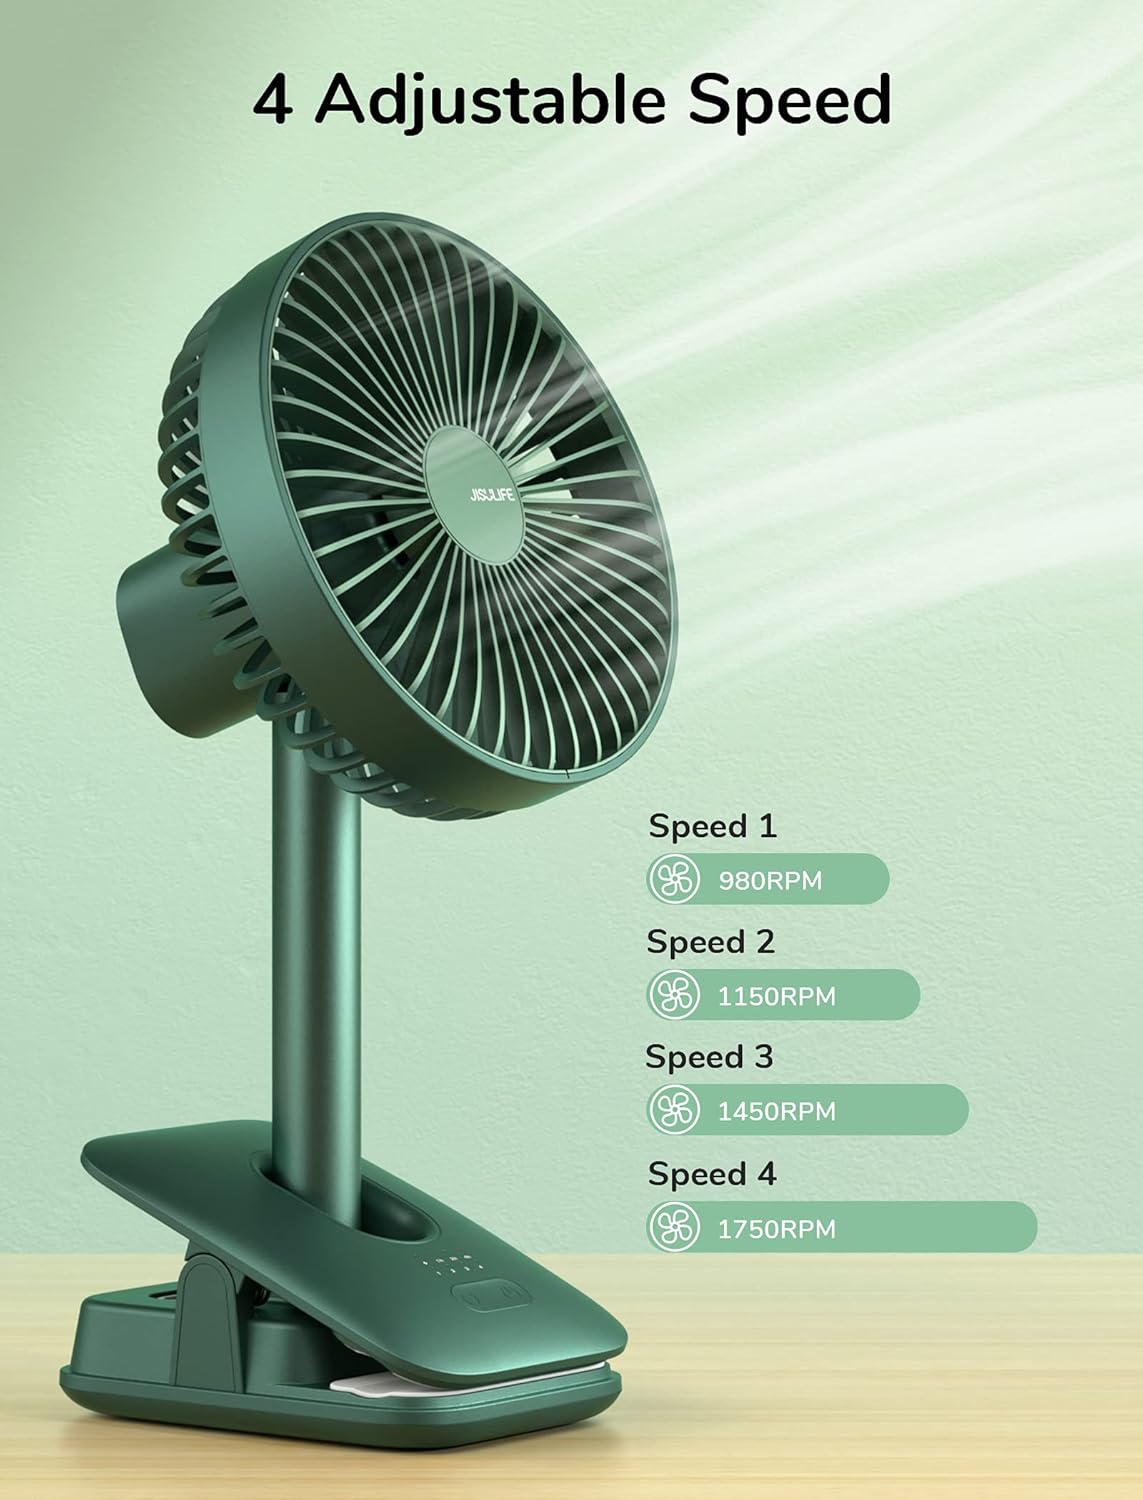
Image: Front view of the JISULIFE Portable Clip-on Oscillating Fan, showing the fan grille, control panel on the base, and the sturdy clip.

Image: The JISULIFE fan clipped onto a surface, demonstrating its versatility as both a desk and clip fan.
Control Panel Indicators:
- Battery Indicator: The first light from the left shows battery status:
- White: 100%-70% battery
- Green: 70%-40% battery
- Red: 40%-15% battery
- Flashing Red: Less than 15% battery
- Speed Indicators: Lights indicating current fan speed.
- Timer Indicators: Lights indicating active timer setting (1h, 2h, 4h).
Setup
- Unpack: Carefully remove all components from the packaging.
- Placement: Place the fan on a flat, stable surface or use the integrated clip to attach it securely to a desk, shelf, or other suitable object. Ensure the clip has a firm grip.
- Initial Charge: Before first use, fully charge the fan using the provided USB cable. Refer to the "Charging" section for details.
Operating Instructions
Power On/Off and Speed Adjustment

Image: Diagram illustrating the four fan speed settings and their corresponding RPMs.
- Power On: Short press the power button (usually the rightmost button on the control panel) to turn on the fan at Speed 1.
- Adjust Speed: Short press the power button repeatedly to cycle through the 4 wind speeds: Speed 1, Speed 2, Speed 3, Speed 4.
- Sleep Mode: When all four speed indicator lights are on, the fan is in Sleep Mode. Press the power button again to exit Sleep Mode.
- Power Off: Long press (2 seconds) the power button in any gear to turn off the fan.
Oscillation Function

Image: Diagram demonstrating the fan's 90° automatic horizontal oscillation and 30° manual vertical rotation capabilities.
- Automatic Oscillation: Short press the oscillation button (usually the leftmost button) to activate 90° automatic horizontal oscillation. Press again to stop oscillation.
- Manual Adjustment: The fan head can be manually adjusted 30° vertically and 330° horizontally to direct airflow precisely.
Timer Shutdown Function

Image: Illustration of the fan's control panel highlighting the timer settings for 1, 2, and 4 hours.
- Activate 1-Hour Timer: Long press (2 seconds) both the power button and the oscillation button simultaneously to activate the 1-hour timer. The corresponding indicator light will illuminate.
- Change Timer Setting: Short press both buttons again to cycle through 2-hour and 4-hour timer settings.
- Deactivate Timer: When all three timer indicator lights are on, the timing function will turn off automatically after 3 seconds.
Charging

Image: Close-up view of the fan's base, showing the USB Type-C charging port with a cable connected.
- Connect the provided USB Type-C cable to the charging port on the fan's base.
- Connect the other end of the USB cable to a compatible USB power source (e.g., PC/laptop, power bank, USB wall adapter).
- The battery indicator light will show the charging status. A full charge provides approximately 5-28 hours of operation, depending on the speed setting.
Maintenance
Cleaning and Disassembly

Image: Diagram illustrating the counter-clockwise rotation to detach the front grille for cleaning and clockwise rotation to reattach.
- Power Off: Ensure the fan is turned off and unplugged before cleaning.
- Detach Grille: Gently rotate the front grille counter-clockwise to detach it from the fan body.
- Clean Blades: Use a soft, dry cloth or a slightly damp cloth to wipe the fan blades and the inside of the grille. Do not use abrasive cleaners or immerse the fan in water.
- Reattach Grille: Align the grille with the fan body and rotate it clockwise until it clicks securely into place.
- Exterior Cleaning: Wipe the exterior of the fan with a soft, dry cloth.
Troubleshooting
| Problem | Possible Cause | Solution |
|---|---|---|
| Fan does not turn on. | Low battery or no power. | Charge the fan using the USB cable. Ensure the power button is pressed correctly. |
| Fan stops unexpectedly. | Battery is depleted or timer function is active. | Recharge the fan. Check if a timer is set and deactivate if not desired. |
| Oscillation not working. | Oscillation function not activated. | Press the oscillation button to activate. Ensure no physical obstruction. |
| Weak airflow. | Fan speed is too low or grille is dirty. | Increase fan speed. Clean the fan blades and grille as per maintenance instructions. |
Specifications
| Feature | Detail |
|---|---|
| Brand | JISULIFE |
| Model | Portable Clip-on Oscillating Fan |
| Battery Capacity | 8000 mAh |
| Working Hours | 5-28 hours (depending on speed) |
| Speeds | 4 (including Sleep Mode) |
| Oscillation | 90° Automatic Horizontal, 30° Manual Vertical, 330° Manual Horizontal |
| Timer Settings | 1h, 2h, 4h |
| Charging Port | USB Type-C |
| Material | Plastic |
| Power Source | Battery Powered / USB Powered |
| Wattage | 5 Watts |
| Voltage | 5 Volts |
| Item Weight | 1.93 Pounds (approx. 0.87 kg) |
Warranty and Support
JISULIFE products are designed for reliability and performance. For warranty information, technical support, or customer service inquiries, please refer to the warranty card included with your purchase or visit the official JISULIFE website. Please have your product model and purchase date available when contacting support.
Note: Specific warranty terms may vary by region and retailer.