1. Introduction
This manual provides detailed instructions for the installation, operation, and maintenance of the Generic 30A DC5-24V Single High Speed LED Strip Amplifier. This device is designed to extend the signal range and increase the load capacity of single-color LED strip installations, ensuring consistent brightness and performance across longer LED runs or multiple strips.
2. Safety Information
- Ensure the power supply voltage matches the amplifier's specified input range (DC 5-24V).
- Do not exceed the maximum load current of 30A. Overloading can damage the amplifier and connected LED strips.
- Always disconnect power before making any electrical connections or performing maintenance.
- Ensure proper polarity (+ to + and - to -) for all connections to prevent damage.
- Install the amplifier in a well-ventilated area, away from direct sunlight, high temperatures, and moisture.
- This product is intended for indoor use unless otherwise specified for outdoor applications.
3. Product Overview
The 30A DC5-24V Single High Speed LED Strip Amplifier acts as a signal repeater for single-color LED systems. It receives a PWM (Pulse Width Modulation) signal from an LED controller and re-transmits it with increased power, allowing for longer LED strip runs or the connection of additional LED strips while maintaining consistent brightness and signal integrity.
Key Features:
- Signal Amplification: Extends the reach of single-color LED signals.
- High Speed: Supports 1Mbit/s signal transmission.
- Wide Voltage Range: Compatible with DC 5-24V power supplies.
- High Load Capacity: Supports up to 30A maximum load current.
- Easy Installation: Simple screw terminal connections.
- Durable Construction: Made with metal material electronic components for long service life.
4. Setup and Installation
4.1 Connection Diagram
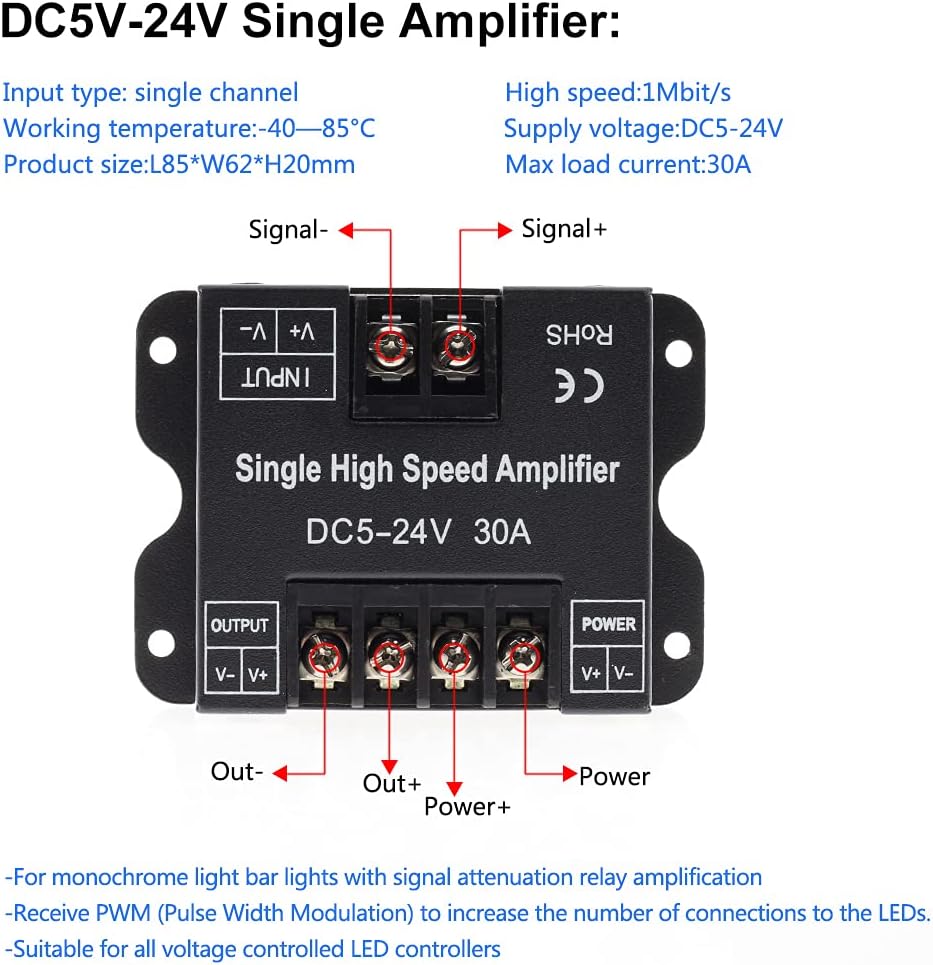
Figure 1: LED Amplifier Connection Diagram
This diagram illustrates the input and output terminals of the LED amplifier. On the input side, connect the signal source (from your LED controller) to the terminals labeled 'Signal-' and 'Signal+'. On the output side, connect the LED strip(s) to 'Output V-' and 'Output V+'. The power supply for the amplifier and the connected LED strips connects to 'Power V+' and 'Power V-'. Ensure correct polarity for all connections to prevent damage.
4.2 Wiring Instructions
- Prepare Wires: Strip approximately 5-7mm of insulation from the ends of all connection wires.
- Connect Input Signal: Connect the signal output from your single-color LED controller to the "INPUT" terminals of the amplifier. Ensure the negative (-) signal wire connects to "Signal-" and the positive (+) signal wire connects to "Signal+".
- Connect Power Supply: Connect a DC 5-24V power supply to the "POWER" terminals of the amplifier. Connect the positive (+) wire of the power supply to "V+" and the negative (-) wire to "V-". This power supply will power both the amplifier and the connected LED strips. Ensure the power supply is capable of providing sufficient current for the amplifier and all connected LED strips (up to 30A total).
- Connect LED Strips (Output): Connect your single-color LED strip(s) to the "OUTPUT" terminals of the amplifier. Connect the positive (+) wire of the LED strip to "V+" and the negative (-) wire to "V-". You can connect multiple LED strips in parallel to these output terminals, provided the total current draw does not exceed 30A.
- Verify Connections: Double-check all connections for correct polarity and secure wiring to prevent short circuits.
- Apply Power: Once all connections are secure and verified, connect the power supply to the main power source. The LED strips should now respond to the commands from your LED controller, amplified by this device.
5. Operating Instructions
The 30A DC5-24V Single High Speed LED Strip Amplifier operates automatically once correctly installed and powered. It functions as a signal repeater, taking the input signal from your LED controller and boosting it to drive additional LED strips. There are no user-adjustable settings on the amplifier itself. Control of the LED strips (e.g., brightness adjustment) is performed via your primary LED controller.
6. Maintenance
- Cleaning: Periodically clean the amplifier's exterior with a soft, dry cloth. Do not use harsh chemicals or abrasive cleaners.
- Inspection: Regularly inspect wiring connections to ensure they remain secure and free from corrosion.
- Ventilation: Ensure the installation area remains well-ventilated to prevent overheating.
- Environmental Conditions: Avoid exposing the amplifier to extreme temperatures, high humidity, or corrosive environments.
7. Troubleshooting
| Problem | Possible Cause | Solution |
|---|---|---|
| LED strips do not light up. | No power to amplifier or LED strips. Incorrect wiring polarity. Faulty LED strip or power supply. | Check power supply connection and ensure it's active. Verify all wiring polarities (+/-). Test LED strips and power supply independently. |
| LED strips flicker or dim. | Insufficient power supply. Loose connections. Overloaded amplifier. | Ensure power supply provides adequate current for total load. Tighten all screw terminal connections. Reduce the number of connected LED strips or use a higher capacity amplifier/power supply. |
| Amplifier is hot to the touch. | Overload. Poor ventilation. | Reduce load on the amplifier. Ensure adequate airflow around the unit. Disconnect power and allow to cool before re-evaluating. |
| LED strips do not respond to controller. | Incorrect signal input wiring. Faulty controller. | Verify signal input wiring to "Signal-" and "Signal+". Test the LED controller with a short LED strip directly. |
8. Specifications
| Model Number | 8b74a890-d6ec-4b67-8a18-6f699d98b0c9 |
| Input Type | Single Channel |
| Supply Voltage | DC 5-24V |
| Max Load Current | 30A |
| High Speed | 1Mbit/s |
| Working Temperature | -40°C to 85°C |
| Product Size (L*W*H) | 85mm * 62mm * 20mm |
| Material | Metal |
| Mounting Type | Surface Mount |
| Number of Channels | 1 |
| Output Power (Max) | 720 Watts (at 24V) |
9. Warranty and Support
This product is manufactured to high-quality standards. For warranty information or technical support, please refer to the retailer or manufacturer's website where the product was purchased. Keep your purchase receipt as proof of purchase.


