SUNWAYFOTO GH-02
SUNWAYFOTO GH-02 Gimbal Head Instruction Manual
Model: GH-02
1. Product Overview
The SUNWAYFOTO GH-02 Gimbal Head is a precision-engineered accessory designed for professional photographers and videographers, particularly those working with telephoto lenses and capturing subjects in motion. Crafted from T6061 aerospace-grade aluminum with a type-III hard anodized finish, it features a hollowed-out design for optimal balance of lightness, strength, and durability.
This universal adjustment head allows for effortless tracking of subjects in all directions, effectively managing the weight of heavy lenses. It is an ideal tool for wildlife photography, bird watching, and any scenario requiring smooth, balanced movement of camera equipment.

Figure 1: Front view of the SUNWAYFOTO GH-02 Gimbal Head, highlighting its design for motion photography.

Figure 2: The hollowed-out design of the GH-02, emphasizing its lightweight yet rigid construction.
2. Package Contents
Verify that all items listed below are included in your package. If any items are missing or damaged, please contact customer support.
- GH-02 Gimbal Head
- Adapter Bushing
- 4mm Wrench
- 2.5mm Wrench
- Cleaning Cloth
- DPG-120DR QR Plate (4.72-inch/12cm Lens QR plate)

Figure 3: All components included in the SUNWAYFOTO GH-02 package.
3. Setup and Assembly
Follow these steps to properly set up your GH-02 Gimbal Head and mount your camera equipment.
- Mounting to Tripod: The GH-02 features an extra-large panning base with a diameter of 2.36 inches (60mm) and a reinforced 3/8” threaded socket. Attach the gimbal head securely to a compatible tripod. Ensure the connection is tight to provide a steady setup and absorb vibration.
- Attaching the QR Plate to Lens: The included 4.72-inch (12cm) Lens QR plate (DPG-120DR) is designed to increase contact surface between your super telephoto lens and the gimbal. Securely attach this plate to the lens collar of your telephoto lens.
- Mounting Camera/Lens to Gimbal:
- Loosen the Cradle Clamp lock-knob (refer to Figure 4, item 6).
- Slide the lens with the attached QR plate into the Cradle Clamp.
- Ensure the lens is centered and balanced. The rotation axis of the gimbal should pass through the central axis of the lens for accurate photo composition, especially for stitching.
- Tighten the Cradle Clamp lock-knob to secure the lens.
- Vertical Adjustment: The gimbal offers a 3.9-inch (10cm) vertical adjustment range. This allows you to adjust the cradle to balance almost any size of lens.
- Loosen the Vertical Adjustment Gliding Plate lock-knob (refer to Figure 4, item 3).
- Slide the gliding plate up or down until the camera and lens are balanced.
- Tighten the lock-knob to secure the vertical position.
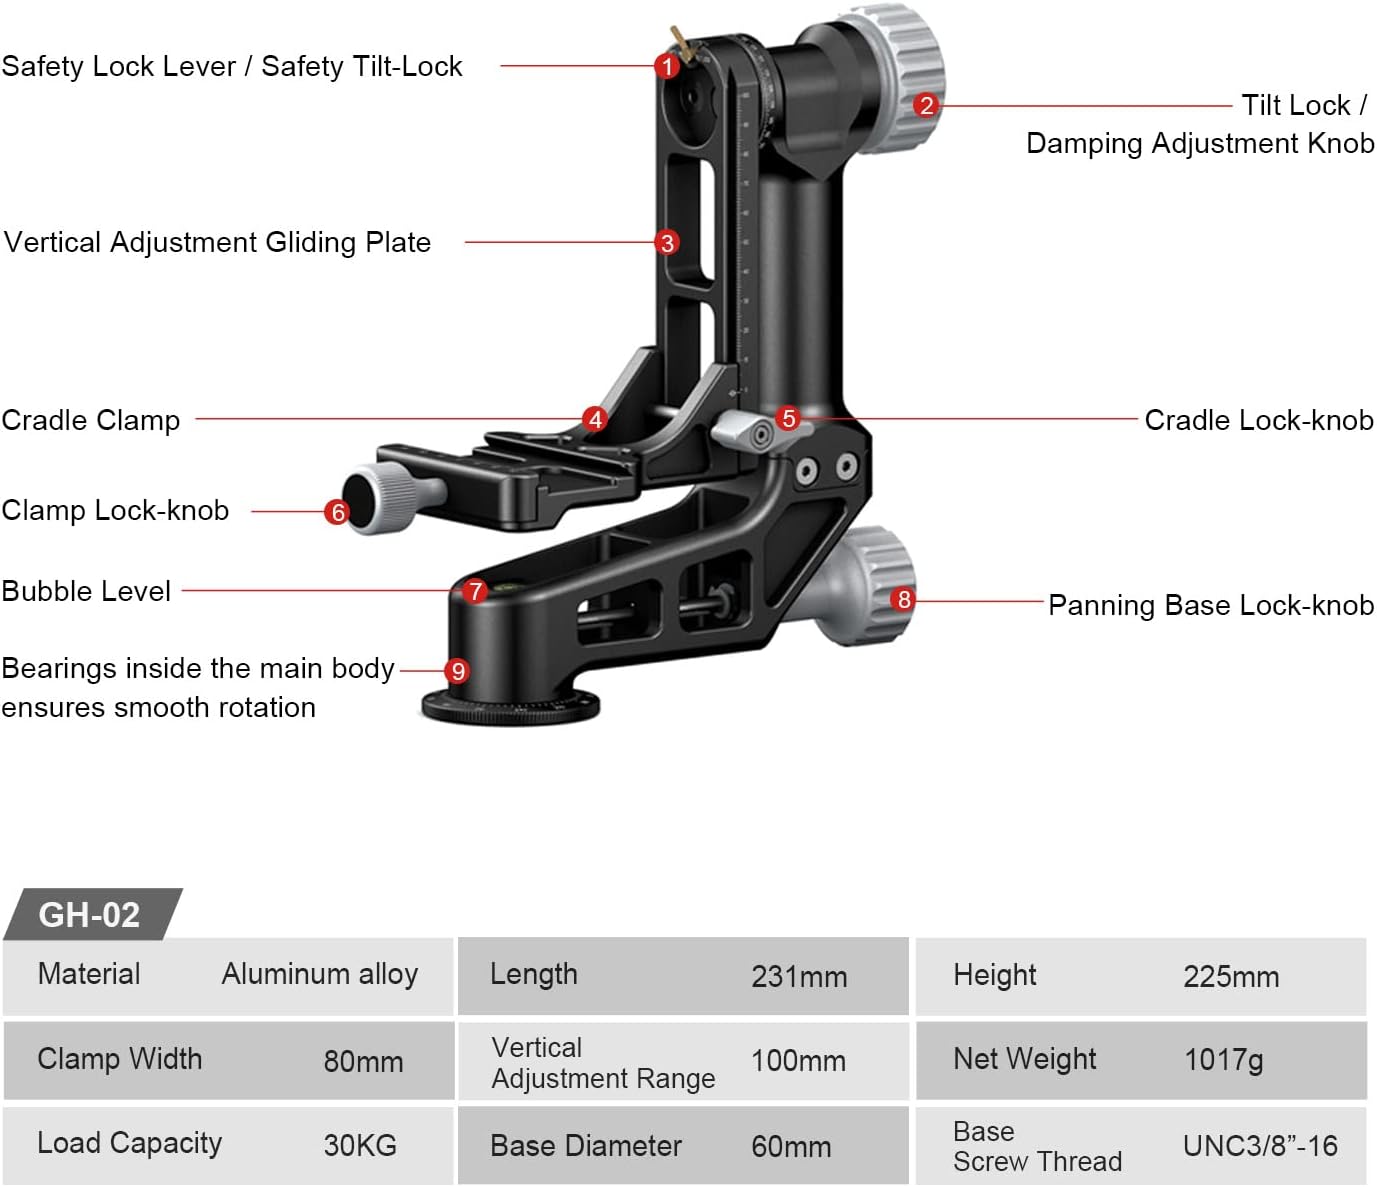
Figure 4: Key components of the GH-02 Gimbal Head for setup and operation.

Figure 5: Illustrates the 100mm vertical adjustment range for balancing various lens sizes.
4. Operating Instructions
The GH-02 Gimbal Head is designed for smooth and precise movements, allowing you to track subjects effortlessly.
4.1 Panning (Horizontal Rotation)
The shooting equipment can be rotated 360 degrees horizontally. The extra-large panning base ensures smooth movement without noise, preventing disturbance to wildlife.
- Damping Adjustment: Use the Damping Adjustment Knob (refer to Figure 6) to control the resistance of the 360° panning. Turn clockwise to increase damping, counter-clockwise to decrease.
- Locking Panning: To lock the panning movement, tighten the Panning Base Lock-knob (refer to Figure 4, item 8).
4.2 Tilting (Vertical Rotation)
The gimbal head allows for tilting up and down around the center of gravity of your equipment. When properly balanced, the equipment can be fixed at any tilt position without relying on the lock-knob.
- Damping Adjustment: Use the Damping Adjustment Knob (refer to Figure 6) to adjust the damping of the fore-aft tilting. Adjust according to the weight of your loaded equipment for appropriate resistance.
- Locking Tilting: To lock the tilting movement, tighten the Tilt Lock / Damping Adjustment Knob (refer to Figure 4, item 2).

Figure 6: Demonstrates the balance and panning/tilt rotation capabilities of the gimbal head.
5. Safety Features
The GH-02 incorporates an innovative safety system to provide the highest protection for your camera body and telephoto lenses.
- Safety Pin (Safety Lock Lever): Twist the safety lock lever to the "Safety Pin" position (refer to Figure 7, top right). This effectively prevents accidental dropping of the shooting equipment from extreme angles due to weight, acting as a secondary stop.
- Tilt Lock: Twist the safety lock lever to the "Tilt Lock" position (refer to Figure 7, bottom right). This immobilizes the vertical adjustment gliding plate, preventing impacts to your shooting equipment during transport or when a fixed position is desired.
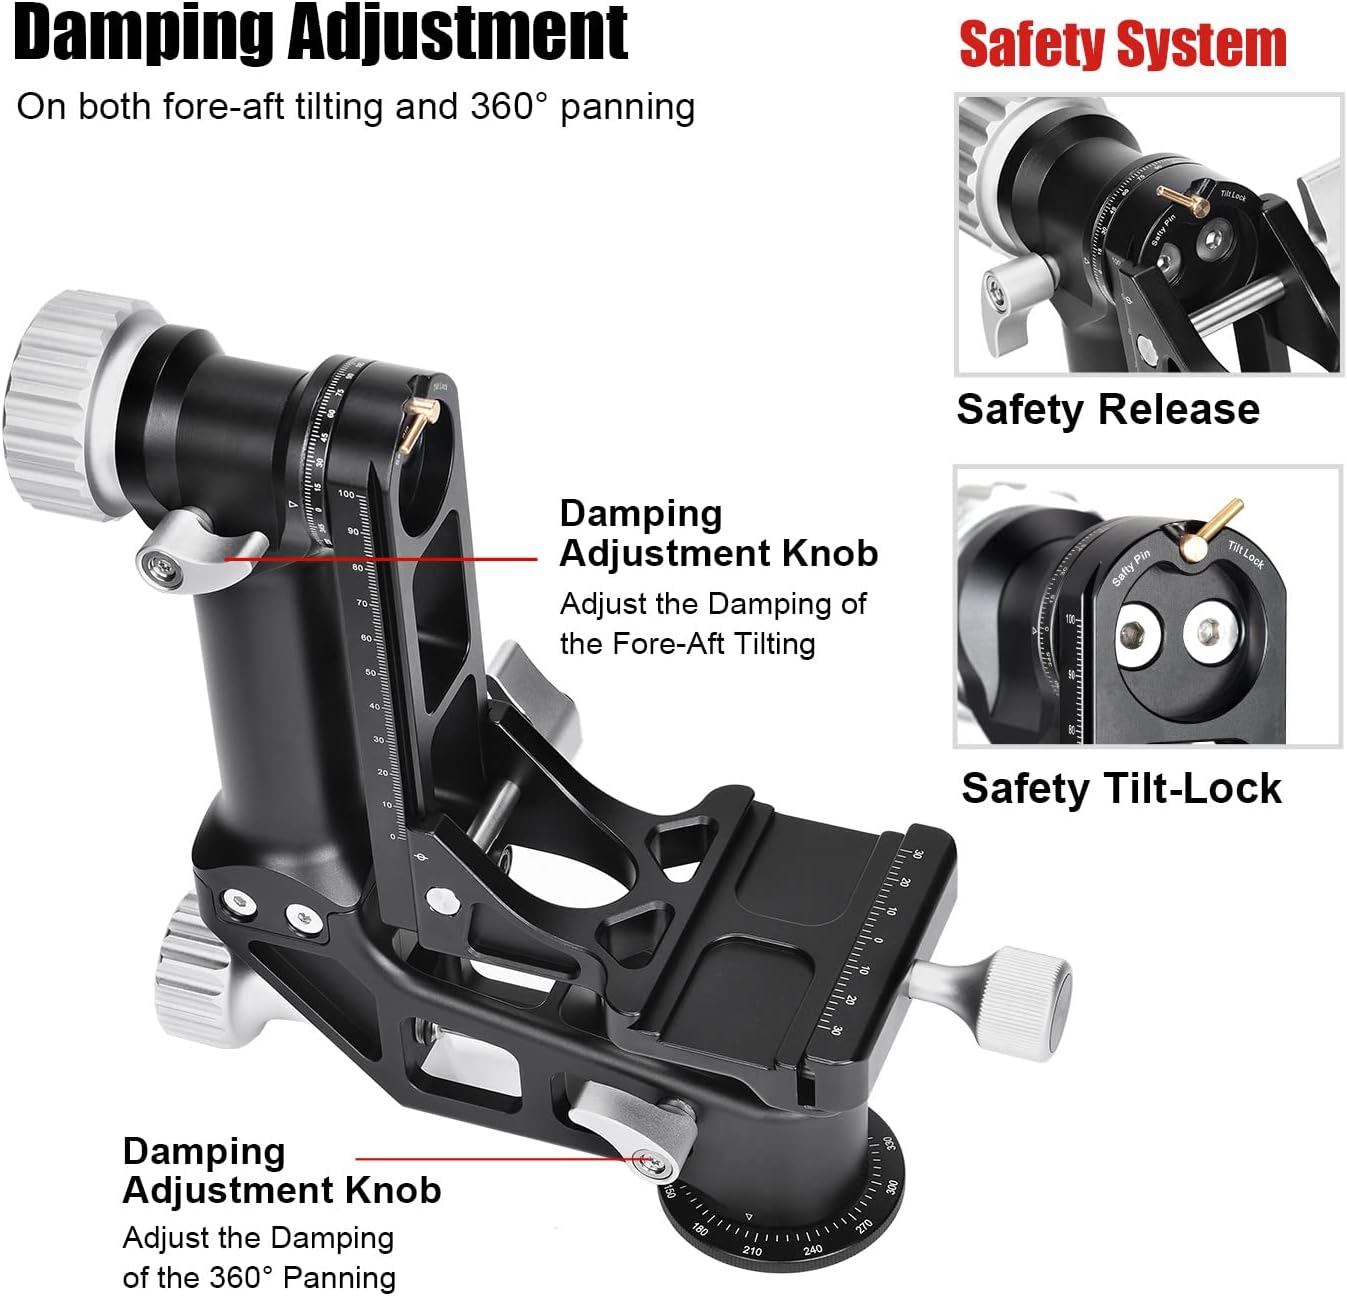
Figure 7: Overview of the damping adjustment knobs and the integrated safety system.
Removable Gliding Plate
The vertical adjustment gliding plate can be removed and replaced by an optional QR clamp (e.g., MAC-15 Clamp) for side-mount conversion, offering versatility for different setups.

Figure 8: Instructions for removing the gliding plate for side-mount conversion.
6. Maintenance
To ensure the longevity and optimal performance of your SUNWAYFOTO GH-02 Gimbal Head, follow these maintenance guidelines:
- Cleaning: Use the provided cleaning cloth to wipe down the gimbal head after each use to remove dust, dirt, and fingerprints. For stubborn grime, use a soft, damp cloth with a mild cleaning solution, then dry thoroughly. Avoid abrasive cleaners or solvents.
- Lubrication: The bearings inside the main body ensure smooth rotation. These are factory-lubricated and generally do not require user maintenance. If you notice any stiffness or unusual noise, contact customer support. Do not attempt to lubricate internal mechanisms yourself.
- Storage: Store the gimbal head in its protective travel case when not in use to prevent scratches and damage. Keep it in a cool, dry place away from direct sunlight and extreme temperatures.
- Inspection: Periodically inspect all knobs, levers, and screws for tightness. Use the provided wrenches (4mm and 2.5mm) to tighten any loose components. Ensure the quick release plate mechanism operates smoothly.
7. Troubleshooting
This section addresses common issues you might encounter with your GH-02 Gimbal Head.
- Issue: Gimbal movement is not smooth.
- Solution: Check the Damping Adjustment Knobs for both panning and tilting. Ensure they are not overtightened. Loosen them slightly to achieve desired fluidity. Also, ensure the equipment is properly balanced on the gimbal head.
- Issue: Camera/lens feels unstable or slips.
- Solution: Verify that the QR plate is securely attached to your lens collar. Ensure the Cradle Clamp lock-knob is fully tightened. For heavy setups, confirm the vertical adjustment is correctly set to balance the center of gravity. Always engage the Safety Pin when possible.
- Issue: Knobs are difficult to turn.
- Solution: This could be due to dirt or debris. Clean the knobs and surrounding areas with a soft cloth. Do not force the knobs. If the issue persists, contact customer support.
If you experience any issues not covered here, please contact SUNWAYFOTO customer support for assistance.
8. Specifications
| Feature | Specification |
|---|---|
| Brand | SUNWAYFOTO |
| Model Number | GH-02 |
| Material | Aluminum alloy (T6061 aerospace grade) |
| Finish | Type-III hard anodized |
| Color | Black |
| Product Dimensions | 14.3 x 11.2 x 5.6 inches (Folded Size: 9.09 x 3.15 x 8.86 inches) |
| Item Weight | 2.16 lbs (980g) / 3 pounds (shipping weight) |
| Maximum Weight Recommendation (Load Capacity) | 66 lbs (30 Kgs) |
| Vertical Adjustment Range | 3.9 inches (10cm) |
| Panning Base Diameter | 2.36 inches (60mm) |
| Base Screw Thread | UNC3/8"-16 |
| Included QR Plate Length | 4.72 inches (12cm) |
9. Warranty and Support
For warranty information, technical support, or service inquiries, please refer to the official SUNWAYFOTO website or contact their authorized distributors. Keep your purchase receipt as proof of purchase for warranty claims.
Contact Information: Please visit www.sunwayfoto.com for the latest support resources and contact details.
Ask a question about this manual
Ask about setup, troubleshooting, compatibility, parts, safety, or missing instructions. Manuals+ will review the question and use this page’s manual context to help answer it.