Mintu 721.85029010
Mintu Magnetron Replacement User Manual
For Kenmore and LG Microwave Ovens
1. Introduction
This manual provides essential information for the safe and effective installation, maintenance, and troubleshooting of your Mintu Magnetron Replacement part. This component is designed to restore the heating functionality of compatible microwave ovens.
Please read this manual thoroughly before attempting any installation or repair. Microwave ovens contain high-voltage components that can be extremely dangerous if not handled correctly.
2. Important Safety Information
WARNING: Microwave ovens store extremely high voltage even when unplugged. Servicing should only be performed by qualified technicians. Failure to follow these instructions can result in serious injury or death.
- Always unplug the microwave oven from the power outlet before beginning any service or repair.
- Discharge the high-voltage capacitor before touching any internal components. This is a critical step and requires proper tools and knowledge.
- Do not operate the microwave oven with the outer casing removed.
- Ensure all connections are secure and correct before restoring power.
- Wear appropriate personal protective equipment (PPE), including insulated gloves and safety glasses.
3. Product Compatibility
The Mintu Magnetron Replacement is compatible with a wide range of Kenmore and LG microwave oven models. Please verify your microwave's model number against the list below to ensure compatibility.
Compatible Kenmore Models:
- 721.85029010, 721.85032010, 721.85032011, 721.85032111, 721.85033010, 721.85033111, 721.85039010, 721.85039011, 721.85039111
- 721.62622200, 721.62624200, 721.62629200, 721.62642200, 721.62643200, 721.62644200, 721.62649200
- 721.80022700, 721.80029700, 721.80032700, 721.80033700, 721.80039700, 721.80042700, 721.80043700, 721.80044700, 721.80049700
- 721.80412500, 721.80413500, 721.80414500, 721.80419500, 721.80492000, 721.80492400, 721.80494000, 721.80494400, 721.80499000, 721.80499400
- 721.80592000, 721.80592400, 721.80592401, 721.80592402, 721.80593000, 721.80593400, 721.80593401, 721.80593402, 721.80594000, 721.80594200, 721.80594400, 721.80594402, 721.80599000, 721.80599200, 721.80599400, 721.80599401, 721.80599402
- 721.81043700, 721.85022010
Compatible LG Models:
- LMV1625B, LMV1625W, LMV1630BB, LMV1630ST, LMV1630WW, LMV1635SB, LMV1635SBQ, LMV1635SW, LMV1680BB, LMV1680ST, LMV1680WW, LMV1683SB, LMV1683ST, LMV1683SW, LMV1762SB, LMV1762ST, LMV1762SW, LMV1831SB, LMV1831ST, LMV1831SW, MV1604SB, MV1604SBQ, MV1604ST, MV1604SW, MV1608BB, MV1608ST, MV1608WW
Compatible Goldstar Models:
- MV1604SB01, MV1604SBQ01, MV1604ST01, MV1604SW01, MV1615W, MVH1670ST
4. Installation (Setup)
Disclaimer: Installation of a magnetron requires advanced technical knowledge and involves high voltage. If you are not comfortable with electrical repairs, it is strongly recommended to seek assistance from a certified appliance technician.
4.1 Tools Required
- Screwdrivers (Phillips and Flathead)
- Needle-nose pliers
- High-voltage discharge tool (essential for safety)
- Insulated gloves
- Safety glasses
4.2 Step-by-Step Installation Guide
- Disconnect Power: Unplug the microwave oven from the wall outlet. This is the most crucial safety step.
- Access the Magnetron: Depending on your microwave model, you may need to remove the outer casing or a specific access panel. Typically, this involves unscrewing several screws on the back and sides of the unit.
- Discharge the Capacitor: Locate the high-voltage capacitor. Using a high-voltage discharge tool, carefully discharge the capacitor. This step is critical to prevent electric shock. Hold the discharge tool across the capacitor terminals for at least 30 seconds.
- Disconnect Wiring: Carefully disconnect the electrical wires connected to the old magnetron. Note their positions for re-connection.
- Remove Old Magnetron: Unscrew the mounting screws holding the old magnetron in place. Gently pull the magnetron out, ensuring not to damage any surrounding components.
- Install New Magnetron: Insert the Mintu Magnetron Replacement into the cavity. Ensure it seats properly. Secure it with the mounting screws.
- Reconnect Wiring: Reconnect the electrical wires to the new magnetron, ensuring they are securely attached to the correct terminals.
- Reassemble Microwave: Replace any removed panels or the outer casing, securing all screws.
- Test Functionality: Plug the microwave oven back into the power outlet. Perform a test by heating a cup of water for 30-60 seconds. The water should be hot.

Figure 4.2.1: Top-down view of the Mintu Magnetron Replacement, showing the antenna and mounting points. This image illustrates the general appearance of the magnetron before installation.
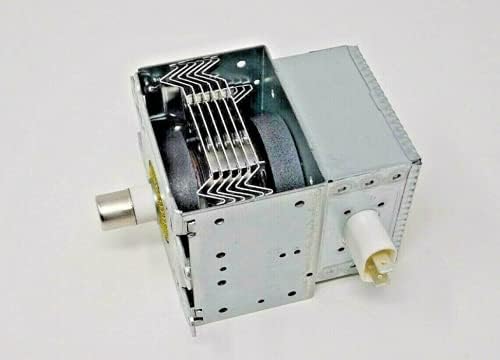
Figure 4.2.2: Side view of the Mintu Magnetron Replacement, highlighting the electrical terminals and cooling fins. This view is helpful for identifying the connection points during installation.
5. Post-Installation Check and Operation
After successful installation of the magnetron, perform the following checks to ensure proper operation and safety:
- Initial Power-Up: Plug the microwave oven into a grounded electrical outlet.
- Functionality Test: Place a microwave-safe cup of water (approximately 1 cup) inside the microwave. Close the door securely.
- Heating Test: Set the microwave to high power and run it for 60 seconds.
- Verify Heating: After 60 seconds, carefully open the door and check if the water is hot. If the water is hot, the magnetron is functioning correctly. If not, refer to the Troubleshooting section.
- Observe for Abnormalities: During operation, listen for any unusual noises (e.g., loud buzzing, arcing sounds) or observe any smoke or burning smells. If any of these occur, immediately unplug the microwave and consult a qualified technician.
6. Maintenance
The magnetron itself is a sealed component and does not require routine maintenance. However, proper care of your microwave oven can extend the life of all its components, including the magnetron.
- Keep Interior Clean: Regularly clean the interior of the microwave oven to prevent food splatters from accumulating, which can cause arcing and damage to the waveguide cover or magnetron antenna.
- Inspect Waveguide Cover: Periodically inspect the waveguide cover (usually a mica sheet inside the microwave cavity) for signs of burning, discoloration, or damage. A damaged waveguide cover can lead to magnetron failure. Replace it if damaged.
- Proper Ventilation: Ensure the microwave oven's ventilation openings are not blocked to allow for proper airflow and cooling of internal components, including the magnetron.
- Avoid Metal Objects: Never place metal objects or containers inside the microwave, as this can cause arcing and damage the magnetron.
7. Troubleshooting
If your microwave oven is not functioning correctly after magnetron replacement, consider the following common issues:
| Problem | Possible Cause | Solution |
|---|---|---|
| Microwave runs but does not heat food. |
|
|
| Loud buzzing or arcing sound during operation. |
|
|
| Microwave does not turn on. |
|
|
Note: Many microwave repairs involve high voltage. If you are unsure about any troubleshooting step, please contact a qualified appliance repair professional.
8. Specifications
| Feature | Detail |
|---|---|
| Product Type | Microwave Magnetron Replacement |
| Brand | Mintu |
| Compatibility | Kenmore, LG, Goldstar Microwave Ovens (specific models listed in Section 3) |
| Part Number (Equivalent) | Refer to your microwave's original part number for cross-reference. |
| Material | Metal and ceramic components |
9. Warranty and Support
For information regarding warranty coverage and customer support for your Mintu Magnetron Replacement part, please refer to the seller's return policy or contact the seller directly through the platform where the purchase was made.
Seller Information: Pafuxd (as per Amazon listing)
Return Policy: 30-day refund/replacement (as per Amazon listing)
For technical assistance beyond the scope of this manual, it is recommended to consult a professional appliance repair technician.