Introduction
Thank you for choosing the EAGLE PEAK 10x10 Outdoor Gazebo Pergola. This product is designed to enhance your outdoor living space with its robust steel frame and adjustable sun shade. This manual provides essential information for safe assembly, operation, maintenance, and troubleshooting to ensure long-lasting enjoyment of your pergola.

Image: The EAGLE PEAK 10x10 Outdoor Gazebo Pergola, showcasing its beige retractable shade and sturdy dark frame, set up on a wooden deck with outdoor furniture.
Important Safety Information
Please read and understand all safety warnings before assembly and use. Failure to follow these instructions may result in injury or damage to the product.
- Always ensure the shelter is securely anchored to the ground using appropriate stakes or weights.
- Keep children and pets away from the retractable canopies when in use or being adjusted to prevent entanglement or injury.
- Do not use the shelter in windy conditions or during severe weather, including heavy rain, snow, or strong gusts. Retract the canopies and secure the structure during adverse weather.
- Always follow the assembly instructions carefully to avoid injury and ensure structural integrity.
- Regularly inspect all bolts and connections to ensure they remain tight and secure.
- The pergola top is made of 160g/m² polyester material with PU coating, offering UPF 50+ UV sun protection. It meets CPAI-84 fire resistant standards, but keep open flames away from the fabric.
Parts List
Before beginning assembly, verify that all parts listed below are present and undamaged. Refer to the assembly video for visual identification of each component.
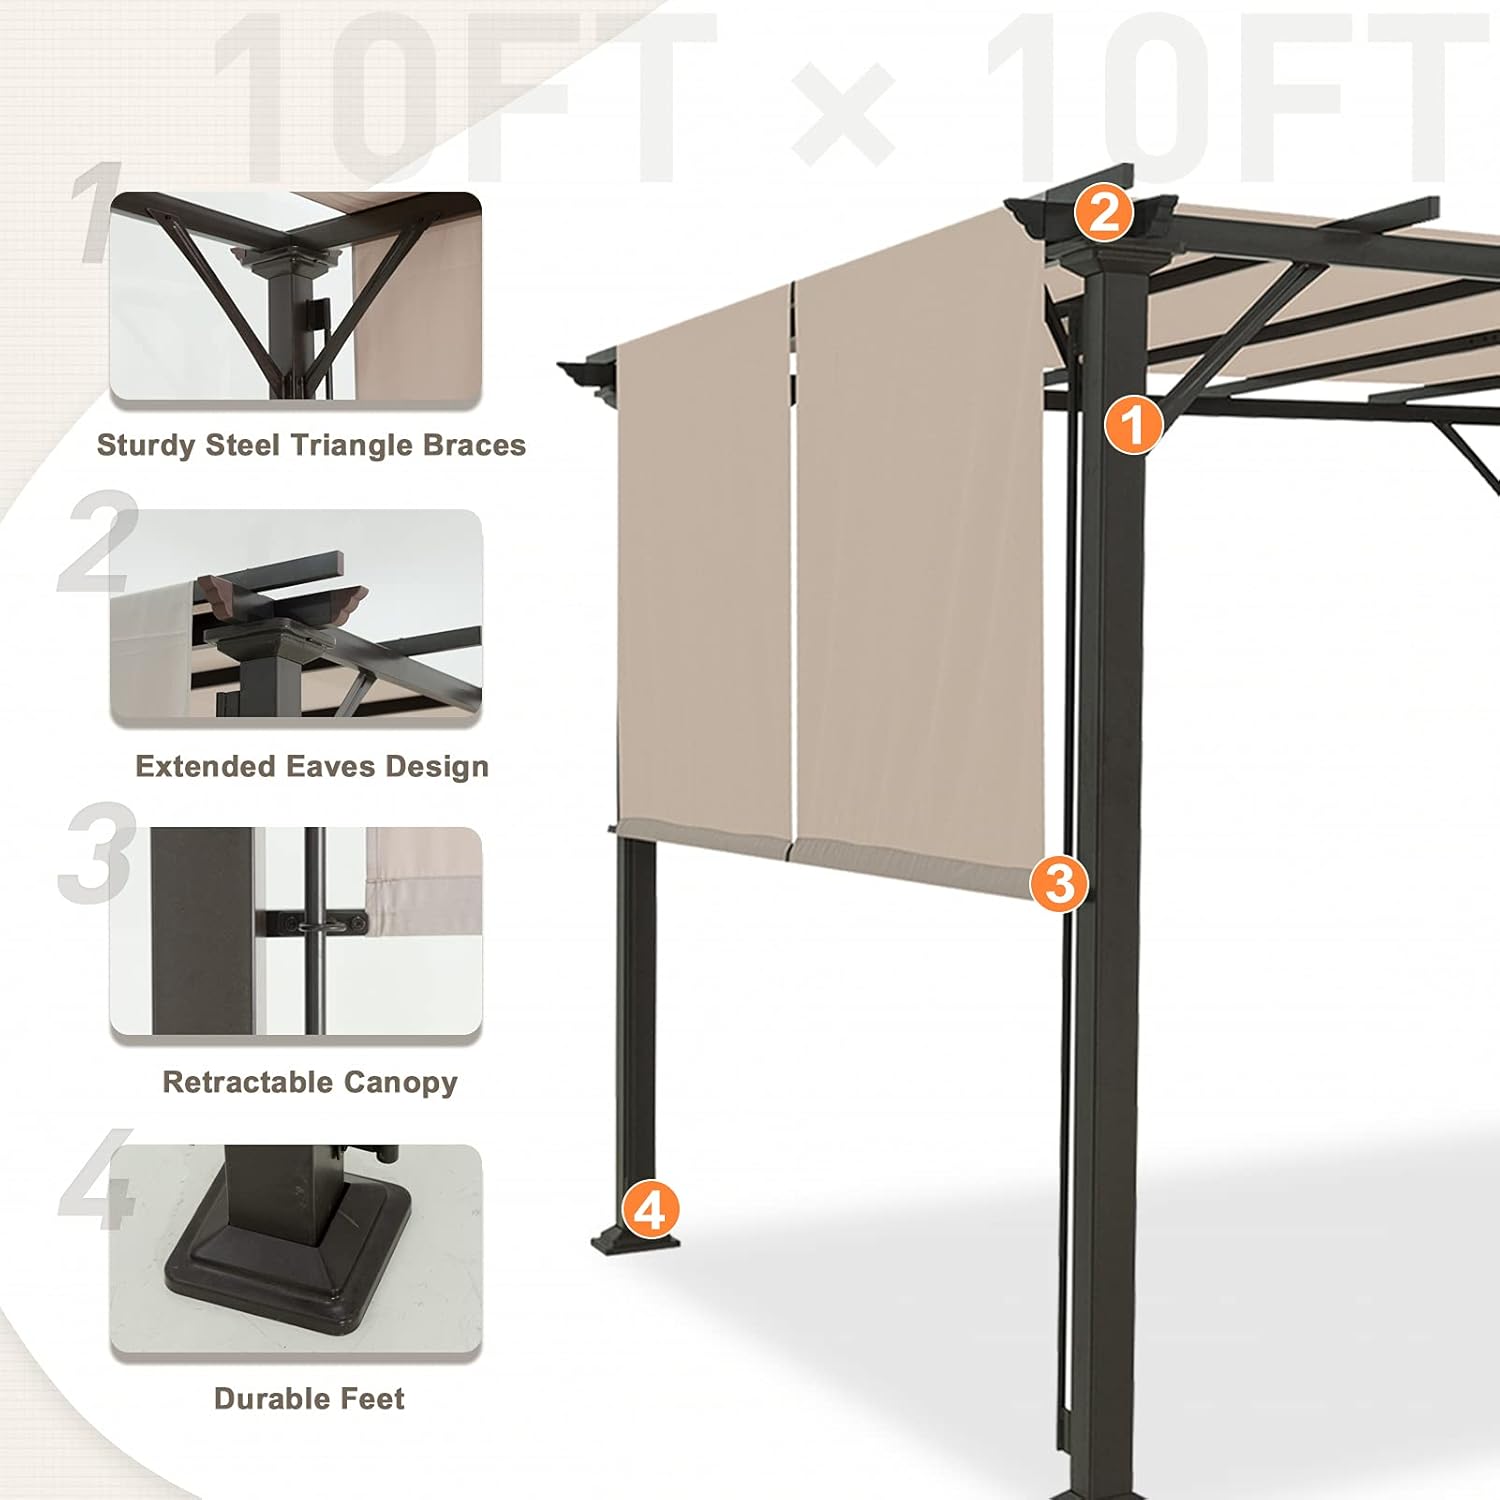
Image: A detailed view highlighting the key structural components and features of the pergola, including the steel triangle braces, extended eaves, retractable canopy, and durable feet.
Main Components:
- Posts (A1, A2)
- Lintel Beams (B1, B2, C1, C2)
- Roof Tubes
- Weight Bars (E1, E2)
- Guide Tubes
- Corner Braces (H1, H2)
- Connectors (K)
- Brackets
- Fixing Plates
- Base Covers
- Top Covers for Posts
- Shade Fabric (2 pieces)
- Hardware (Bolts, Stakes, Allen Key, Limiting Rings)
Setup and Assembly
Assembly requires at least two people. Follow these steps carefully. For a visual guide, please refer to the official assembly video below.
Video: Official EAGLE PEAK assembly guide for the 10x10 Outdoor Gazebo Pergola, demonstrating step-by-step installation of all components.
- Prepare the Base: Place the four base plates on the desired installation area. Ensure they are properly aligned to form a 10x10 ft square.

Image: An overhead view of the pergola's base structure, showing the four main posts securely anchored to the ground, ready for further assembly.
- Attach Base Plates to Posts: Securely attach the base plates to the bottom of each Post (A1, A2) using the provided bolts and Allen key. Ensure all connections are tight.
- Assemble Lintel Beams: Connect the Lintel Beams (B1, B2, C1, C2) to the top of the posts. These beams form the upper square frame of the pergola. Use the provided bolts to secure them firmly.
- Install Corner Braces: Attach the Corner Braces (H1, H2) to the corners where the posts meet the lintel beams. These braces provide additional stability and strength to the structure.
- Attach Roof Tubes: Install the Roof Tubes across the top of the lintel beams. These tubes create the framework for the retractable shade. Ensure they are evenly spaced and securely fastened.
- Set up Guide System: Attach the guide system brackets to the posts. Insert the Guide Tubes into these brackets. This system allows the shade fabric to slide smoothly.
- Install Shade Fabric and Weight Bars: Slide the Shade Fabric onto the Roof Tubes. Insert the Weight Bars (E1, E2) into the bottom hem of each shade panel. This helps keep the fabric taut and allows for smooth retraction.

Image: A close-up illustrating the adjustable canopy feature, showing the fabric being moved up and down along the guide rails to control sun exposure.
- Final Checks: Double-check all connections to ensure they are tight. Ensure the shade fabric slides freely along the guide system.
Operating Instructions
The EAGLE PEAK Gazebo Pergola features two independent adjustable canopies, allowing you to customize your shade and sunlight exposure.
- Adjusting the Shade: Each canopy panel can be moved independently along its guide system. Gently pull or push the shade fabric to extend or retract it to your desired position.
- Securing the Shade: When fully extended or retracted, ensure the shade panels are properly aligned and secured to prevent flapping in light breezes.
- Weather Conditions: In anticipation of strong winds, heavy rain, or snow, it is highly recommended to fully retract both shade panels to prevent damage to the fabric and the pergola structure.
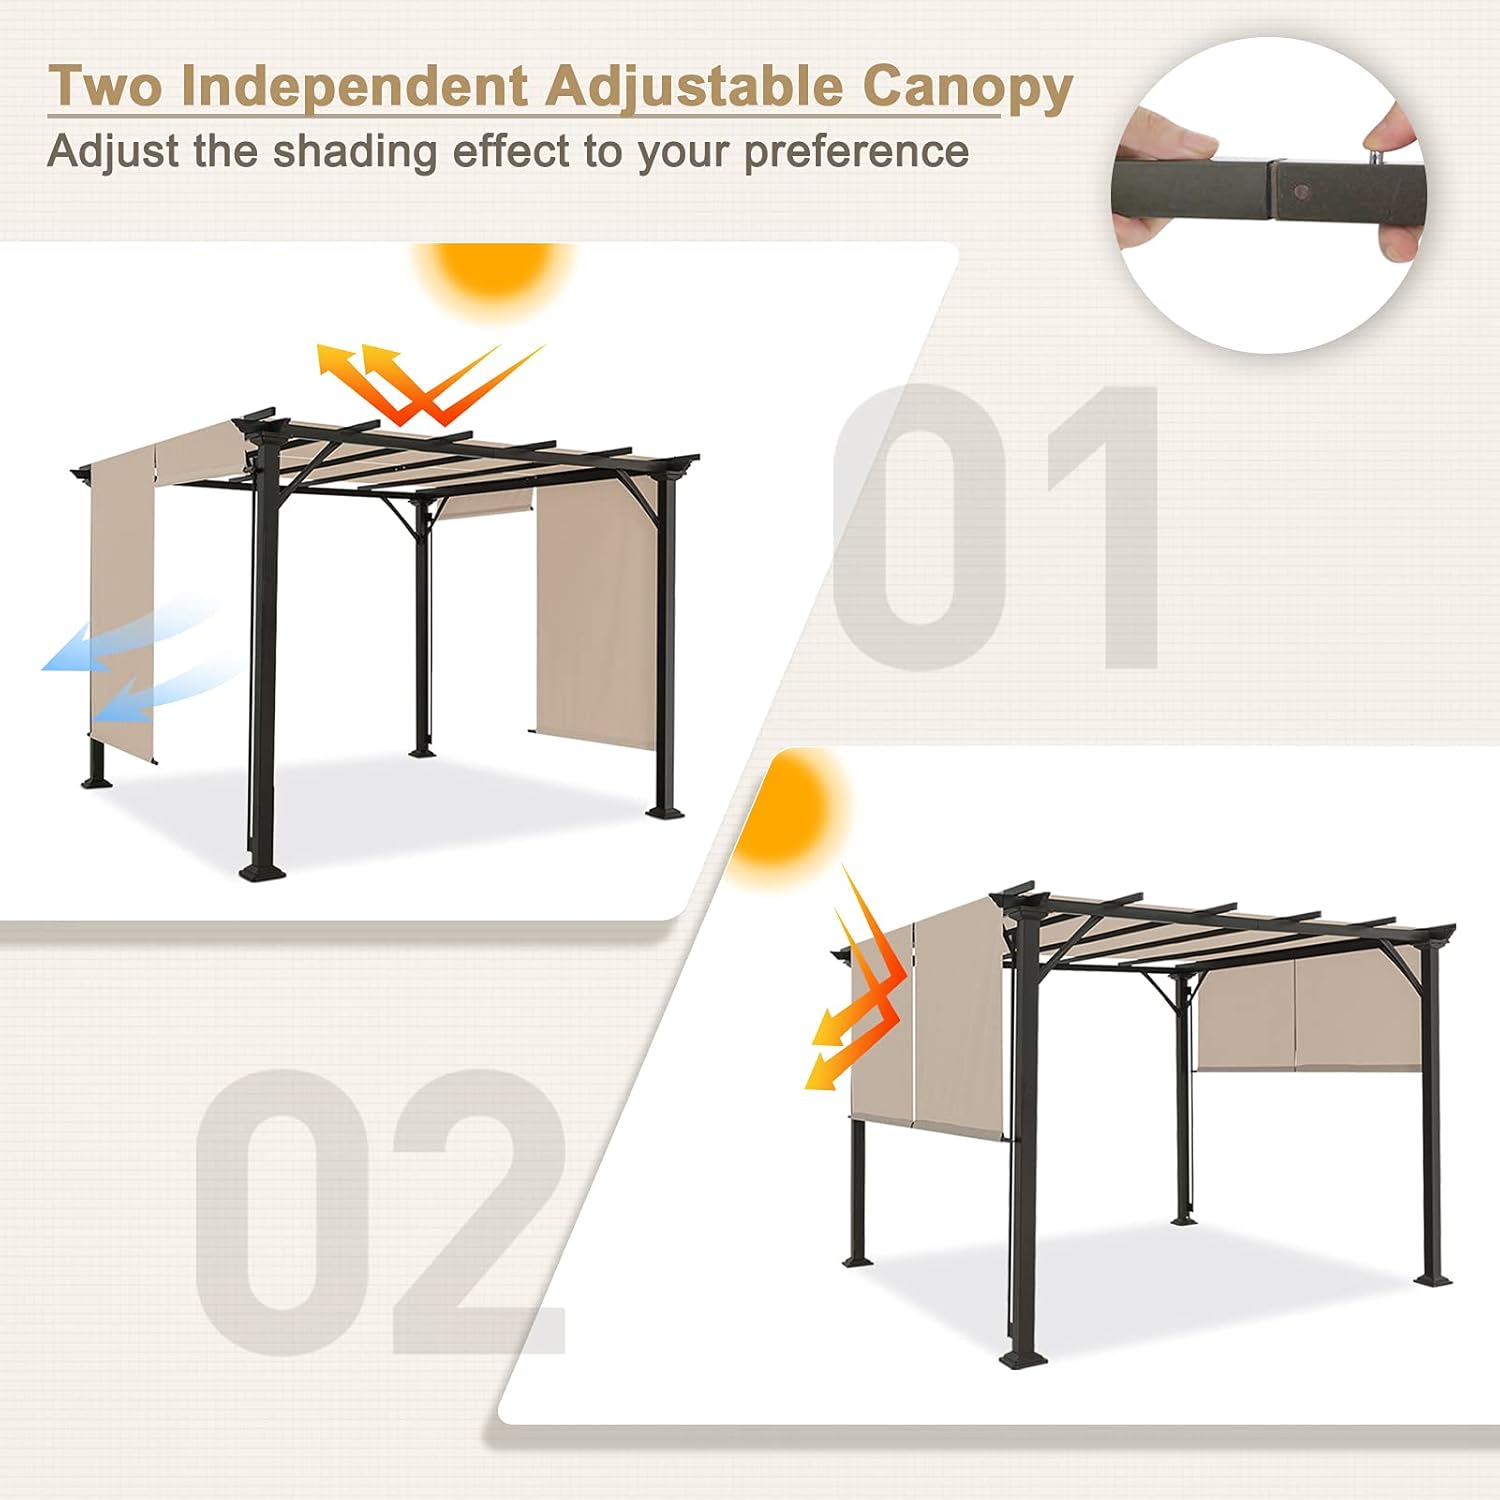
Image: A visual representation showing how the two independent canopy panels can be adjusted to provide varying levels of shade or sun exposure.
Maintenance
Regular maintenance will extend the life and appearance of your EAGLE PEAK pergola.
- Cleaning the Fabric: Clean the polyester canopy fabric with mild soap and water. Do not use harsh chemicals or abrasive cleaners. Allow the fabric to air dry completely before retracting or storing.
- Frame Care: The steel frame is powder-coated for rust-resistance. Clean the frame with a damp cloth and mild detergent. Inspect for any scratches or chips in the coating and touch up with appropriate paint to prevent rust.
- Hardware Inspection: Periodically check all bolts, screws, and connections to ensure they are tight. Tighten any loose hardware to maintain the stability of the structure.
- Winter Storage: In areas with heavy snow or prolonged freezing temperatures, it is advisable to remove the canopy fabric and store it indoors to prevent damage. Consider disassembling the entire structure if severe weather is expected.
Troubleshooting
Here are some common issues and their potential solutions:
| Problem | Possible Cause | Solution |
|---|---|---|
| Pergola feels unstable or wobbly. | Loose bolts or improper anchoring. | Ensure all bolts are securely tightened. Verify that the base is properly anchored to the ground using stakes or additional weights if necessary. |
| Canopy does not slide smoothly. | Obstruction in the guide system or misaligned fabric. | Check the guide tubes for debris or damage. Ensure the weight bars are correctly inserted and the fabric is not twisted. Lightly lubricate the guide system if needed. |
| Water pooling on canopy. | Improper tension or heavy rainfall. | Ensure the canopy is fully extended and taut. Retract the canopy during heavy rain to prevent water accumulation and potential damage. |
| Bent or damaged components upon arrival. | Shipping damage or manufacturing defect. | Contact EAGLE PEAK customer service immediately with proof of purchase and photos of the damaged parts for replacement. Do not attempt to assemble with damaged parts. |
Specifications
| Feature | Detail |
|---|---|
| Brand | EAGLE PEAK |
| Model Number | PERGOLA-100-BGE |
| Material | Polyester (160g/m² with PU coating), Alloy Steel |
| Product Dimensions | 120"L x 120"W x 86.4"H (10'L x 10'W x 7.2'H) |
| Item Weight | 130.7 Pounds |
| Frame Material | Alloy Steel (Powder-Coated) |
| Water Resistance Level | Not Water Resistant (Canopy is water-repellent, but not fully waterproof for heavy rain) |
| Shape | Square |
| Ultraviolet Light Protection | Yes (UPF 50+) |
| Assembly Required | Yes |
| Occupancy | 8 person |
| Color | Beige |
| Country of Origin | China |
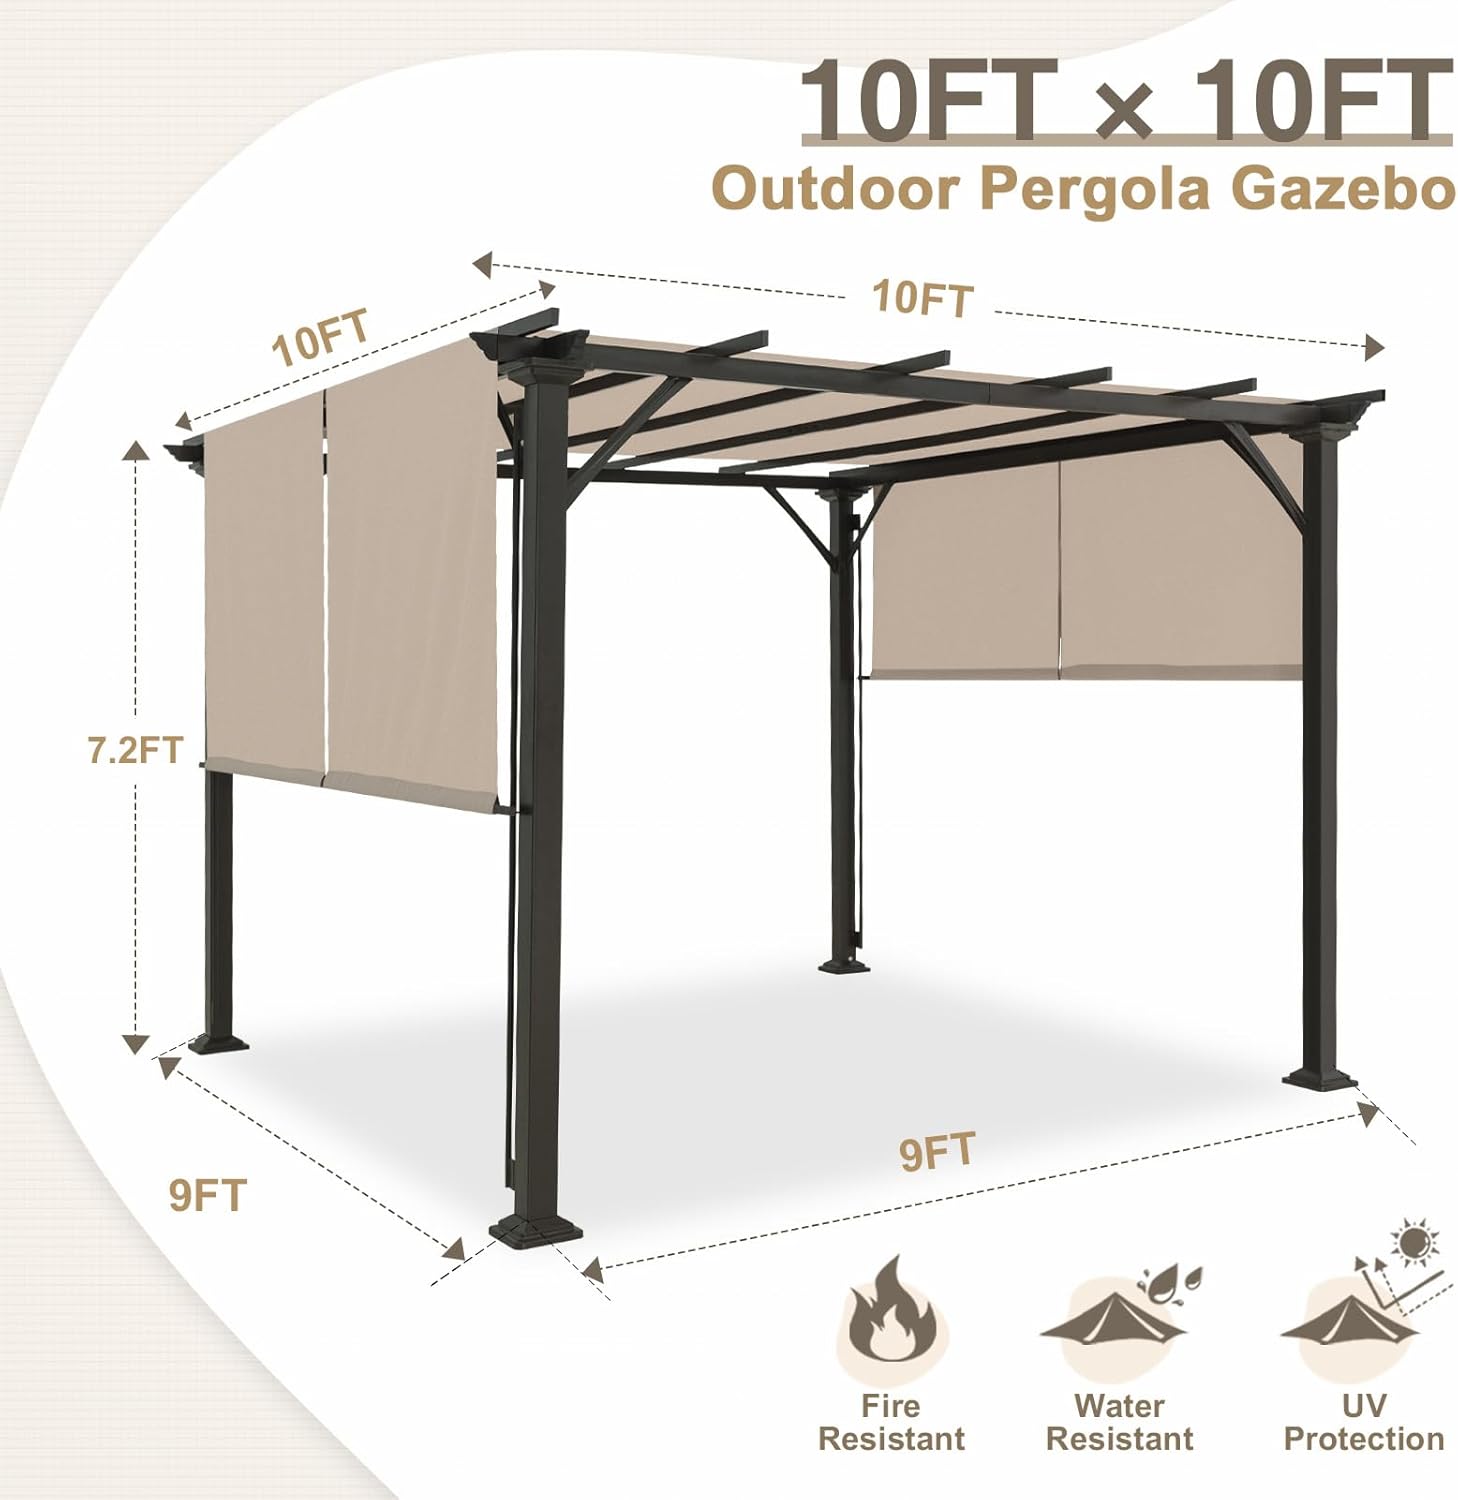
Image: A diagram illustrating the overall dimensions of the 10x10 Outdoor Pergola Gazebo, including height and width, along with icons for fire resistance, water resistance, and UV protection.
Warranty and Customer Support
EAGLE PEAK stands behind the quality of its products.
- Warranty: EAGLE PEAK offers a 1-year limited after-sale protection from the original date of purchase. This warranty covers manufacturing defects and material flaws under normal use.
- Customer Service: If you have any questions, concerns, or require assistance with your product, please contact our professional service team. Refer to your purchase documentation for specific contact details or visit the official EAGLE PEAK website.
For more information and to explore other EAGLE PEAK products, visit the EAGLE PEAK Store.


