1. Introduction
This manual provides essential instructions for the safe and efficient operation, setup, and maintenance of your Sister Speedway SW-820 Double Needle Post-Bed Sewing Machine. This industrial-grade machine is designed for sewing medium to heavy thick materials, including leather, and is particularly suited for three-dimensional items such as shoes, bags, and other leather goods due to its post-bed design.
Please read this manual thoroughly before assembly or operation to ensure proper use and to prevent damage to the machine or injury to the operator.
2. Safety Instructions
- Always disconnect the power supply before cleaning, lubricating, or performing any maintenance on the machine.
- Keep fingers and clothing away from the needle, presser foot, and other moving parts during operation.
- Ensure the machine is properly grounded to prevent electrical shock.
- Do not operate the machine if any parts are damaged or missing.
- Use only recommended needles (DPx5 #14 Standard) and parts.
- Keep the work area well-lit and free from obstructions.
- Wear appropriate safety glasses if necessary.
3. Assembly and Setup
The Sister Speedway SW-820 machine requires professional assembly. The following steps outline the general assembly process for the machine head, table, and motor components.
3.1 Unpacking and Component Identification
Carefully unpack all components and verify against the packing list. Components typically include the machine head, tabletop, table legs, servo motor, and accessories (drawer, belt, tools, lamp).
3.2 Assembling the Table Stand
Assemble the 'L' shaped table legs to form a stable stand. Ensure all bolts are securely tightened. The table height is adjustable from 24.5 inches to 34 inches.
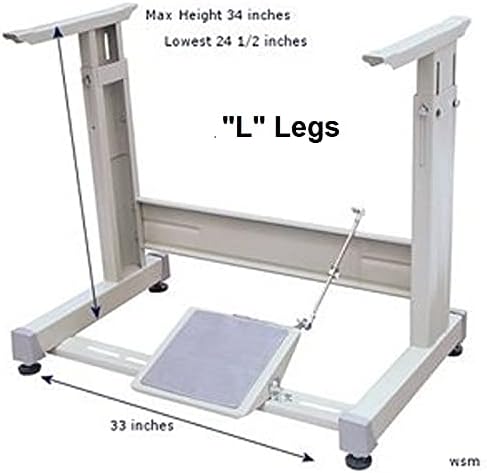
Figure 3.2: Industrial Sewing Machine Table 'L' Legs. This image displays the 'L' shaped legs for the industrial sewing machine table. The legs are adjustable in height, ranging from a lowest setting of 24.5 inches to a maximum of 34 inches, and have a width of 33 inches. These provide a stable base for the machine and motor.
3.3 Mounting the Tabletop
Place the tabletop onto the assembled stand. Align the pre-drilled holes in the tabletop with the mounting points on the stand and secure with the provided hardware.

Figure 3.3: Industrial Sewing Machine Tabletop. A view of the industrial sewing machine tabletop, featuring pre-drilled holes for mounting the machine head and other accessories. It includes a cutout for the machine's post-bed and a ruler marking along one edge for convenient measurement during sewing.
3.4 Installing the Servo Motor
Mount the electronic DC servo motor underneath the tabletop using the designated brackets and hardware. Connect the motor to the foot pedal mechanism and ensure the drive belt is correctly aligned between the motor pulley and the machine head pulley.

Figure 3.4: Sister Speedway SW-820 Electronic DC Servo Motor. An image of the electronic DC servo motor, typically mounted underneath the sewing machine table. This motor provides variable speed control, ranging from 0 to 3300 RPM, offering precise stitching speed for different applications and operator skill levels. The speed adjustment dial is visible on the motor housing.
3.5 Mounting the Machine Head
Carefully place the machine head into the cutout on the tabletop. Secure it using the appropriate bolts and washers. Ensure the machine is stable and level.

Figure 3.5: Sister Speedway SW-820 Double Needle Post-Bed Sewing Machine Head. This image displays the main unit of the Sister Speedway SW-820 double needle post-bed sewing machine. It features a robust, light gray metal construction with the 'Speedway' brand name visible on the arm. The post-bed design is prominent, indicating its suitability for sewing three-dimensional items like shoes and bags.
3.6 Installing the LED Lamp
Attach the flexible LED lamp to the machine or table as desired, ensuring it illuminates the sewing area effectively. Plug it into a suitable power source.

Figure 3.6: Flexible LED Sewing Machine Lamp. This image shows a flexible LED lamp designed for sewing machines. It features a gooseneck for adjustable positioning and an integrated power switch, providing focused illumination to the sewing area for improved visibility.
4. Operating Instructions
4.1 Needle Installation
Use DPx5 #14 (Standard) needles. Ensure needles are inserted correctly and securely tightened. Incorrect needle installation can lead to skipped stitches or needle breakage.
4.2 Bobbin Winding and Insertion
The machine utilizes a double bobbin system. Wind bobbins evenly with the desired thread. Insert the wound bobbins into their respective shuttle hooks located within the post-bed. Ensure the thread is correctly routed through the bobbin case tension spring.
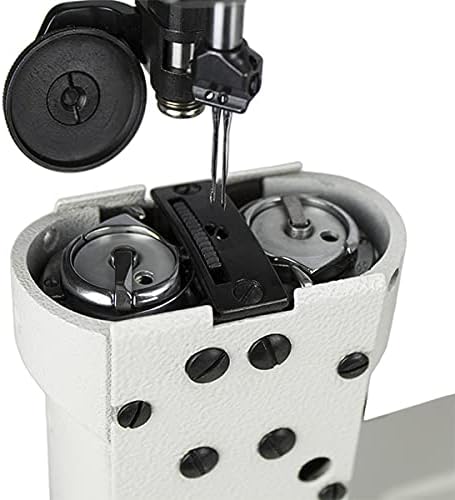
Figure 4.2: Close-up of Sister Speedway SW-820 Double Bobbin Area. A detailed view of the double bobbin and shuttle hook area located within the post-bed of the SW-820 machine. This design allows for two independent lower threads, essential for double-needle stitching. The bobbins are easily accessible for winding and replacement.
4.3 Threading the Machine
Follow the threading path indicated on the machine. This typically involves guiding the thread from the spool pin, through the thread guides, tension discs, take-up lever, and finally through the needle eye. Ensure both needles are threaded correctly and independently.
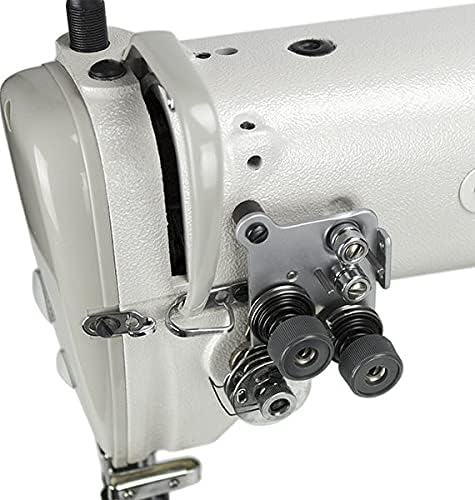
Figure 4.3: Sister Speedway SW-820 Thread Tension Assembly. This image shows the thread tension assembly on the side of the machine head. It features multiple tension discs and springs, allowing precise control over the upper thread tension for each needle, crucial for balanced double-needle stitching.
4.4 Adjusting Stitch Length
The stitch length can be adjusted using the dial on the machine arm. Rotate the dial to select a stitch length between 0 and 4mm, depending on the material thickness and desired stitch appearance.

Figure 4.4: Sister Speedway SW-820 Stitch Length Adjustment Dial. This close-up shows the stitch length adjustment dial located on the machine arm. The dial is clearly marked with numerical settings, allowing the operator to precisely select stitch lengths from 0 to 4mm for various material thicknesses and desired stitch patterns.
4.5 Presser Foot Lift
The presser foot can be lifted by hand (approximately 7mm) or by using the knee lift mechanism (approximately 10mm). Use the knee lift for greater clearance when inserting or removing thicker materials.
4.6 Speed Control
The electronic DC servo motor allows for variable speed control from 0 to 3300 stitches per minute (s.p.m.). Adjust the speed using the control dial on the motor or via the foot pedal for precise stitching.
5. Maintenance
5.1 Cleaning
Regularly clean lint and dust from the bobbin area, feed dogs, and tension discs using a brush or compressed air. Accumulation of debris can affect stitch quality and machine performance.
5.2 Lubrication
Refer to the machine's lubrication points (usually marked with red dots or specific instructions in a detailed service manual). Apply appropriate sewing machine oil to these points regularly to ensure smooth operation and prevent wear.
5.3 Needle Replacement
Replace needles frequently, especially when sewing dense or thick materials, or if the needle shows signs of bending or dullness. A dull or bent needle can cause skipped stitches, thread breakage, and damage to the fabric.
6. Troubleshooting
- Skipped Stitches: Check needle installation, ensure it's not bent or dull. Verify correct threading and bobbin insertion.
- Thread Breakage: Inspect for burrs on thread guides or needle plate. Check thread tension (too tight). Ensure thread quality is suitable for the material.
- Uneven Stitches: Adjust upper and lower thread tension. Ensure consistent material feeding.
- Machine Jamming: Disconnect power immediately. Remove any tangled thread from the bobbin area and feed dogs. Check for foreign objects.
7. Specifications
| Feature | Specification |
|---|---|
| Model Number | SW-820 |
| Number of Needles | 2 |
| Distance Between Needles | 2.4 mm (approx. 1/16") |
| Max. Sewing Speed | 3,000 s.p.m. |
| Max. Stitch Length | 0-4mm |
| Needle Bar Stroke | 33.4 mm |
| Presser Foot Lift (Hand) | 7 mm (1/4") |
| Presser Foot Lift (Knee) | 10 mm (1/2") |
| Post Height | 178 mm (7") |
| Application Needle | DPx5 #14 (Standard) |
| Motor Type | Electronic DC Servo Motor, 1 Phase, 110 Volt |
| Motor Horsepower | 1/2 H.P. (or 3/4 H.P. depending on configuration) |
| UPC | 880238942859 |
8. Warranty and Support
For warranty information and technical support, please refer to the documentation provided at the time of purchase or contact your authorized Sister Speedway dealer. Keep your purchase receipt as proof of purchase for any warranty claims.