1. Introduction
This manual provides essential information for the proper installation, operation, and maintenance of your KEA A/F (Air/Fuel) Sensor AZ0-202. The A/F sensor, also known as an oxygen (O2) sensor, is a critical component in your vehicle's exhaust system, responsible for monitoring the oxygen content in the exhaust gases. This data is then sent to the engine control unit (ECU) to optimize the air-fuel mixture for efficient combustion, reduced emissions, and improved fuel economy.
This KEA A/F Sensor AZ0-202 is compatible with the following Mazda vehicle models:
- Mazda Biante: CCEFW
- Mazda Premacy: CREW
It is designed to be a direct replacement for genuine part numbers: LF2L-18-8G1C, LF2L-18-8G1B, LF2L-18-8G1A.

Image 1.1: KEA A/F Sensor AZ0-202. This image shows the main product, highlighting its design and connector.
2. Setup and Installation
Proper installation is crucial for the correct function and longevity of the A/F sensor. It is highly recommended that installation be performed by a qualified automotive technician. If you choose to install it yourself, please refer to your vehicle's specific service manual for detailed instructions and safety precautions.
2.1 Compatibility Confirmation
Before purchasing or installing, it is essential to confirm compatibility with your specific vehicle. Even within the same car model, variations in year and grade can lead to different sensors being required. Relying solely on the model name is insufficient for compatibility verification.
To confirm compatibility, please provide the following information to KEA support:
- First registration year
- Chassis number
- Model designation number (5 digits)
- Classification number (4 digits)
This information can typically be found on your vehicle's inspection certificate.

Image 2.1: Compatibility Confirmation. This diagram illustrates the importance of verifying compatibility using specific vehicle details from the inspection certificate.
2.2 Installation Steps (General Guidelines)
These are general steps. Always consult your vehicle's service manual for precise instructions.
- Ensure the engine is cool before starting work.
- Disconnect the vehicle's battery to prevent electrical issues.
- Locate the existing A/F sensor in the exhaust system.
- Disconnect the electrical connector from the old sensor.
- Using an appropriate oxygen sensor wrench, carefully remove the old sensor.
- Apply anti-seize compound to the threads of the new KEA A/F Sensor AZ0-202 (if not pre-applied).
- Thread the new sensor into the exhaust bung by hand to avoid cross-threading.
- Tighten the sensor to the manufacturer's specified torque using the oxygen sensor wrench.
- Connect the electrical connector securely.
- Reconnect the vehicle's battery.
- Start the engine and check for any warning lights or exhaust leaks.

Image 2.2: Sensor and Connectors. This image displays the KEA A/F Sensor AZ0-202 along with its electrical connectors, illustrating the components involved in installation.
3. Operating Principles
The KEA A/F Sensor AZ0-202 operates continuously once installed and the engine is running. It measures the oxygen concentration in the exhaust gas and generates a voltage signal that varies depending on the air-fuel ratio. This signal is then transmitted to the vehicle's ECU.
The ECU uses this information to make real-time adjustments to fuel injection and ignition timing, ensuring the engine runs at its optimal efficiency (stoichiometric ratio) for performance, fuel economy, and emission control. A properly functioning A/F sensor is vital for maintaining your vehicle's engine health and compliance with emission standards.
4. Maintenance
A/F sensors are not typically user-serviceable or require routine maintenance. Their lifespan is generally determined by factors such as fuel quality, engine condition, and driving habits. However, it is recommended to include a check of the A/F sensor's function as part of your vehicle's regular diagnostic inspections, especially if an engine warning light illuminates.
If a sensor is found to be faulty, it should be replaced promptly to prevent potential damage to other emission control components, such as the catalytic converter, and to maintain optimal engine performance.
5. Troubleshooting
If your vehicle's engine check lamp illuminates, it indicates a potential issue within the engine or emission control system. While an A/F sensor malfunction can be a cause, it's important to note that it accounts for only a portion of such issues.
First Step: Check for Error Codes. The most effective way to diagnose the problem is to use an OBD-II diagnostic scanner to retrieve any stored error codes (DTCs) from the vehicle's ECU. These codes will provide specific information about the detected malfunction.

Image 5.1: Engine Check Lamp Causes. This diagram illustrates that while O2 sensor errors can trigger the engine check lamp, they represent approximately 11% of the total causes. Other common issues include misfire detection, fuel system problems, catalytic converter degradation, EGR valve malfunction, and air flow meter malfunction.
Common issues that can trigger an engine check lamp, besides an A/F sensor error, include:
- Misfire detection
- Fuel system issues
- Catalytic converter degradation
- EGR (Exhaust Gas Recirculation) valve malfunction
- Air flow meter malfunction
- And other various sensor or system failures.
If an A/F sensor error code is present, consider replacing the sensor. If the engine check lamp remains on after replacement, or if different error codes appear, further diagnosis by a professional is recommended.
6. Specifications
| Feature | Detail |
|---|---|
| Manufacturer | KEA (Kansai Eco-App) |
| Part Number | AZ0-202 |
| Product Type | A/F Sensor (O2 Sensor) |
| Product Weight | 200 g |
| Package Dimensions | 14 x 8.5 x 4.7 cm |
| ASIN | B09D834M7K |
| First Available Date | January 29, 2021 |

Image 6.1: Zirconia Element Technology. This image explains how KEA O2 sensors utilize zirconia elements for stable and accurate measurement, contrasting with unstable elements.

Image 6.2: Manufacturing Technology. This image highlights KEA's advanced forming technology and electrode printing process, ensuring high quality and performance equivalent to genuine parts.
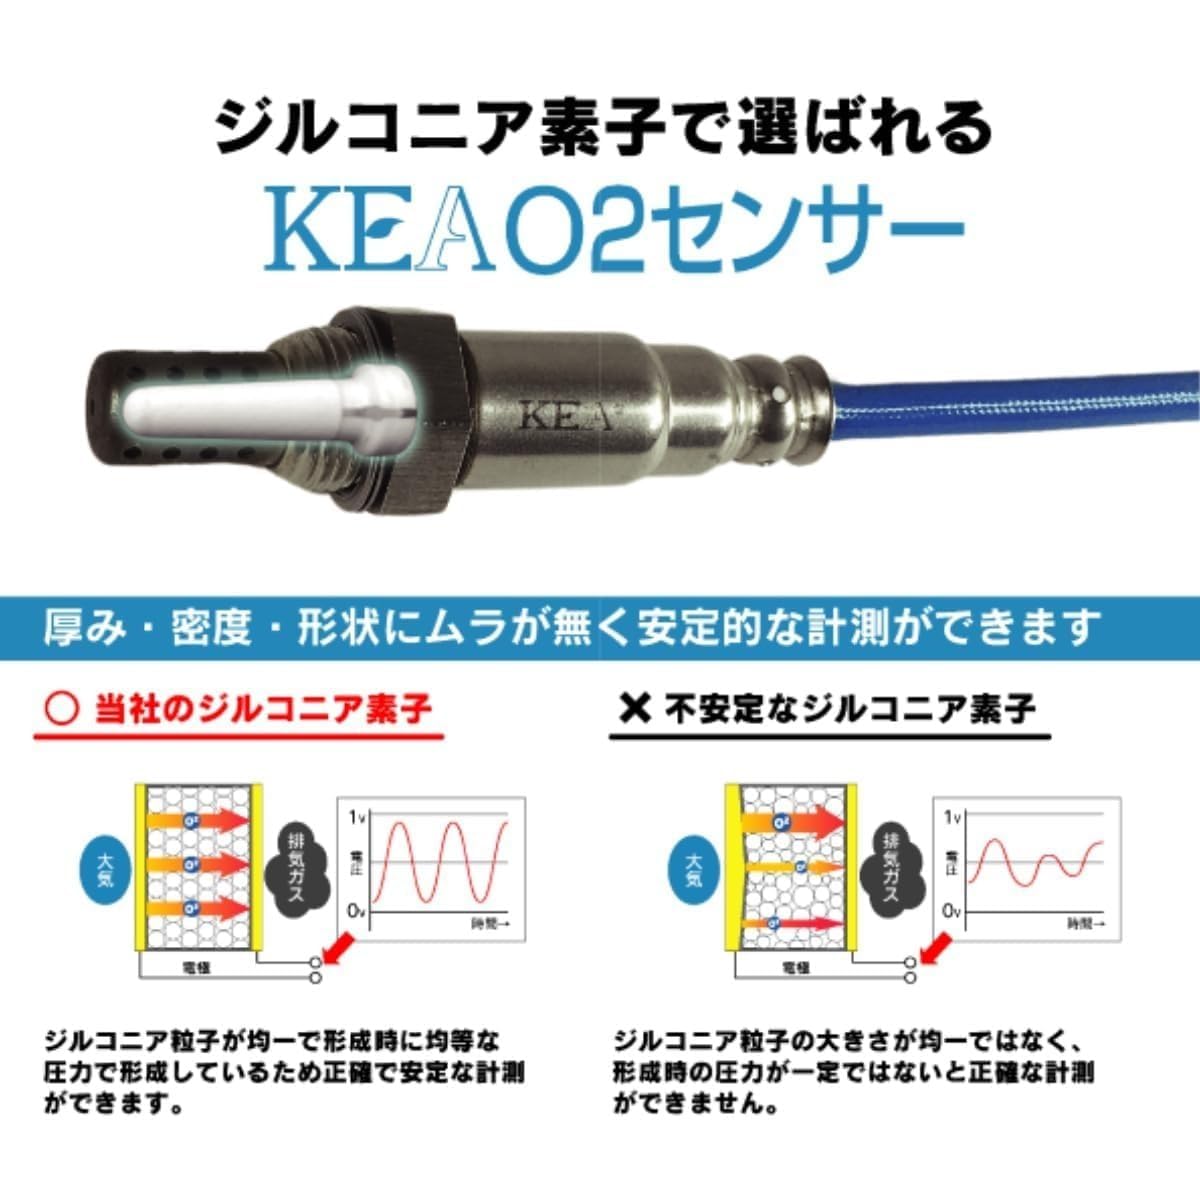
Image 6.3: Durability and Performance Tests. This image displays various rigorous tests conducted on KEA O2 sensors, including durability, dust, salt spray, vibration, pendulum, and wire bend tests, to ensure high quality and reliability.
7. Warranty Information
KEA provides a warranty for the A/F Sensor AZ0-202 under the following conditions:
- Warranty Period: 180 days from the date of product shipment.
- Coverage: The warranty covers initial defects and malfunctions that occur when the product is used with proper installation methods within the warranty period.
- Remedy: In case of a covered defect or malfunction, the product will be exchanged for a substitute.
- Exclusions: Costs and damages incurred during the replacement process (e.g., labor costs for removal/installation) are not covered by this warranty.
- Claim Process: To process a warranty claim, you must provide error codes and their content detected by a diagnostic machine. If the error code is unclear or cannot be identified, KEA may not be able to provide support.
- Return of Defective Product: The removed defective product should be returned to KEA using a cash-on-delivery shipping label provided with the replacement product.
- Important Note on Compatibility: It is mandatory to confirm compatibility with KEA prior to placing an order. Returns due to incompatibility without prior confirmation will be treated as customer convenience returns, and the customer will be responsible for the return shipping costs.
For detailed warranty information, please refer to the seller's profile or contact KEA directly.
8. Support and Contact Information
For any questions regarding product compatibility, installation, troubleshooting, or warranty claims, please contact KEA customer support.
Contact KEA:
- It is highly recommended to confirm compatibility with KEA before purchase to avoid issues.
- Refer to the seller information on the product page for direct contact methods.
Thank you for choosing KEA products.