KOTLIE WH-LS-738S
KOTLIE Garment Steamer WH-LS-738S User Manual
Model: WH-LS-738S | Brand: KOTLIE
Important Safety Instructions
Please read all instructions carefully before using this appliance. Failure to follow these instructions may result in electric shock, fire, or serious injury.
- Always unplug the steamer from the electrical outlet immediately after using and before cleaning.
- Do not operate any appliance with a damaged cord or plug, or after the appliance malfunctions or has been dropped or damaged in any manner.
- To protect against a risk of electric shock, do not immerse the appliance in water or other liquids.
- Do not direct steam at people, animals, or electrical appliances.
- Use only distilled water to prevent mineral buildup and prolong the life of the appliance.
- Keep the appliance away from children.
- The ironing plate and steam emitted are hot. Exercise caution to avoid burns.
Product Overview
The KOTLIE Garment Steamer WH-LS-738S is a versatile 2-in-1 appliance designed for both steaming and ironing clothes. It features a ceramic heating plate and a detachable water tank for convenience.

Image: Overview of the KOTLIE Garment Steamer, showing the main unit with the water tank and the detachable ironing head.
Key Components:
- Main Unit: Contains the water tank and heating element.
- Ironing Head: Detachable head with ceramic heating plate and steam vents.
- Water Tank: Transparent, removable tank for water.
- Steam Hose: Connects the main unit to the ironing head.
- Control Dial: For adjusting steam levels and power.
- Steam Trigger/Lock: On the ironing head for steam release.
Setup Instructions
- Unpack the Steamer: Carefully remove all components from the packaging. Ensure all parts are present: main unit, ironing head, steam hose, and any accessories (e.g., heat-protective mitt).
- Assemble the Unit:
- Place the main unit on a stable, flat surface.
- Connect the steam hose to the designated port on the main unit. Ensure it is securely fastened.
- Attach the ironing head to the other end of the steam hose.
- Fill the Water Tank:
- Remove the water tank from the main unit.
- Open the water tank cap and fill with distilled water. Do not exceed the maximum fill line.
- Close the cap securely and reinsert the water tank into the main unit until it clicks into place.
- Power Connection: Plug the power cord into a grounded electrical outlet (260 Volts, 1600 Watts).

Image: Illustrates the assembly of the steamer, showing the main unit, hose, and ironing head connected.
Operating Instructions
1. Pre-heating:
- Turn the control dial to the desired steam setting (e.g., low, medium, high).
- Allow the steamer to heat up for approximately 30-45 seconds until the indicator light turns solid.
2. Steaming Garments:
- Hang the garment on a hanger or use the integrated hanger support if available.
- Hold the ironing head a few inches away from the fabric.
- Press the steam trigger on the ironing head to release steam. For continuous steam, engage the steam lock.
- Move the ironing head slowly over the fabric, from top to bottom, allowing the steam to relax the fibers and remove wrinkles.
- For stubborn wrinkles, gently press the ceramic plate against the fabric while steaming.
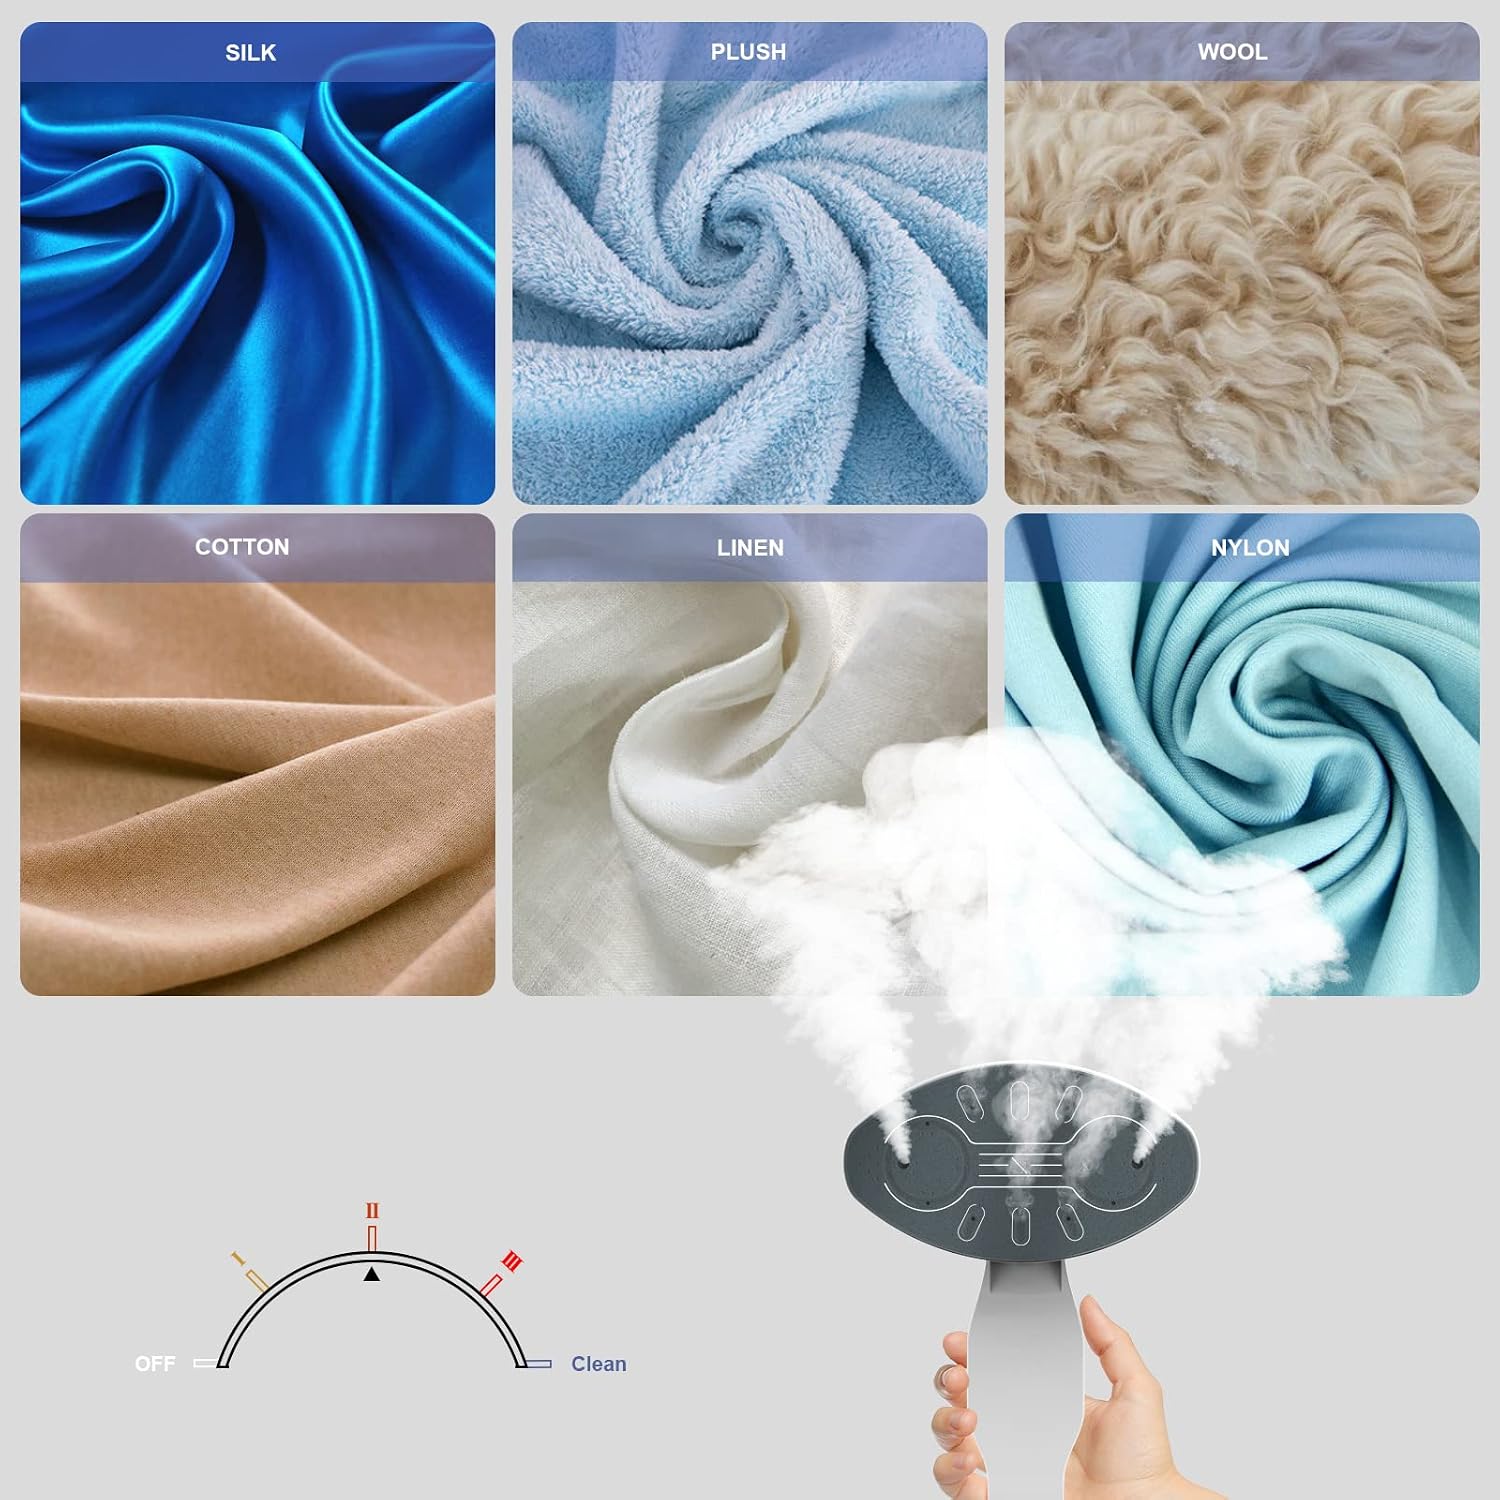
Image: Demonstrates the steamer being used on a hanging garment, showing steam being applied to remove wrinkles.
3. Ironing Function:
- For traditional ironing, place the garment on an ironing board.
- Adjust the steam setting as needed.
- Press the ceramic plate directly onto the fabric and glide it smoothly to iron out wrinkles.

Image: Shows the steamer being used in a horizontal position on an ironing board, functioning as a traditional iron.
4. Fabric Settings:
The steamer is suitable for various fabrics. Adjust the steam level according to the fabric type:
| Fabric Type | Recommended Steam Level |
|---|---|
| Silk, Synthetics | Low |
| Wool, Cotton | Medium |
| Linen, Denim | High |

Image: Shows the control dial with different fabric settings (Silk, Plush, Wool, Cotton, Linen, Nylon) and corresponding steam levels.
Official Product Video:
Video: Demonstrates the KOTLIE Clothes Steamer in use, highlighting its features and effectiveness on various garments.
Maintenance and Cleaning
- Empty Water Tank: After each use, unplug the steamer and allow it to cool completely. Remove the water tank and empty any remaining water.
- Descaling: To prevent mineral buildup, periodically descale the steamer. Fill the water tank with a mixture of 50% distilled water and 50% white vinegar. Run the steamer until the tank is empty. Repeat with pure distilled water to rinse.
- Clean Exterior: Wipe the exterior of the steamer and ironing head with a soft, damp cloth. Do not use abrasive cleaners.
- Storage: Store the steamer in a cool, dry place. Ensure the water tank is empty before storage.

Image: Shows the KOTLIE Garment Steamer with its water tank detached, illustrating ease of cleaning and refilling.
Troubleshooting
| Problem | Possible Cause | Solution |
|---|---|---|
| No steam or weak steam | Water tank empty; mineral buildup; steamer not heated sufficiently. | Refill water tank; descale the steamer; allow more time for pre-heating. |
| Water leaking from ironing head | Overfilled water tank; steamer not hot enough; mineral buildup. | Do not overfill; allow full pre-heating; descale the steamer. |
| Steamer not turning on | Not plugged in; power outlet issue; damaged cord/plug. | Check power connection; try a different outlet; contact customer support if cord/plug is damaged. |
Specifications
- Model Number: WH-LS-738S
- Brand: KOTLIE
- Power: 1600 Watts
- Voltage: 260 Volts
- Product Dimensions: 14.57 x 7.87 x 10.63 inches
- Item Weight: 6.69 pounds
- Color: Blue
- Style: Handheld, Portable
Warranty and Support
For warranty information or technical support, please refer to the contact details provided with your product packaging or visit the official KOTLIE website. Keep your purchase receipt as proof of purchase.
KOTLIE Official Store: Visit KOTLIE Store on Amazon
Ask a question about this manual
Ask about setup, troubleshooting, compatibility, parts, safety, or missing instructions. Manuals+ will review the question and use this page’s manual context to help answer it.