P PBAUTOS PB-3CFM-01T
P PBAUTOS 3CFM Vacuum Pump and Manifold Gauge Set User Manual
Model: PB-3CFM-01T
Introduction
This manual provides detailed instructions for the safe and efficient operation, maintenance, and troubleshooting of your P PBAUTOS 3CFM 1/4HP Single Stage Vacuum Pump and 3-Way Manifold Gauge Set. This set is designed for HVAC refrigeration recharging and maintenance, compatible with R12, R22, R134A, and R502 refrigerants.
Please read this manual thoroughly before using the product to ensure proper function and to prevent damage or injury.

Figure 1: Complete P PBAUTOS 3CFM Vacuum Pump and Manifold Gauge Set, including the vacuum pump, manifold gauge, hoses, and accessories in a portable case.
Product Components
The P PBAUTOS 3CFM Vacuum Pump and Manifold Gauge Set includes the following main components:
- 3CFM 1/4HP Single Stage Vacuum Pump: Designed for high efficiency and low noise, featuring an aluminum housing and a thermally protected motor for long-term operation.
- 3-Way Manifold Gauge: Multi-functional gauge for accurate pressure measurement and system repair, with an oversized sight glass and high reading accuracy. Compatible with R12, R22, R134A, R502 refrigerants.
- Three-Color Hoses: Yellow, blue, and red hoses with brass fittings, designed to identify high pressure, low pressure, and filling lines. Working pressure of 600 PSI-3000 PSI.
- Portable Case: A durable case for organizing and carrying the manifold gauge and accessories.
- Additional Accessories: Quick couplers, ACME adapter, Can Tap valve, and other necessary fittings.
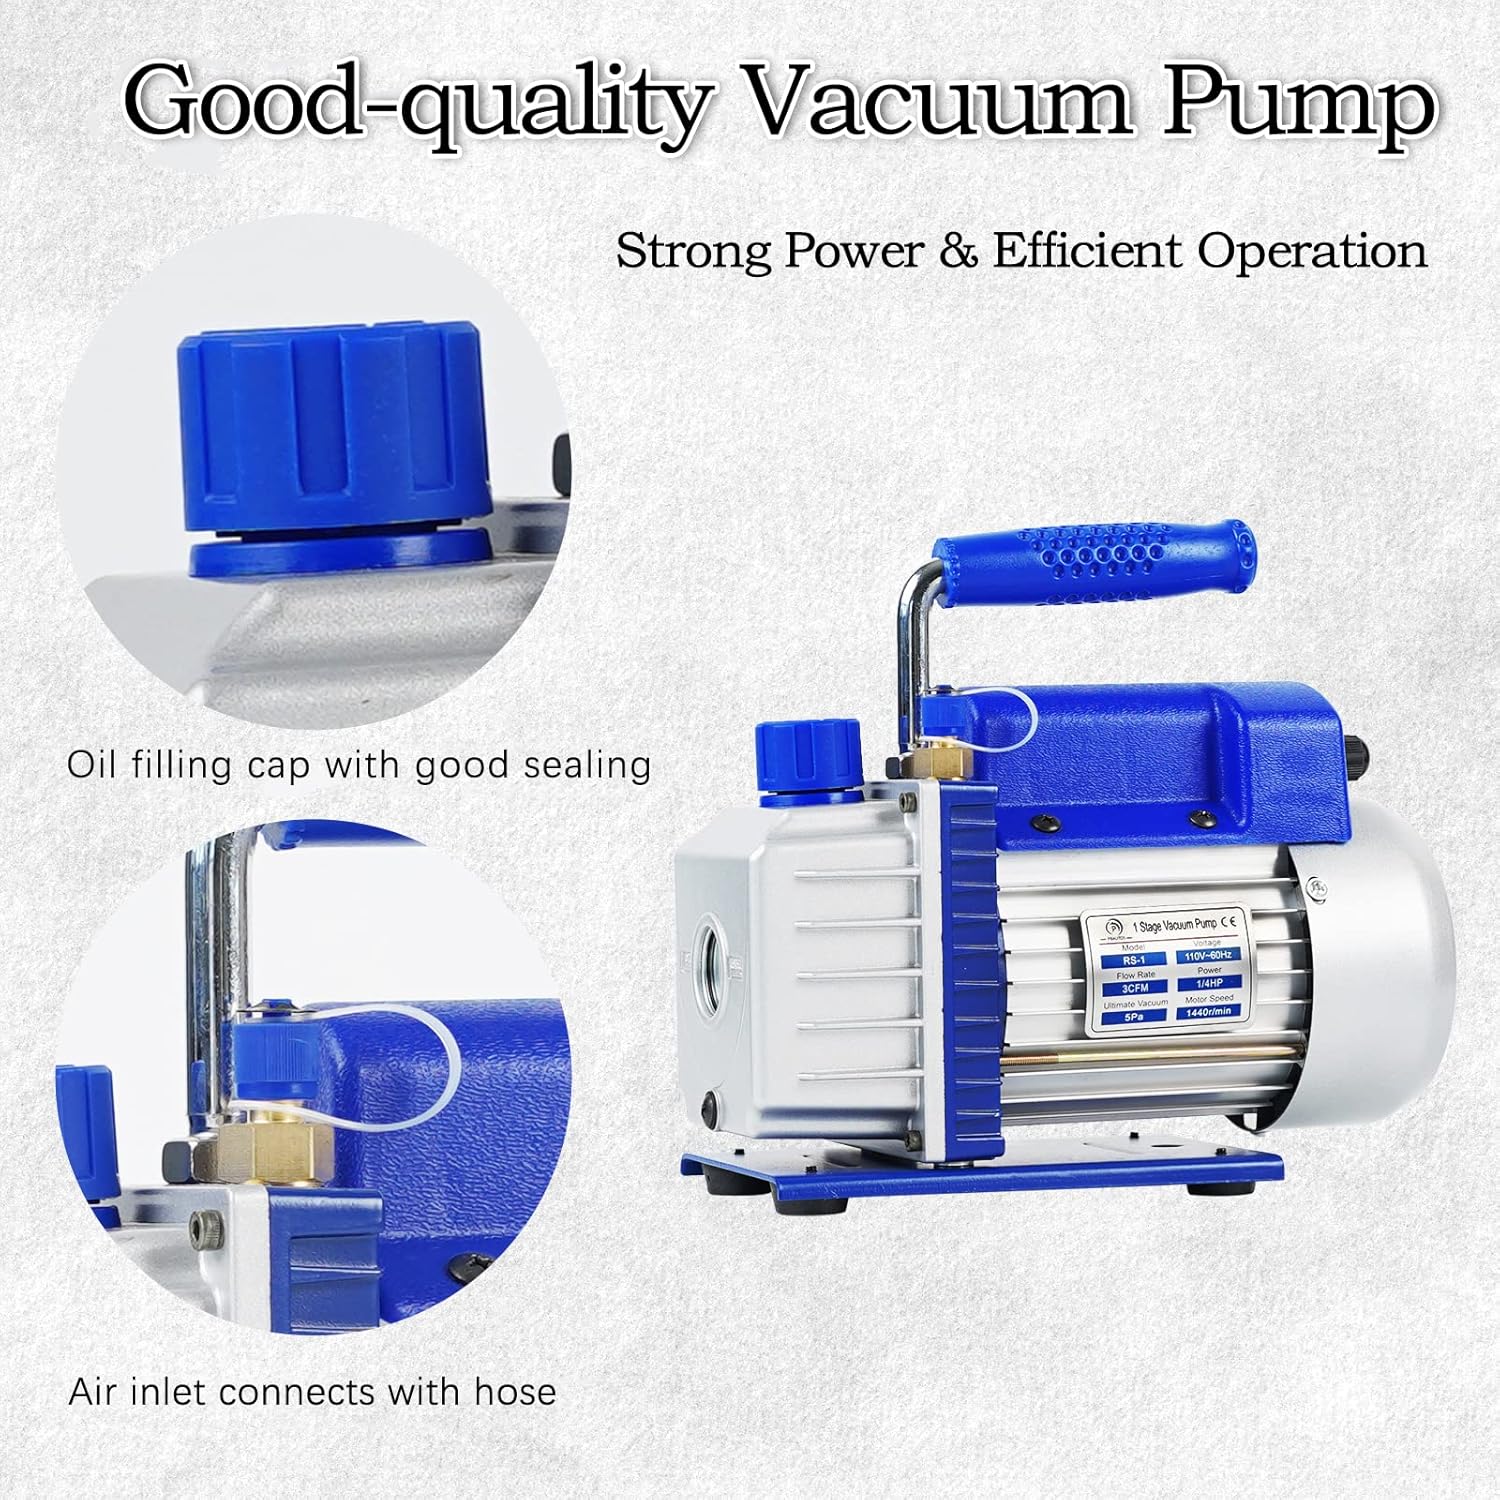
Figure 2: Detailed view of the vacuum pump, highlighting the oil filling cap with good sealing and the air inlet connection point.

Figure 3: The manifold gauge set and hoses neatly stored within its portable carrying case.

Figure 4: Diagram illustrating the connections for the low pressure (blue) and high pressure (red) lines, and the charging hose (yellow) on the manifold gauge.

Figure 5: Key components of the diagnostic manifold gauge set, including the 3-valve gauge, 3-color hoses, quick couplers, ACME adapter, and Can Tap valve.
Setup Instructions
Before operating the vacuum pump and manifold gauge set, ensure all components are present and in good condition. No oil is included with the pump, so it must be added before first use.
1. Adding Vacuum Pump Oil
- Locate the oil fill port on the vacuum pump. This is typically a cap on the top of the pump.
- Remove the oil fill cap.
- Carefully pour appropriate vacuum pump oil (not included) into the fill port until the oil level reaches the center of the sight glass. Do not overfill.
- Replace the oil fill cap securely.

Figure 6: Close-up of the large oil fill port, designed for easy oil addition.

Figure 7: The clear sight glass on the vacuum pump, used to monitor the oil level and condition.
2. Connecting Hoses to Manifold Gauge
- Connect the blue hose to the low-pressure port on the manifold gauge.
- Connect the red hose to the high-pressure port on the manifold gauge.
- Connect the yellow hose to the service port (center port) on the manifold gauge. This hose is typically used for vacuuming or charging.

Figure 8: The three-color hoses (red, yellow, blue) with brass fittings, ready for connection to the manifold gauge and HVAC system.

Figure 9: Close-up of the durable brass hose connectors, ensuring secure and leak-free connections.
Operating Instructions
This section outlines the general procedure for using the vacuum pump and manifold gauge set for HVAC system evacuation.
System Evacuation Procedure
- Ensure the vacuum pump has sufficient oil and is placed on a stable, level surface.
- Connect the blue (low pressure) hose to the low-side service port of the HVAC system.
- Connect the red (high pressure) hose to the high-side service port of the HVAC system.
- Connect the yellow (service) hose from the manifold gauge to the vacuum pump's inlet port.
- Ensure both the high-pressure and low-pressure valves on the manifold gauge are fully open.
- Turn on the vacuum pump. The manifold gauges should begin to show a decrease in pressure, indicating the system is being evacuated.
- Allow the pump to run until the desired vacuum level is achieved (typically -29.9 inHg or below, depending on system requirements). Monitor the gauges for stability.
- Once the vacuum is achieved, close both the high-pressure and low-pressure valves on the manifold gauge.
- Turn off the vacuum pump.
- Observe the manifold gauges for a period (e.g., 15-30 minutes) to ensure the vacuum holds. A stable reading indicates a leak-free system. If the pressure rises, there may be a leak that needs to be addressed.
- After confirming the vacuum holds, the system is ready for refrigerant charging.
Note: Always refer to the specific HVAC system's service manual for exact vacuum levels and charging procedures.
Maintenance
Regular maintenance ensures the longevity and optimal performance of your vacuum pump and manifold gauge set.
1. Vacuum Pump Oil Change
Vacuum pump oil should be changed regularly, especially if it appears cloudy, discolored, or contaminated. Dirty oil reduces pump efficiency and can damage internal components.
- Ensure the vacuum pump is cool and unplugged from power.
- Place a suitable container under the oil drain plug.
- Remove the oil drain plug and the oil fill cap to allow the oil to drain completely.
- Replace the oil drain plug securely.
- Refill the pump with new, clean vacuum pump oil as described in the "Setup Instructions" section.
- Dispose of used oil responsibly according to local regulations.
2. Cleaning
- Wipe down the exterior of the vacuum pump and manifold gauge with a clean, damp cloth.
- Keep hoses clean and free of debris. Store them properly to prevent kinking or damage.
- Periodically check all connections for tightness and wear.
3. Storage
When not in use, store the vacuum pump and manifold gauge set in their portable case in a clean, dry environment, away from extreme temperatures and direct sunlight.
Troubleshooting
This section provides solutions to common issues you might encounter.
| Problem | Possible Cause | Solution |
|---|---|---|
| Vacuum pump not starting or making unusual noise. |
|
|
| Cannot achieve desired vacuum level. |
|
|
| Manifold gauges giving inaccurate readings. |
|
|
Specifications
| Feature | Detail |
|---|---|
| Brand | P PBAUTOS |
| Model Number | PB-3CFM-01T |
| Vacuum Pump Flow Rate | 3 CFM |
| Vacuum Pump Horsepower | 1/4 HP |
| Vacuum Pump Stage | Single Stage |
| Manifold Gauge Compatibility | R12, R22, R134A, R502 Refrigerants |
| Hose Working Pressure | 600 PSI - 3000 PSI |
| Material | Brass (for manifold and fittings) |
| Item Dimensions (L x W x H) | 13.98 x 10.83 x 11.42 inches |
| Item Weight | 17.49 pounds (7.95 Kilograms) |
| Country of Origin | China |
Warranty and Support
P PBAUTOS is committed to providing quality products. For warranty information, technical support, or service inquiries, please refer to the contact information provided at the point of purchase or visit the official P PBAUTOS brand store.
P PBAUTOS Brand Store: Visit Store
For common issues, please refer to the Troubleshooting section of this manual.
Ask a question about this manual
Ask about setup, troubleshooting, compatibility, parts, safety, or missing instructions. Manuals+ will review the question and use this page’s manual context to help answer it.