1. Product Overview
The Taidacent Fingerprint Recognition Module is designed for secure access control applications, such as car door locks, industrial control, and general access systems. This module features a robust fingerprint sensor and a control board with relay output, supporting MODBUS communication for integration with various systems.
The module is available in different configurations, including options with a control board and a high-grade waterproof fingerprint sensor.

Image 1: Taidacent Fingerprint Recognition Module with control board and fingerprint sensor.
2. Key Features
- Wide Voltage Input: The control board supports DC 7V-30V, ensuring compatibility with various power sources.
- Compact Design: Bare control board dimensions are 56mm * 30mm * 19mm. The matching control panel box measures 60mm * 40mm * 25mm.
- Flexible Fingerprint Management: Easily add, delete, or restore all user fingerprints. Supports deletion of specific user fingerprints.
- Multiple Relay Modes: Choose between self-locking, jog, and ignition modes for relay control. Jog mode allows adjustable relay activation time.
- Non-Volatile Memory: Recorded fingerprint data, jog time settings, and relay modes are retained even after power loss.
- Waterproof Fingerprint Sensor: Metal head fingerprint sensor, fixed by a nut, with 25mm installation hole diameter and 19mm thread length.
- Self-Learning Capability: The fingerprint sensor learns and adapts to user fingerprint characteristics over time, improving recognition accuracy and sensitivity.
- High-Grade Sensor Option: High-grade waterproof metal nut fingerprint sensors feature a 300-capacity fingerprint head and a Swedish FPC biocapacitive 192*192 sensor for enhanced recognition and fake fingerprint rejection.
- MODBUS RTU Communication: Supports 485 MODBUS communication for integration with PLCs or industrial control touch screen devices (requires an additional TTL to 485 communication module).
3. Components and Connections
Familiarize yourself with the main components and connection points of the control board.

Image 2: Detailed view of the control board showing power supply, relay output, fingerprint reader connection, setting button, and RS485 port.
- Power Supply: Input DC12V/24V (compatible with DC7V-30V). Connect positive (+) and negative (-) terminals.
- Finger Reader Port: Connect the fingerprint sensor cable here.
- Setting Button: Used for configuration and factory reset.
- Exit Button Pin: Connection point for an external exit button (if desired).
- RS485 Port / Extra MODBUS: For MODBUS RTU communication. Requires an external TTL to 485 communication module for PLC/industrial control integration.
- Relay Output: NO (Normally Open), COM (Common), NC (Normally Closed) terminals for controlling external devices.
- Indicator Lights: Blue and Red lights indicate status.

Image 3: Dimensions of the metal fingerprint sensor, showing M25mm thread and 19mm length.
4. Setup and Installation
4.1 Power Connection
Connect the power supply to the control board's input terminals. Ensure correct polarity: + (positive) and - (negative). The board supports DC 7V-30V.
4.2 Fingerprint Sensor Installation
The metal fingerprint sensor is designed for panel mounting. Drill a 25mm diameter hole for installation. Secure the sensor using the provided nut. The thread length is 19mm.
4.3 Relay Wiring Diagrams
The relay output can control various devices. Refer to the following diagrams for common wiring configurations:
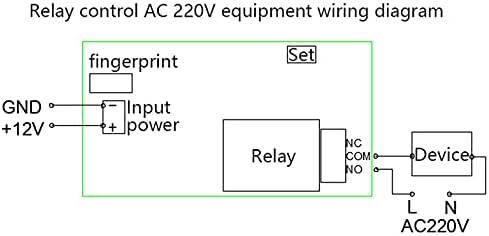
Image 4: Wiring diagram for controlling AC 220V equipment using the relay. Connect the device to the COM and NO (Normally Open) terminals for typical operation.

Image 5: Wiring diagram for controlling DC 12V equipment using the relay. Connect the device to the COM and NO (Normally Open) terminals.
Note: The default shipping accessories do not include a one-key unlocking terminal wire. If your host computer is a PLC or industrial control touch screen device requiring Modbus RTU communication, an additional TTL to 485 communication module is necessary.
5. Basic Operation
5.1 Factory Reset
- Ensure the board is powered on.
- Press and hold the "setting key" for more than 10 seconds.
- The red indicator light on the circuit board will illuminate, and the fingerprint module will light up in white.
- Release the "setting key".
- If the green light on the fingerprint module stays on for 1 second, the deletion of all fingerprints is successful. If it fails, the light will not stay on.
After a factory reset, all stored fingerprints are cleared, and the system enters demonstration mode, allowing any fingerprint to activate the relay.
5.2 Adding Fingerprints (Enrollment)
(Detailed steps for adding fingerprints are not provided in the source text. This section will be a placeholder for typical enrollment instructions.)
- Press the "setting key" briefly (or follow specific enrollment mode instructions if available).
- Place the finger to be enrolled on the sensor.
- Lift and place the finger multiple times as prompted by indicator lights or sounds until enrollment is complete.
- Repeat for additional fingers or users.
5.3 Deleting Fingerprints
The system allows deleting all ordinary user fingerprints or specific ones. Refer to the factory reset procedure for deleting all fingerprints. Specific deletion procedures for individual fingerprints are typically detailed in the full product manual.
5.4 Relay Control Modes
The module supports three relay control modes:
- Self-locking Mode: A valid fingerprint toggles the relay state (on/off).
- Jog Mode: A valid fingerprint activates the relay for a set duration, then it deactivates automatically. The duration is adjustable.
- Ignition Mode: (Specific details not provided in source, typically means relay stays active as long as fingerprint is present or until another action).
The method for selecting and adjusting these modes is typically done via the setting key or through MODBUS commands.
6. Advanced Operation (MODBUS Communication)
For integration with industrial control systems like PLCs or touch screens, the module supports MODBUS RTU communication via its RS485 port.
Important:
- An external TTL to 485 communication module is required to enable 485 communication.
- Refer to the MODBUS communication protocol documentation (not provided here) for specific commands and register addresses.
7. Maintenance
- Cleaning: Keep the fingerprint sensor surface clean and free from dirt or moisture. Use a soft, dry cloth for cleaning. Avoid abrasive materials or harsh chemicals.
- Environmental Conditions: Ensure the module operates within its specified temperature and humidity ranges. The metal head fingerprint sensor is waterproof, but the control board may require protection from direct water exposure.
- Firmware Updates: Check the manufacturer's website for any available firmware updates that may improve performance or add features.
8. Troubleshooting
| Problem | Possible Cause | Solution |
|---|---|---|
| Module not powering on | Incorrect power connection; Power supply voltage out of range; Faulty power supply. | Verify power supply polarity (+/-). Ensure voltage is within DC 7V-30V. Test power supply. |
| Fingerprint not recognized | Finger not properly placed; Fingerprint not enrolled; Sensor dirty; Dry/wet finger. | Ensure full finger contact. Enroll fingerprint if not already. Clean sensor. Moisten/dry finger as needed. |
| Relay not activating | Incorrect wiring; Relay mode not set correctly; Device fault. | Check relay wiring against diagrams. Verify relay mode (self-locking, jog). Test the connected device independently. |
| MODBUS communication failure | Missing TTL to 485 module; Incorrect wiring; Incorrect communication parameters. | Install TTL to 485 module. Verify RS485 wiring. Check baud rate, parity, stop bits. |
9. Specifications
| Feature | Specification |
|---|---|
| Model | B09CTN7RSS |
| Input Voltage | DC 7V - 30V |
| Control Board Dimensions (L*W*H) | 56mm * 30mm * 19mm |
| Control Panel Box Dimensions (L*W*H) | 60mm * 40mm * 25mm |
| Fingerprint Sensor Type (Standard) | Metal head, 50-capacity, 160*160 resolution |
| Fingerprint Sensor Type (High-Grade) | Swedish FPC biocapacitive, 300-capacity, 192*192 resolution |
| Fingerprint Sensor Installation Hole Diameter | 25mm |
| Fingerprint Sensor Thread Length | 19mm |
| Relay Output | NO, COM, NC |
| Communication Interface | RS485 (MODBUS RTU, requires external TTL to 485 module) |
| Memory Retention | Non-volatile (retains data after power off) |
10. Warranty and Support
For warranty information and technical support, please contact Taidacent directly or refer to their official website. Keep your purchase receipt for warranty claims.
Manufacturer: Taida
Brand: Taidacent
UPC: 739319148096
ASIN: B09CTN7RSS
For further assistance, visit the Taidacent Store on Amazon.