1. Introduction
The QUECOO T12-956 is an advanced OLED digital soldering station designed for precision soldering tasks. It features rapid heating, precise temperature control, and various intelligent functions to enhance efficiency and user experience. This manual provides essential information for the safe and effective operation and maintenance of your soldering station.
2. Safety Instructions
- Always wear appropriate personal protective equipment, including safety glasses, when operating the soldering station.
- Ensure the work area is well-ventilated to avoid inhaling solder fumes.
- The soldering iron tip reaches high temperatures (up to 480°C). Avoid direct contact with skin or flammable materials.
- Place the soldering iron in its designated stand when not in use.
- Disconnect the power supply before performing any maintenance or changing tips.
- Do not use the soldering station near water or in damp environments.
- Keep out of reach of children.
3. Package Contents
Verify that all items are present in your package:
- QUECOO T12-956 OLED Digital Soldering Station
- M8 Soldering Iron Handle
- T12-K Soldering Iron Tip
- US Power Plug (AC power cord)
4. Product Overview
The T12-956 soldering station features a compact design with an OLED display for clear information. It includes a rotary encoder for easy temperature adjustment and menu navigation.

Figure 4.1: QUECOO T12-956 Soldering Station with M8 handle and T12-K tip connected.
The rear panel provides connections for both AC and DC power inputs, offering flexibility in power sources.

Figure 4.2: Rear panel with AC and DC power input interfaces.
Internally, the station is designed for stable and sufficient power delivery, crucial for T12 soldering tips.
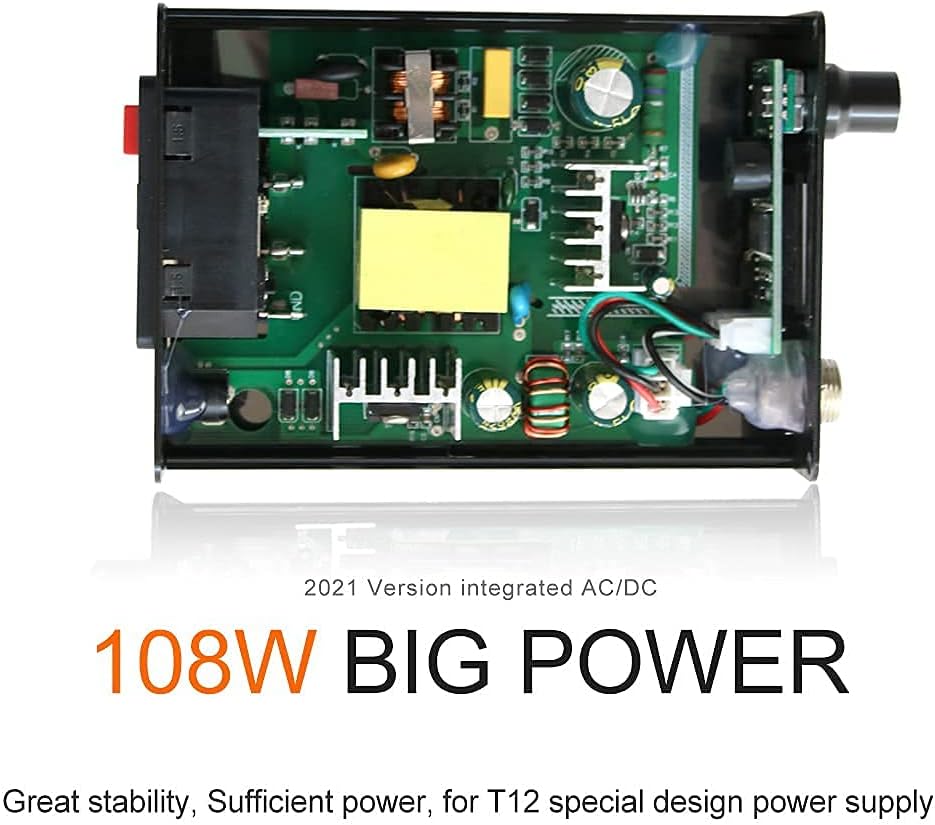
Figure 4.3: Internal view highlighting the 108W integrated AC/DC power supply.
5. Setup
5.1 Connecting the Soldering Iron Handle and Tip
- Insert the T12-K soldering iron tip into the M8 handle. Ensure it is pushed firmly into the innermost part of the handle.
- Rotate the tip slightly to ensure the tab on the tip makes good contact with the inner tab of the handle. This ensures proper electrical connection and temperature sensing.
- Connect the M8 handle cable to the corresponding port on the front of the T12-956 soldering station.
5.2 Power Connection
The station supports both AC and DC power inputs.
- AC Power: Connect the provided US power plug to the AC110-240V power interface on the rear of the station.
- DC Power: Alternatively, connect a 24V 4A DC power supply to the DC IN 24V4A port on the rear.
After connecting the power, switch on the main power switch located on the rear panel.
Video 5.1: Demonstration of the T12-956 station's functions, including setup and basic operation. This video illustrates how to connect the soldering iron handle and tip, power on the unit, and navigate some menu options.
6. Operation
6.1 Power On and Initial Display
Once powered on, the OLED display will show the current set temperature, actual tip temperature, and other status indicators. If an "ERROR" message appears, refer to the Troubleshooting section.
6.2 Temperature Adjustment
Rotate the encoder knob on the front panel to adjust the desired soldering temperature. The temperature range is 200°C to 480°C. The station heats up quickly, reaching 300°C in approximately 8 seconds.

Figure 6.1: The T12-956 soldering station can melt tin in under 8 seconds under 110-240V operation.
7. Settings and Functions
The T12-956 offers several customizable settings accessible via the menu system. Press the encoder knob to enter the menu.
7.1 Auto-Sleep Function
This feature automatically reduces the tip temperature to a safe level (e.g., 150°C) after a period of inactivity. This extends tip life and enhances safety. The default sleep time is 1 minute, but it can be adjusted from 0-99 minutes or turned off.

Figure 7.1: Navigating to and adjusting the Auto Sleep setting.
7.2 Auto Power Off Function
If the station remains in auto-sleep mode for a set duration, it will automatically power off to conserve energy and prevent accidental damage. The default power-off time is 1 minute, adjustable from 0-99 minutes or turned off.

Figure 7.2: Navigating to and adjusting the Auto Power Off setting.
7.3 Boost Function
The Boost function allows for a temporary increase in temperature for soldering larger joints or components requiring more heat. Press the encoder knob briefly to activate. The boost duration (0-99 minutes) and temperature increase (10-80°C) can be configured in the menu.

Figure 7.3: Overview of intelligent functions including Boost, Auto Sleep, and Vibration Wake Up.
7.4 Other Menu Options
Additional settings available in the menu include:
- Calibration: For fine-tuning temperature accuracy.
- Battery Guard: To protect batteries when using DC power.
- Firmware: Displays the current firmware version.
- Factory Reset: Restores all settings to their default values.
8. Maintenance
8.1 Soldering Tip Care
- Always tin the soldering tip before and after use to prevent oxidation.
- Clean the tip regularly with a damp sponge or brass wool.
- Avoid excessive pressure when soldering, as this can damage the tip.
- To protect the working life of the soldering iron tip, it is recommended that the temperature does not exceed 380°C for prolonged periods.
8.2 General Cleaning
Wipe the soldering station and handle with a soft, dry cloth. Do not use abrasive cleaners or solvents.
9. Troubleshooting
| Problem | Possible Cause | Solution |
|---|---|---|
| "ERROR" displayed on screen or light always on. | Handle or tip not installed properly. | Use pliers to push the tip into the innermost part of the handle. Rotate the tip to ensure good contact between the tip's tab and the handle's inner tab. If the issue persists, contact customer support. |
| Temperature readout jumps erratically. | Poor connection between tip and handle, or faulty mercury switch in handle. | Ensure tip is fully seated and making good contact. If problem continues, contact customer support. |
| Soldering iron not heating up. | Power not connected, power switch off, or faulty component. | Check power connections and ensure the power switch is on. Verify the tip is correctly installed. |

Figure 9.1: Example of an "ERROR" message on the OLED display.
10. Specifications
| Model Number | T12-956 |
| Brand | QUECOO |
| Output Temperature Range | 200°C - 480°C |
| Temperature Stability | 300°C |
| Power Source | AC/DC (110V AC, 24V DC) |
| Wattage | 72 Watts |
| Display Type | OLED |
| Included Components | Soldering Station, M8 Handle, T12-K Tip |
| Material | Aluminum |
| Product Dimensions | 4.72 x 3.46 x 1.5 inches |
| Item Weight | 1.21 pounds |
| Cord Length | 1.1 Meters |
11. Warranty and Support
For warranty information or technical support, please contact QUECOO customer service through the retailer where the product was purchased. Keep your purchase receipt as proof of purchase.