1. Introduction
This manual provides detailed instructions for the installation, operation, and maintenance of your MOTOR METER RACING W PRO 85mm 2-in-1 GPS Speedometer Tachometer. This instrument combines a GPS speedometer and a tachometer into a single 85mm (3-3/8") gauge, suitable for various automotive and marine applications. It features a digital odometer, trip meter, and integrated indicators for turn signals and high beam.
2. Product Features
- Size: 85mm (3-3/8") diameter.
- Compatibility: Tachometer functions with both gasoline and diesel engines.
- Power Requirements: Designed for 12V / 24V negative ground systems.
- Durability: IP67 waterproof, rustproof, anti-fog, and UV-resistant construction.
- Construction: Features a convex clear lens, 316 stainless steel bezel, and ABS plastic housing.
- Display: Black gauge faceplate with a red needle and white LED illumination.
- Speedometer: Displays speed from 0 to 120 MPH, with integrated turn signal and high beam indicators.
- Tachometer: Displays engine RPM from 0 to 8000 RPM.
- Odometer: Records total mileage up to 99999.9 miles with power-off memory function.
- Trip Meter: Records single trip mileage up to 999.9 miles and resets to zero when power is turned off.

Figure 1: Front view of the gauge highlighting key features like turn signals, high beam, and mileage display.

Figure 2: Side view illustrating the construction materials: ABS Housing, Stainless Steel Bezel, and Convex Lens.
3. Package Contents
Verify that all items are present in the package:
- 1x 2-in-1 Multi-Function Gauge
- 1x GPS Sensor & Harness
- 1x Power Harness
- 1x Gauge Visor
- 1x Installation Instructions (this manual)

Figure 3: The included GPS Sensor with its 9-foot signal wire.
4. Installation
4.1 Mounting the Gauge
The gauge requires an 85mm (3-3/8") diameter opening for flush mounting. Ensure sufficient depth (approximately 96.5mm or 3.80") is available behind the mounting surface for the gauge body and wiring connections.

Figure 4: Gauge dimensions for proper installation.
4.2 Wiring Connections
Connect the power harness to your vehicle's 12V or 24V negative ground system. Refer to the wiring diagram below for specific connections. Ensure all connections are secure and properly insulated.
- Red Wire: +12V / +24V (Ignition Switched Power)
- Black Wire: Ground (-)
- Orange Wire: Backlight +12V / +24V (Connect to vehicle's illumination circuit)
- Blue Wire: Tachometer Signal Input (Connect to engine's RPM signal)
- Green Wire: Left Turn Signal Input
- Yellow Wire: Right Turn Signal Input
- White Wire: High Beam Input
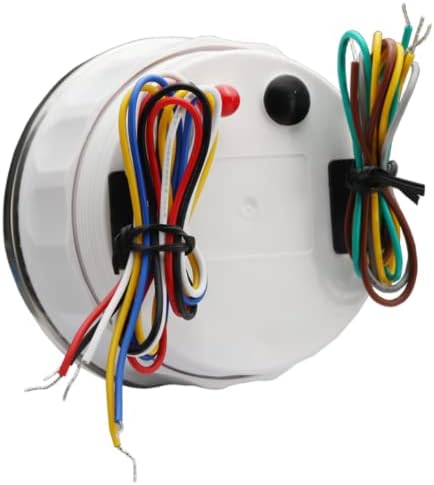
Figure 5: Rear view of the gauge with wiring harness.
4.3 GPS Sensor Placement
Mount the GPS sensor in a location with a clear, unobstructed view of the sky. Avoid placing it under metal surfaces or near other electronic devices that may interfere with the GPS signal. The sensor comes with a 9-foot signal wire for flexible placement.
5. Operating Instructions
5.1 Power On/Off
The gauge powers on automatically when connected to an ignition-switched power source. The white LED illumination will activate when the orange backlight wire receives power.

Figure 6: Gauge display in Power Off vs. Power On states.
5.2 Speedometer and Tachometer
Once powered on and the GPS sensor acquires a signal, the speedometer will display your current speed. The tachometer will display engine RPM when the blue wire receives an RPM signal from your engine.
5.3 Odometer and Trip Meter
The digital display shows both total mileage (odometer) and trip mileage (trip meter). The odometer retains its value even when power is off. The trip meter resets to zero each time the gauge is powered off.
5.4 Turn Signal and High Beam Indicators
The integrated green arrows on the gauge face will illuminate to indicate left or right turn signals. The blue light will illuminate when the high beam is active.
6. Maintenance
The MOTOR METER RACING W PRO gauge is designed for durability and requires minimal maintenance.
- Cleaning: Use a soft, damp cloth to clean the gauge face and bezel. Avoid abrasive cleaners or solvents that may damage the lens or finish.
- Inspection: Periodically check wiring connections for corrosion or looseness. Ensure the GPS sensor remains securely mounted and unobstructed.
- Environmental Protection: The IP67 rating ensures protection against dust and water immersion up to 1 meter for 30 minutes. However, prolonged submersion or high-pressure water jets should be avoided.
7. Troubleshooting
| Problem | Possible Cause | Solution |
|---|---|---|
| Gauge does not power on. | No power supply or incorrect wiring. | Check power and ground connections. Ensure the red wire is connected to a 12V/24V ignition-switched source. |
| Speedometer not displaying speed. | No GPS signal or faulty GPS sensor. | Ensure the GPS sensor has a clear view of the sky. Check the GPS sensor connection. Move the vehicle to an open area. |
| Tachometer not displaying RPM. | No RPM signal or incorrect wiring. | Verify the blue wire is correctly connected to the engine's RPM signal source. Check for loose connections. |
| Backlight not working. | Orange wire not connected or no power to illumination circuit. | Check the orange wire connection to the vehicle's illumination circuit. Ensure the vehicle's lights are on. |
| Trip meter resets unexpectedly. | Normal operation. | The trip meter is designed to reset upon power cycling. This is not a malfunction. The odometer retains total mileage. |
8. Specifications
- Brand: MOTOR METER RACING
- Model Number: MMSPTA-GPS-120BT-MP
- Material: Stainless Steel (Bezel), ABS (Housing)
- Item Weight: Approximately 0.4 Kilograms (14 ounces)
- Package Dimensions: 4.3 x 4.3 x 4 inches
- Operating Voltage: 12V / 24V DC
- Speedometer Range: 0 - 120 MPH
- Tachometer Range: 0 - 8000 RPM
- Odometer Range: 0 - 99999.9 Miles
- Trip Meter Range: 0 - 999.9 Miles
- Waterproof Rating: IP67
9. Warranty and Support
This product comes with a One Year Limited Warranty covering non-human factor damage. For technical support or warranty claims, please contact MOTOR METER RACING customer service.
Optional gauge mounting cups are available for purchase separately. Refer to ASINs B0CXCQTNRL (Black) or B0D4DBTRJL (Silver) if required.
10. Product Overview Video
For a visual overview of the MOTOR METER RACING W Pro Series gauges, including features and design, please watch the following video:
Video 1: An overview of the MOTOR METER RACING W Pro Series of boat and car gauges, showcasing their design and functionality.