Introduction
This user manual provides detailed instructions for the setup, operation, and maintenance of your Docooler Indoor/Outdoor Wireless Thermometer. This device is designed to provide accurate indoor and outdoor temperature readings with a clear LCD display, featuring wireless transmission, max/min temperature records, and flexible placement options.

Image: The main display unit of the Docooler Indoor/Outdoor Wireless Thermometer, showing indoor and outdoor temperature readings and time.
What's in the Box
- 1x Temperature Clock (Main Display Unit)
- 1x Transmitter (Outdoor Sensor)
- 1x User Manual
Product Features
- Wireless Technology: Displays indoor and outdoor temperature and time simultaneously. The wireless transmitter allows you to monitor outdoor temperature from the indoor receiver.
- Max/Min Temperature Records: Records the highest and lowest indoor and outdoor temperatures for easy tracking.
- Portable Transmitter: Sensors outdoor temperature and transmits data wirelessly to the main unit within a range of up to 100 meters (330 feet) without obstacles.
- Portable and Practical: The main unit can be placed on a tabletop using its integrated stand or mounted on a wall. Both units are powered by 2x 1.5V AAA batteries (not included).
- User-Selectable Options: Choose between 12-hour or 24-hour time format and Celsius (°C) or Fahrenheit (°F) temperature units.
- Large LCD Display: Features an easy-to-read LCD screen with large numbers for clear visibility.

Image: Diagram illustrating the wireless transmission range of approximately 100 meters (330 feet) between the outdoor sensor and the indoor display unit.
Setup
- Insert Batteries: Open the battery compartments on both the main display unit and the outdoor transmitter. Insert 2x AAA batteries into each unit, ensuring correct polarity (+/-). Batteries are not included.
- Placement of Transmitter: Place the outdoor transmitter in a sheltered location away from direct sunlight and heavy rain to ensure accurate readings and prolong its lifespan. The transmission range is up to 100 meters (330 feet) without significant obstacles.
- Placement of Main Unit: Position the main display unit indoors where you can easily view it. It can be placed on a tabletop using its integrated stand or mounted on a wall using the suspended hole on the back.
- Synchronization: The main unit and outdoor transmitter should automatically synchronize within a few minutes after battery insertion. If synchronization does not occur, refer to the "Troubleshooting" section.

Image: The outdoor transmitter with its battery cover removed, showing the battery compartment for AAA batteries.

Image: Visual representation of the main unit and outdoor sensor, highlighting options for wall mounting and tabletop placement.
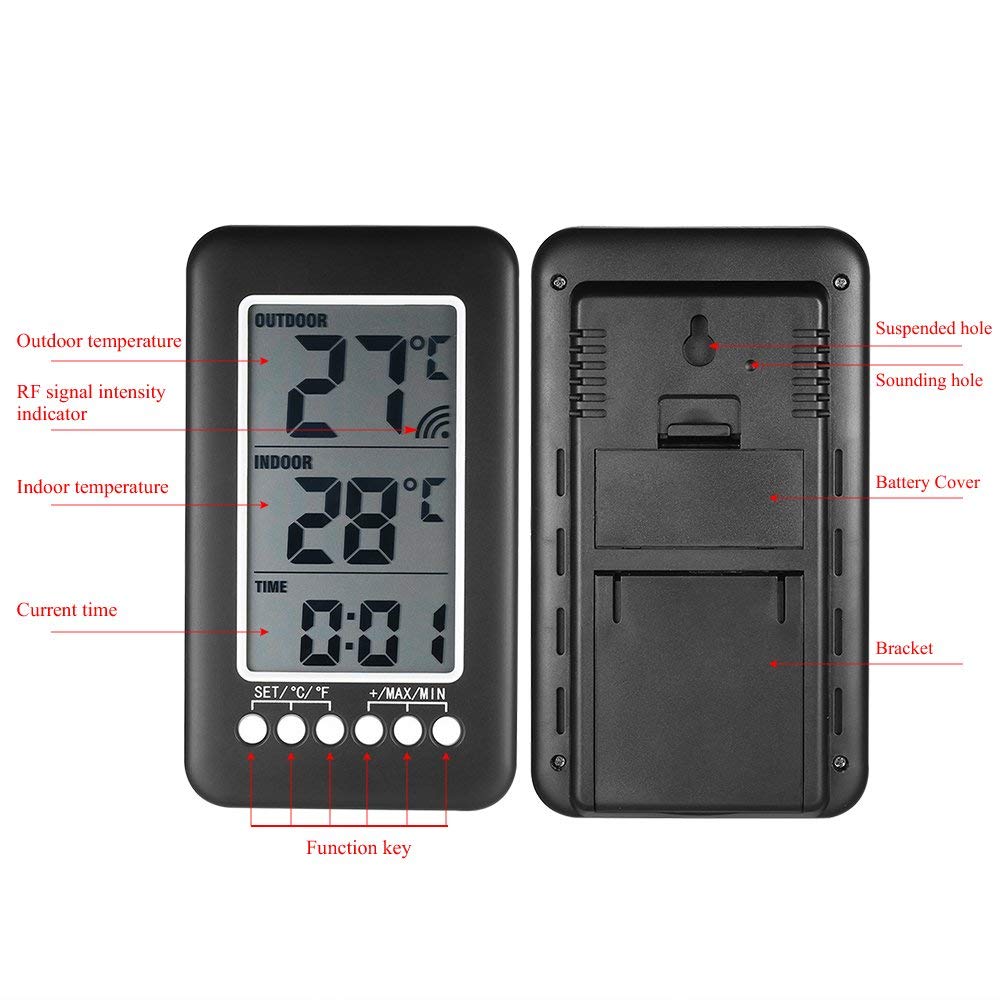
Image: Rear view of the main display unit, showing the suspended hole for wall mounting, battery cover, and bracket for tabletop use.
Operating Instructions
Video: A short demonstration of the Wireless Digital Thermometer's appearance and basic button functions, including setting the time.
- Power On/Off: The device powers on automatically when batteries are inserted. To power off, remove the batteries from both units.
- Setting Time:
- Press and hold the "SET/°C/°F" button to enter time setting mode. The hour digits will flash.
- Use the "+/MAX/MIN" button to increase the hour or the "-/12/24" button to decrease it.
- Press "SET/°C/°F" again to confirm the hour and move to minute setting. The minute digits will flash.
- Use the "+/MAX/MIN" or "-/12/24" buttons to adjust the minutes.
- Press "SET/°C/°F" once more to confirm the minutes and exit time setting mode.
- Changing Temperature Unit (°C/°F): Briefly press the "SET/°C/°F" button to toggle between Celsius and Fahrenheit display.
- Viewing Max/Min Temperature Records:
- Press the "+/MAX/MIN" button once to display the maximum recorded indoor and outdoor temperatures.
- Press it again to display the minimum recorded indoor and outdoor temperatures.
- Press a third time to return to the current temperature display.
- To clear the Max/Min records, press and hold the "+/MAX/MIN" button while viewing the records.
- Changing Time Format (12H/24H): Briefly press the "-/12/24" button to switch between 12-hour (AM/PM) and 24-hour time formats.
Video: An overview of the Indoor Outdoor Thermometer, demonstrating its features and functionality.
Maintenance
- Cleaning: Wipe the units clean with a soft, dry cloth. Do not use abrasive cleaners, solvents, or immerse the units in water.
- Battery Replacement: Replace batteries in both the main unit and transmitter when the low battery indicator appears on the display. For optimal performance, it is recommended to replace both sets of batteries at the same time.
- Outdoor Transmitter Protection: While the transmitter is designed for outdoor use, placing it in a sheltered area will protect it from extreme weather conditions and extend its operational life.
Troubleshooting
- No Outdoor Temperature Display / Inaccurate Readings:
- Ensure both units have fresh batteries and are inserted with correct polarity.
- Verify that the outdoor transmitter is within the 100-meter (330-foot) range of the main unit and that there are no major obstacles (e.g., thick walls, large metal objects) blocking the wireless signal.
- Try repositioning the outdoor transmitter closer to the main unit or in a different location.
- Remove batteries from both units, wait for a few minutes, then reinsert them to force a resynchronization.
- Inaccurate Indoor Temperature:
- Ensure the main unit is not placed near heat sources (e.g., direct sunlight, heating vents, appliances) or in areas with cold drafts.
- Display is Faint or Blank:
- Replace batteries in the affected unit.
- Time Not Set Correctly:
- Refer to the "Setting Time" instructions in the Operating Instructions section.
Specifications
| Brand | Docooler |
| Model Name | YLW4178911817888FZ |
| Display Type | LCD |
| Connectivity Technology | Wireless |
| Power Source | Battery Powered (2x 1.5V AAA batteries per unit, not included) |
| Outdoor Transmission Range | Up to 100m (330ft) without obstacles |
| Temperature Unit | °C / °F selectable |
| Time Format | 12H / 24H selectable |
| Special Features | Max/Min temperature records, High Accuracy |
| Outer Material | ABS |
| Product Care | Wipe Clean |
| Main Unit Dimensions | Approx. 150mm (5.91in) H x 86mm (3.38in) W |
| Transmitter Dimensions | Approx. 130mm (5.12in) H x 40mm (1.57in) W x 22mm (0.87in) D |

Image: Diagram showing the dimensions of both the main display unit and the outdoor wireless sensor.
Warranty and Support
For warranty information, technical support, or any inquiries regarding your Docooler Indoor/Outdoor Wireless Thermometer, please refer to the documentation included with your purchase or contact Docooler customer service directly. Contact details can typically be found on the product packaging or the official Docooler website.