1. Introduction
This manual provides essential information for the proper installation, operation, and maintenance of your INSTARTING Alternator Generator Rectifier, model MIA8519. Please read this manual thoroughly before installation and retain it for future reference. This rectifier is designed to convert the alternating current (AC) produced by the alternator into direct current (DC) for your vehicle's electrical system and battery charging.
2. Safety Information
Always observe the following safety precautions to prevent injury or damage to the product and vehicle:
- Disconnect the vehicle's battery before performing any work on the electrical system.
- Wear appropriate personal protective equipment, including safety glasses and gloves.
- Ensure the vehicle is turned off and cooled down before beginning installation.
- Consult a qualified automotive technician if you are unsure about any installation steps.
- Avoid contact with hot engine components.
3. Product Overview
The INSTARTING MIA8519 Alternator Generator Rectifier is a critical component in your vehicle's charging system. It contains diodes that rectify the AC output from the alternator stator into DC, which is then used to power the vehicle's electrical components and recharge the battery. This unit is manufactured with new premium quality components to meet or exceed OEM specifications.

Image 1: Top view of the INSTARTING Alternator Generator Rectifier MIA8519, showing the diode assembly and connection points.
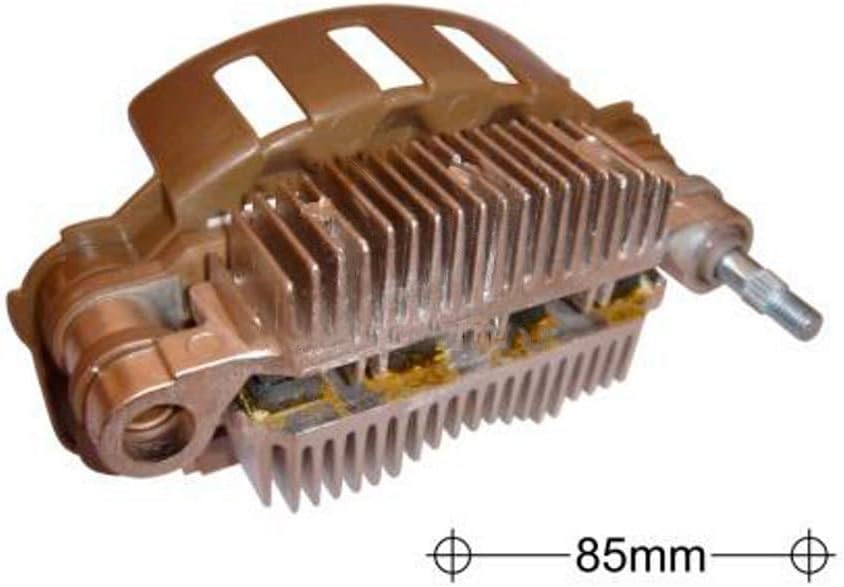
Image 2: Side view of the INSTARTING Alternator Generator Rectifier MIA8519, highlighting the heat sink fins and the 85mm mounting length.
4. Specifications
| Model | MIA8519 |
| Diodes | 8-30 Ampere |
| Mounting Length | 85mm |
| Battery Post | M5×44mm |
| Capacitor | Without |
| Trio | Without |
| Item Weight | 1.76 pounds |
| Manufacturer Part Number | MIA8519 |
| OEM Part Numbers | A860X68670, A860X88570AM, 230660, 333819, ZJ0118W60, 23700AA370, 23700AA390, A002T33191A, A2T33191A, A2TB0191, A2TB0191A, A2TB2891, A2TB7191, A2TC0091, ALM1283UX, ALM1283YX, ALM1409DD, ALM1409RN, ALM1409UX, ALM1409WA, ALM1704MQ, ALM1704UX, ALM1704WA, ALM1898BS, ALM1898UX, ALM1898WA, ALM1898ZD, ZJ0118300 |
5. Installation
Installation of an alternator rectifier requires careful attention to detail and proper tools. If you are not experienced with automotive electrical systems, it is highly recommended to seek professional assistance.
5.1 Pre-Installation Checks
- Verify Compatibility: Confirm that the MIA8519 rectifier is the correct replacement part for your specific alternator and vehicle model using the provided OEM part numbers.
- Inspect New Part: Visually inspect the new rectifier for any signs of damage during shipping.
- Gather Tools: Ensure you have the necessary tools, which may include wrenches, sockets, screwdrivers, and a multimeter.
5.2 Removal of Old Rectifier
- Disconnect Battery: Disconnect the negative terminal of the vehicle's battery to prevent electrical shorts.
- Access Alternator: Depending on your vehicle, you may need to remove other components to gain access to the alternator.
- Remove Alternator: Detach the alternator from its mounting brackets and disconnect all electrical connections.
- Disassemble Alternator: Carefully disassemble the alternator to access the rectifier assembly. This usually involves removing the rear cover and possibly the voltage regulator.
- Remove Old Rectifier: Unbolt and disconnect the old rectifier from the alternator housing and stator windings. Note the orientation and connections for reassembly.
5.3 Installation of New Rectifier
- Position New Rectifier: Carefully place the new MIA8519 rectifier into the alternator housing, ensuring proper alignment with the stator connections and mounting points.
- Secure Connections: Connect the rectifier to the stator windings and secure it with the appropriate fasteners. Ensure all connections are tight and free from corrosion.
- Reassemble Alternator: Reassemble the alternator, ensuring all components are correctly seated and secured.
- Reinstall Alternator: Mount the alternator back into the vehicle and reconnect all electrical wiring, including the main power cable and any excitation wires.
- Reconnect Battery: Reconnect the negative terminal of the vehicle's battery.

Image 3: Internal view of the rectifier, illustrating the heat sinks and the arrangement of the diodes responsible for AC to DC conversion.
6. Operating Instructions
Once installed, the rectifier operates automatically as part of the alternator system. When the engine is running, the alternator generates AC power. The rectifier converts this AC power into DC power, which is then regulated by the voltage regulator to maintain a stable voltage (typically 13.8 to 14.8 volts) for the vehicle's electrical system and to charge the battery.
6.1 Post-Installation Check
- Start the vehicle and observe the battery warning light on the dashboard. It should turn off shortly after the engine starts.
- Using a multimeter, check the voltage across the battery terminals with the engine running. The reading should be within the normal charging range (e.g., 13.8V - 14.8V).
- If the battery light remains on or the voltage is outside the normal range, refer to the troubleshooting section.
7. Maintenance
The rectifier itself is a sealed unit and does not require specific maintenance. However, regular inspection of the overall charging system can help ensure its longevity and proper function:
- Battery Condition: Ensure your vehicle's battery is in good condition and properly charged. A weak battery can put extra strain on the charging system.
- Belt Tension: Check the alternator belt for proper tension and wear. A loose or worn belt can lead to insufficient alternator output.
- Wiring Connections: Periodically inspect all electrical connections to the alternator and battery for corrosion, looseness, or damage.
- Cleanliness: Keep the alternator and its components free from excessive dirt, oil, and debris, which can affect cooling and performance.
8. Troubleshooting
If you experience issues with your vehicle's charging system after installing the rectifier, consider the following common problems and solutions:
| Symptom | Possible Cause | Solution |
|---|---|---|
| Battery warning light stays on | Faulty alternator, loose belt, wiring issue, or incorrect rectifier installation. | Check belt tension, inspect wiring, re-verify rectifier installation, test alternator output. |
| Battery not charging (low voltage) | Weak battery, loose connections, faulty voltage regulator, or rectifier issue. | Test battery, clean and tighten connections, test voltage regulator, re-check rectifier. |
| Battery overcharging (high voltage) | Faulty voltage regulator. | Replace voltage regulator. (Note: Rectifier typically does not cause overcharging directly, but a faulty diode could contribute to incorrect output if not properly rectifying AC.) |
| Unusual noises from alternator | Worn bearings, loose pulley, or internal damage. | Inspect alternator for mechanical issues. This is typically not rectifier-related. |
If troubleshooting steps do not resolve the issue, it is recommended to consult a professional automotive technician for diagnosis and repair.
9. Warranty and Support
For warranty information or technical support regarding your INSTARTING MIA8519 Alternator Generator Rectifier, please refer to the documentation provided at the time of purchase or contact the seller directly. Ensure you have your purchase details and product model number (MIA8519) available when contacting support.