HURI B09CCM9CCL
Instruction Manual for HURI Chainsaw Parts Kit
Brand: HURI | Model: B09CCM9CCL (Replacement Parts Kit)
1. Introduction
This instruction manual provides essential information for the installation and maintenance of the HURI Chainsaw Replacement Parts Kit. This kit includes chain adjuster tensioners, a fuel line, and a fuel filter, designed to replace original components in compatible Stihl chainsaw models. Please read this manual thoroughly before attempting any installation or maintenance.

Figure 1: Complete HURI Chainsaw Parts Kit. This image displays all components included in the package: two silver chain adjuster tensioners, one black curved fuel line, and one small black fuel filter.
2. Compatibility
This replacement parts kit is compatible with the following Stihl chainsaw models:
- Stihl 009
- Stihl 028
- Stihl 038
- Stihl 038AV
- Stihl MS280
- Stihl MS380
The chain adjuster tensioners are designed to replace Stihl part number 1118 664 1600.
3. Package Contents
Upon opening the package, verify that all the following components are present:
- 2 x Chain Adjuster Tensioners
- 1 x Fuel Line
- 1 x Fuel Filter
4. Setup and Installation
Important Safety Note: Before beginning any work on your chainsaw, ensure the engine is off, the spark plug wire is disconnected, and the saw has cooled down. Wear appropriate safety gear, including gloves and eye protection.
4.1. Chain Adjuster Tensioner Installation

Figure 2: Detail of a single chain adjuster tensioner. This image shows the threaded shaft and the adjustment mechanism of one of the two tensioners included in the kit.
- Locate the existing tensioner: The chain tensioner is typically located near the guide bar and chain, often accessible from the side cover of the chainsaw.
- Remove the old tensioner: Depending on your specific Stihl model, this may involve loosening or removing the side cover and then unscrewing or disengaging the old tensioner mechanism. Note its orientation for reassembly.
- Install the new tensioner: Carefully insert the new HURI chain adjuster tensioner into its designated slot. Ensure it aligns correctly with the guide bar and the chain adjustment pin.
- Secure the tensioner: Reattach any covers or screws that were removed. Do not fully tighten yet.
- Adjust chain tension: With the guide bar nuts slightly loose, use the tensioner screw to adjust the chain tension. The chain should be snug against the guide bar but still able to be pulled around by hand. Refer to your chainsaw's original manual for precise tensioning guidelines.
- Tighten guide bar nuts: Once the tension is correct, fully tighten the guide bar nuts.
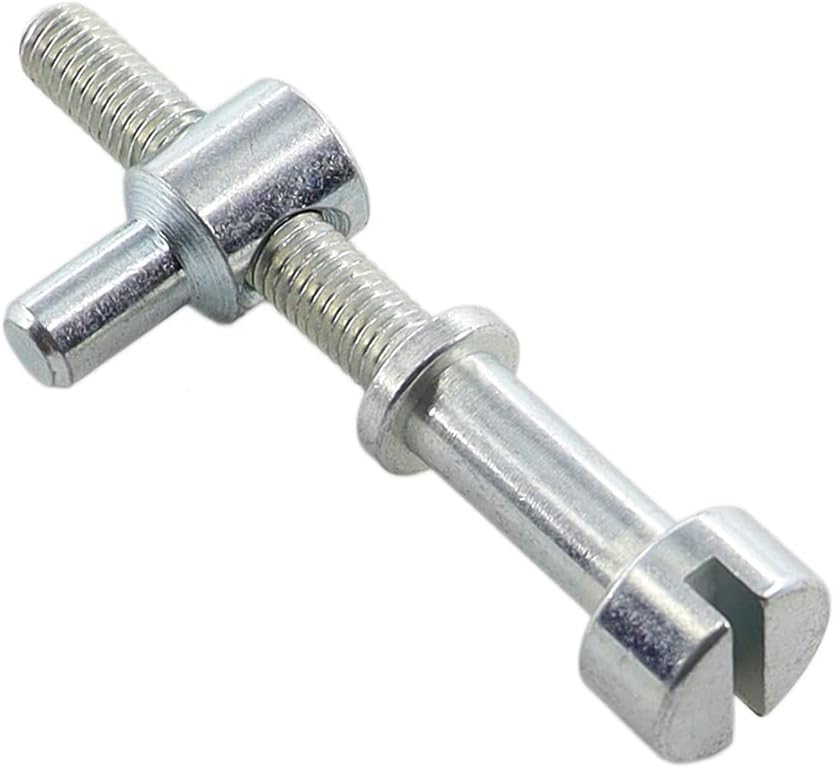
Figure 3: Angled view of the chain adjuster tensioner. This perspective highlights the robust construction and threading of the tensioner, showing how it would engage with the chainsaw's components.
4.2. Fuel Line and Fuel Filter Installation
- Drain fuel tank: Safely drain all fuel from the chainsaw's fuel tank into an approved container.
- Locate existing fuel line and filter: The fuel line connects the fuel tank to the carburetor. The fuel filter is typically at the end of the fuel line inside the fuel tank.
- Remove old components: Carefully pull the old fuel line and filter out of the tank. You may need pliers or a hook tool.
- Install new fuel filter: Attach the new fuel filter securely to one end of the new fuel line. Ensure a tight fit to prevent leaks.
- Install new fuel line: Feed the fuel line with the attached filter into the fuel tank opening. Guide the filter to the bottom of the tank, ensuring it can draw fuel effectively.
- Connect to carburetor: Connect the other end of the fuel line to the carburetor's fuel inlet. Ensure all connections are secure and free of kinks.
- Refill fuel tank: Carefully refill the fuel tank with the appropriate fuel mixture for your chainsaw. Check for any leaks before starting the engine.
5. Operating Considerations
These parts are designed to restore the proper function of your chainsaw. After installation, always perform a functional check:
- Chain Tension: Verify the chain tension is correct before each use. An improperly tensioned chain can be dangerous and cause premature wear.
- Fuel System: Check for any fuel leaks around the new fuel line and filter connections. Ensure the engine starts and runs smoothly, indicating proper fuel delivery.
6. Maintenance
Regular maintenance of these components will extend their lifespan and ensure optimal chainsaw performance:
- Chain Adjuster: Keep the tensioner screw threads clean and lightly lubricated to ensure smooth adjustment. Periodically check for any signs of wear or damage.
- Fuel Filter: The fuel filter should be inspected regularly (e.g., every 25 hours of operation or annually) and replaced if it appears clogged or dirty. A clogged filter can lead to poor engine performance.
- Fuel Line: Inspect the fuel line for cracks, hardening, or leaks. Replace immediately if any damage is observed.
7. Troubleshooting
| Problem | Possible Cause | Solution |
|---|---|---|
| Chain not tensioning properly | Tensioner screw stripped or misaligned; guide bar nuts too tight. | Ensure guide bar nuts are slightly loose during adjustment. Check tensioner for damage; replace if necessary. |
| Fuel leaks from connections | Fuel line not securely attached to filter or carburetor; damaged fuel line. | Re-secure connections. Inspect fuel line for cracks; replace if damaged. |
| Engine runs poorly or stalls | Clogged fuel filter; kinked fuel line. | Inspect and replace fuel filter if dirty. Check fuel line for kinks and correct routing. |
8. Specifications
- Product Type: Chainsaw Replacement Parts Kit
- Components: 2 x Chain Adjuster Tensioners, 1 x Fuel Line, 1 x Fuel Filter
- Replaces Part Number: 1118 664 1600 (for chain adjuster)
- Compatible Chainsaw Models: Stihl 009, 028, 038, 038AV, MS280, MS380
- Manufacturer: HURI
- ASIN: B09CCM9CCL
9. Warranty and Support
For information regarding warranty, returns, or technical support, please refer to the seller's policy on the platform where the product was purchased. As these are replacement parts, specific warranty terms may vary.
Ask a question about this manual
Ask about setup, troubleshooting, compatibility, parts, safety, or missing instructions. Manuals+ will review the question and use this page’s manual context to help answer it.