1. Product Overview
The AUTO-VOX TW1 is a solar-powered wireless backup camera system designed for easy installation and enhanced vehicle safety. It features a 5-inch monitor and a waterproof camera with super night vision, offering a clear view for reversing and parking. The system operates wirelessly, eliminating the need for complex wiring, and includes a rechargeable battery with solar charging capabilities for extended use.

Image: The AUTO-VOX TW1 system, showing the 5-inch monitor and the cylindrical wireless camera.
2. Package Contents
Please verify that all items listed below are included in your package:
- 5-inch Monitor
- Wireless Backup Camera
- Monitor Mount (Suction Cup)
- Car Charger with Activate Button
- Battery Charging Cable (USB)
- Screwdriver
- Double-Sided Tape
- User Manual
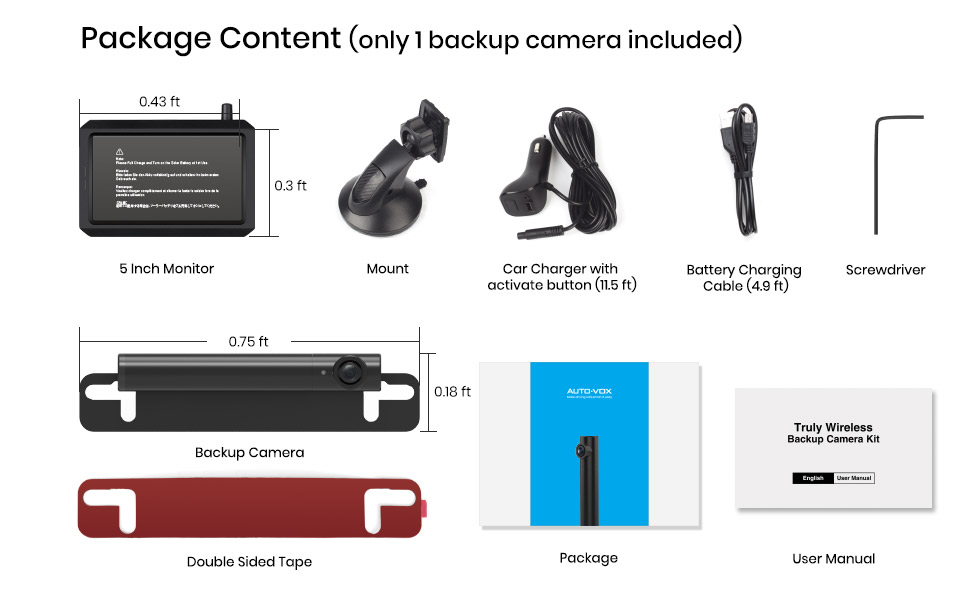
Image: A visual representation of all components included in the AUTO-VOX TW1 package, including the monitor, camera, various cables, and mounting accessories.
3. Setup and Installation
3.1 Camera Installation
The AUTO-VOX TW1 camera is designed for quick and easy DIY installation without the need for drilling or complex wiring. It can be flexibly attached to the top or bottom of any standard U.S. license plate frame using a screwdriver.
- Position the camera bracket behind your vehicle's license plate.
- Align the camera with the license plate holes.
- Secure the camera to the license plate using the provided screws and screwdriver.
- Ensure the camera is firmly attached and has a clear view.
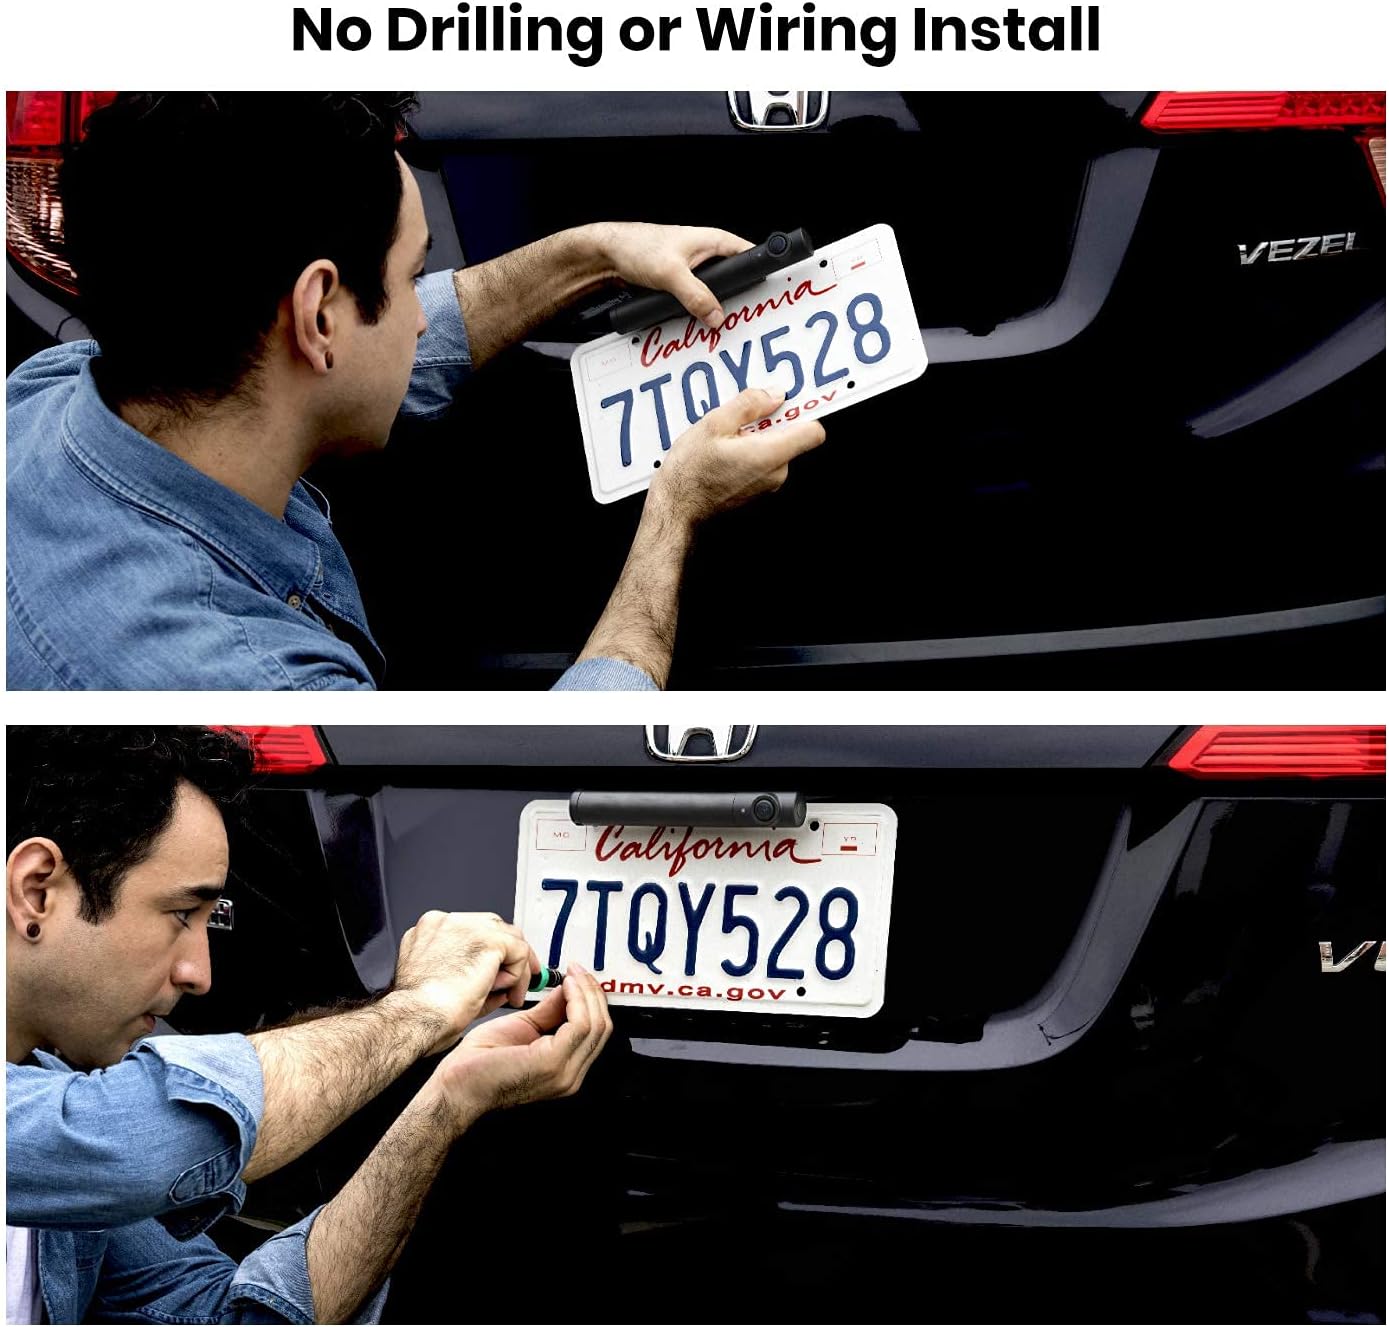
Image: A person demonstrating the simple, no-drilling installation of the camera onto a vehicle's license plate using a screwdriver.
3.2 Monitor Setup
The 5-inch monitor can be mounted on your dashboard or windshield for optimal viewing.
- Attach the suction cup mount to the monitor.
- Clean the desired mounting surface on your dashboard or windshield.
- Press the suction cup firmly against the surface and engage the lever to secure it.
- Adjust the monitor angle for best visibility.
- Connect the monitor to your vehicle's 12V power outlet using the provided car charger.

Image: The AUTO-VOX TW1 monitor positioned on a car's dashboard, displaying a clear view of the rear.
4. Operating Instructions
4.1 Powering On/Off
The monitor powers on automatically when connected to the car charger and the vehicle's ignition is on. To power off, simply turn off your vehicle's ignition or disconnect the car charger.
4.2 Adjusting Display Settings
The 5-inch HD monitor provides a clear display with super night vision capabilities. Use the buttons on the side of the monitor to navigate the menu and adjust settings such as brightness, contrast, and color saturation for optimal viewing conditions.

Image: The 720P HD monitor displaying a clear image with adjustable parking guidelines, suitable for low-light conditions like a parking garage.
4.3 Image Flip and Guidelines
The system supports 4 image flip modes (Normal/Mirror/Up/Down) to accommodate various mounting positions. You can also adjust 6 guidelines with different widths to assist with parking and reversing.

Image: Examples of the four image flip modes (Original+Up, Mirror+Up, Original+Down, Mirror+Down) available on the monitor, allowing for flexible camera orientation.
4.4 Dual Camera Functionality
The TW1 system supports the addition of a second camera (sold separately) to provide multiple viewing angles. This allows you to monitor the front, rear, or side of your vehicle simultaneously.
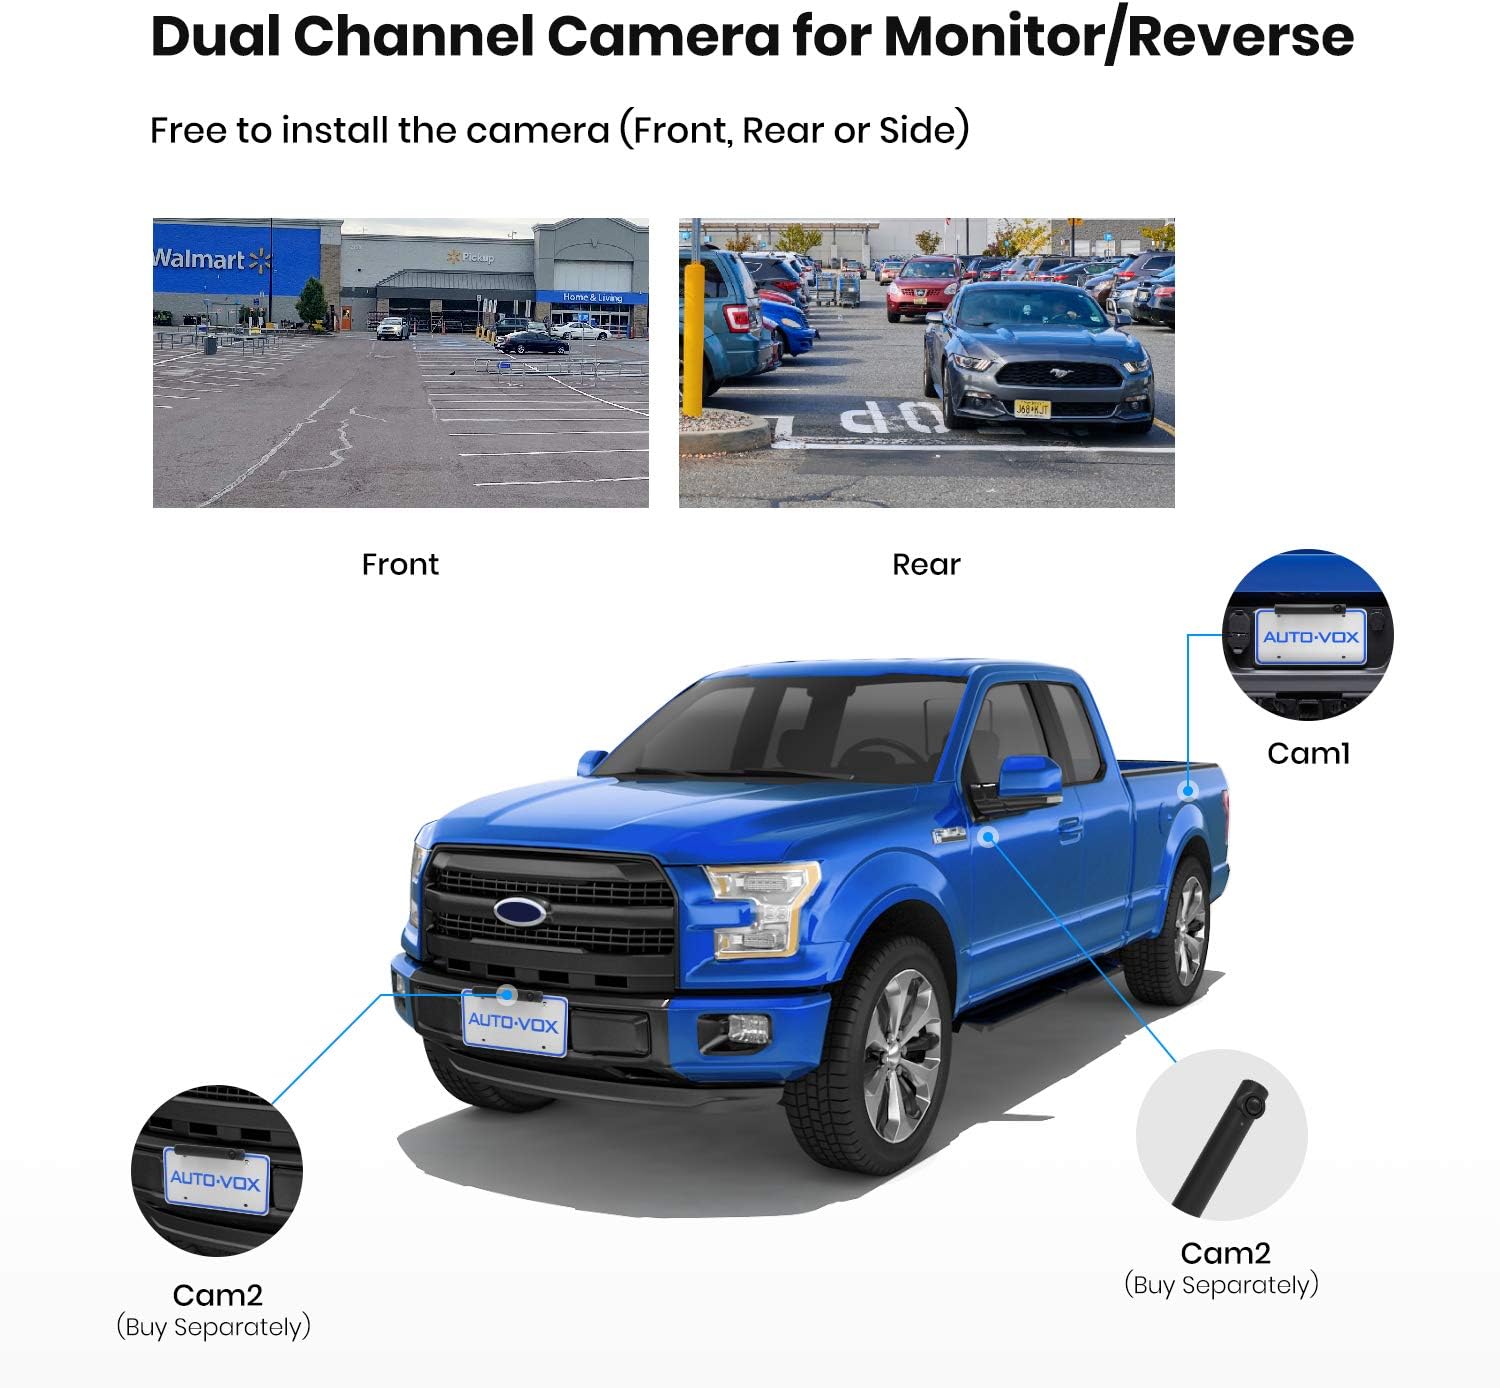
Image: A diagram illustrating how two cameras can be integrated with the AUTO-VOX TW1 system, showing potential placements on the front and rear of a pickup truck.
5. Charging and Battery
The camera features a built-in 3350mAh rechargeable battery, offering independent operation without constant connection to the car's power system. It can be charged via USB or its integrated solar panel.
5.1 USB Charging
To charge the camera via USB, locate the USB charging port on the camera unit. Connect the provided USB charging cable to the camera and a suitable USB power source (e.g., car charger, USB wall adapter).

Image: A detailed view of the USB charging port located on the end of the AUTO-VOX TW1 camera unit.
5.2 Solar Charging
The camera is equipped with a solar panel that converts sunlight into power, extending the battery life and reducing the frequency of manual charging. Ensure the solar panel is clean and exposed to direct sunlight for efficient charging.

Image: A close-up view of the solar panel integrated into the design of the AUTO-VOX TW1 camera, positioned on top of a license plate.
6. Maintenance
6.1 Cleaning
Regularly clean the camera lens and monitor screen with a soft, damp cloth. Avoid using abrasive cleaners or solvents that could damage the surfaces.
6.2 Weather Resistance
The camera is designed with an IP68 waterproof rating, ensuring durability against various weather elements such as rain, snow, and extreme temperatures. This prevents fogging and ensures reliable performance in diverse conditions.

Image: The AUTO-VOX TW1 camera shown with water droplets, illustrating its IP68 waterproof capability, designed to withstand harsh weather.
7. Troubleshooting
If you encounter issues with your AUTO-VOX TW1 system, please refer to the following common problems and solutions:
- No Signal/Image: Ensure the camera's USB lid is securely closed after charging, as it contains the antenna. Verify the monitor is powered on and within the 33ft wireless transmission range of the camera. Check for strong interference sources nearby.
- Image Flickering or Interference: The system uses digital wireless technology to minimize interference. Ensure no other wireless devices are operating on similar frequencies very close to the unit.
- Poor Night Vision: Clean the camera lens thoroughly. Ensure there are no obstructions blocking the camera's view.
- Battery Not Holding Charge: Ensure the solar panel is clean and exposed to sufficient direct sunlight. If solar charging is insufficient, charge the camera fully via the USB port.
- Monitor Not Powering On: Check the connection of the car charger to both the monitor and the vehicle's 12V outlet. Ensure the vehicle's ignition is on.
8. Specifications
| Feature | Specification |
|---|---|
| Brand | AUTO-VOX |
| Model | TW1 |
| Display Technology | LCD |
| Screen Size | 5 Inches |
| Video Capture Resolution | 720p |
| Voltage | 12 Volts |
| Battery Cell Composition | Lithium Ion |
| Lens Type | Wide Angle |
| Actual Viewing Angle | 120 Degrees |
| Wireless Transmission Range | Up to 33 ft |
| Waterproof Rating | IP68 |
| Installation Type | Surface Mount (License Plate) |
9. Warranty and Support
AUTO-VOX products are designed for reliability and performance. For specific warranty details regarding your TW1 Solar Wireless Backup Camera System, please refer to the warranty card included in your product packaging or visit the official AUTO-VOX website.
If you require technical assistance, have questions about installation, or need to report an issue, please contact AUTO-VOX customer support. Contact information can typically be found on the product packaging, the official website, or within the included user manual.
When contacting support, please have your product model (TW1) and purchase details ready to facilitate a quicker resolution.


