Brilnurse 001
Brilnurse 4-Output TENS Muscle Stimulator User Manual
Model: 001
Introduction
Thank you for choosing the Brilnurse 4-Output TENS Muscle Stimulator. This device is designed to provide temporary relief of pain associated with sore and aching muscles due to strain from exercise or normal household and work activities. It uses Transcutaneous Electrical Nerve Stimulation (TENS) technology to deliver gentle electrical pulses through electrodes placed on the skin, stimulating nerves and muscles.
Please read this manual thoroughly before using the device to ensure safe and effective operation. Keep this manual for future reference.
Important Safety Information
WARNING: Do not use this device if you have a pacemaker, implanted defibrillator, or other implanted metallic or electronic device. Consult your physician before use if you have any medical conditions, including but not limited to:
- Pregnancy
- Heart disease
- Epilepsy
- Cancer
- Recent surgery
- Skin conditions or open wounds in the treatment area
Precautions:
- Do not place electrode pads on the head, face, throat, or across the chest.
- Do not use while driving, operating machinery, or during any activity where involuntary muscle contractions could put the user at undue risk.
- Keep out of reach of children.
- Do not use in the bath or shower.
- Discontinue use if you experience any adverse reactions such as skin irritation, redness, or discomfort.
- Only use accessories provided or recommended by Brilnurse.
Product Overview
Key Features
- 4 Independent Channels: Allows for simultaneous treatment of up to 8 electrode pads with different modes and intensities.
- 24 Massage Modes: A variety of pre-programmed modes for diverse pain relief and muscle stimulation needs.
- 20 Intensity Levels: Adjustable intensity to customize your therapy experience.
- Rechargeable Lithium Battery: Provides up to 20 hours of continuous use on a single charge.
- Adjustable Timer: Session duration can be set from 10 to 60 minutes.
- Memory Function: Remembers the last used mode and intensity settings.
Package Contents

Image: Contents of the Brilnurse TENS Muscle Stimulator package, including the device, electrode pads, lead wires, USB cable, pad holder, and storage bag.
- 1 x Brilnurse 4-Output TENS Device
- 4 x Lead Wires
- 16 x Electrode Pads (8 Palm pads, 4 Large Rectangular pads, 4 Oval pads)
- 1 x USB Cable
- 1 x Pad Holder
- 1 x Storage Bag
- 1 x User Manual
Device Components and Controls

Image: Front and top view of the Brilnurse TENS unit with labels indicating Output A1/A2, Output B1/B2, Time indicator, Battery indicator, LCD screen, Mode indicator, A/B Intensity indicator, Lock indicator, A/B Intensity adjustment buttons, Mode selector, Time adjustment, USB port, and On/Off switch.
- LCD Screen: Displays mode, intensity, time, and battery status.
- Output Ports (A1, A2, B1, B2): Connect lead wires for electrode pads.
- On/Off Switch: Powers the device on or off.
- Mode Button (M): Cycles through the 24 available massage modes.
- Time Button (T): Adjusts the treatment duration (10-60 minutes).
- Intensity Buttons (+/-): Adjusts the intensity level for channels A and B independently.
- Lock Button: Locks the screen to prevent accidental changes.
- USB Charging Port: For recharging the internal battery.
Setup
1. Charging the Device
- Ensure the device is turned off.
- Connect the provided USB cable to the charging port on the device.
- Plug the other end of the USB cable into a USB wall charger (not included), power bank, or computer USB port.
- The battery indicator on the LCD screen will show charging status. A full charge typically takes a few hours and provides up to 20 hours of use.
2. Connecting Lead Wires and Electrode Pads
- Insert the pin connectors of the lead wires into the electrode pads. Ensure a secure connection.
- Plug the lead wire connectors into the output ports (A1, A2, B1, B2) on the top of the TENS unit. Each lead wire has two pin connectors for two pads.
- For optimal adhesion and longevity of the pads, clean the skin area where pads will be applied with soap and water, then dry thoroughly. Avoid applying pads to broken or irritated skin.
Operating Instructions
1. Applying Electrode Pads
Carefully peel the electrode pads from their protective film. Apply the sticky side of the pads firmly to the clean, dry skin area requiring treatment. Ensure the pads are flat against the skin and not overlapping.

Image: Visual guide for common TENS pad placement locations on the body, including back, shoulders, arms, and legs, for pain relief.
For best results, place pads on either side of the pain area, or on specific muscle groups. Refer to the included pad placement guide for detailed recommendations.
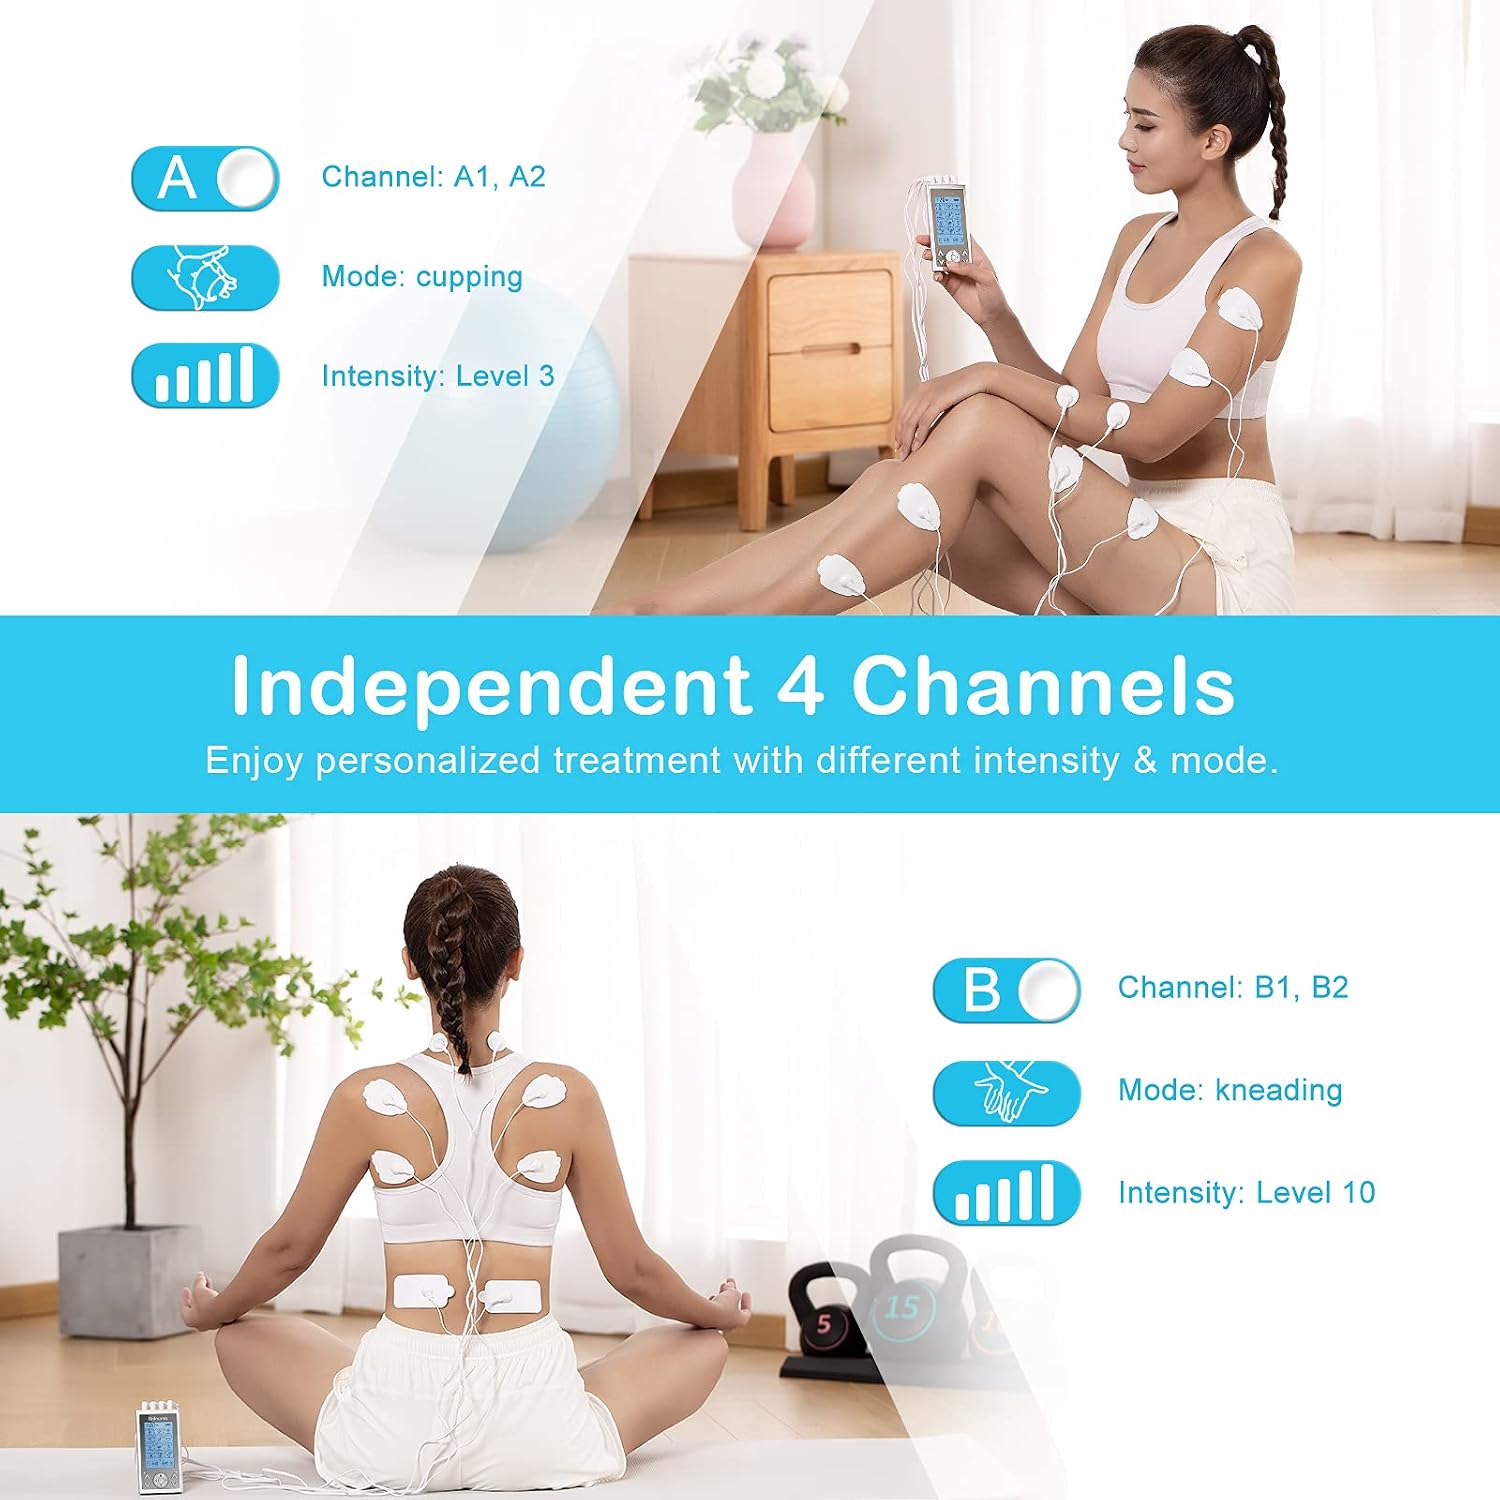
Image: A woman demonstrating the use of the Brilnurse TENS unit with electrode pads applied to her shoulders and upper back, illustrating the independent channel functionality.
2. Powering On and Selecting Mode
- Slide the On/Off switch to the "On" position. The LCD screen will illuminate.
- Press the M (Mode) button to cycle through the 24 available massage modes. The selected mode will be displayed on the screen.
3. Adjusting Intensity
The Brilnurse TENS unit features 4 independent channels (A1, A2, B1, B2) grouped into two adjustable pairs (A and B). This allows you to set different intensity levels for different body areas simultaneously.
- Use the A +/- buttons to adjust the intensity for channels A1 and A2.
- Use the B +/- buttons to adjust the intensity for channels B1 and B2.
- Start with the lowest intensity and gradually increase until you feel a comfortable, gentle pulsing sensation. Avoid increasing intensity to a painful level.

Image: The Brilnurse TENS unit display illustrating the 20 intensity levels, categorized by their general effects such as Muscle Activation, Fascia Relaxation, Lactic Acid reduction, Deep Massage, and Professional Mode.
4. Setting the Timer
- Press the T (Time) button to adjust the treatment duration.
- The timer can be set from 10 to 60 minutes in 10-minute increments.
- The device will automatically shut off once the timer counts down to zero.
5. Locking the Screen
To prevent accidental changes to settings during a session, press and hold the 'M' button for a few seconds to lock the screen. Repeat to unlock.
6. Ending a Session
- When the session is complete, or if you wish to stop early, turn off the device using the On/Off switch.
- Gently peel the electrode pads from your skin. Do not pull on the wires.
Maintenance
Cleaning the Device
Wipe the device with a soft, damp cloth. Do not use abrasive cleaners or immerse the device in water.
Caring for Electrode Pads
- After each use, place the electrode pads back onto their protective film or the included pad holder.
- If pads lose their stickiness, gently dab the adhesive side with a few drops of water to reactivate. Allow to air dry slightly before reapplication.
- Replace pads when they no longer adhere well to the skin, as poor adhesion can reduce effectiveness and cause discomfort.
Storage
Store the device and accessories in the provided storage bag in a cool, dry place, away from direct sunlight and extreme temperatures. Ensure the device is fully charged before long-term storage.
Troubleshooting
| Problem | Possible Cause | Solution |
|---|---|---|
| Device does not turn on. | Low battery or device is off. | Charge the device. Ensure the On/Off switch is in the "On" position. |
| No sensation or weak sensation. |
|
|
| Skin irritation under pads. |
|
|
Specifications
| Brand | Brilnurse |
| Model Number | 001 |
| ASIN | B09C35H435 |
| Output Channels | 4 Independent Channels |
| Massage Modes | 24 Modes |
| Intensity Levels | 20 Levels |
| Battery | Rechargeable Lithium-ion |
| Battery Life | Up to 20 hours (continuous use) |
| Timer Settings | 10-60 minutes |
| Package Dimensions | 15.8 x 9.6 x 7.3 cm |
| Item Weight | 430.91 grams |
Warranty and Support
The Brilnurse TENS Muscle Stimulator comes with a standard one-year warranty. You may be eligible for an extended warranty of an additional two years upon product registration with Brilnurse.
For any questions, concerns, or support needs, please do not hesitate to contact Brilnurse customer service. We aim to respond to all inquiries within 24 hours.
Please refer to the contact information provided on the product packaging or the official Brilnurse website for the most up-to-date support details.
Related Documents - 001
 |
Brilnurse FM-B2404/PRO15AB Nerve Muscle Stimulator User Manual Comprehensive user manual for the Brilnurse FM-B2404/PRO15AB Nerve Muscle Stimulator, detailing its features, operation, safety instructions, and maintenance for effective pain relief and muscle stimulation. |
 |
Naimoli Tech Dolce Benessere Heating Pad User Manual User manual for the Naimoli Tech Dolce Benessere heating pad, detailing its features, safe operation, charging, washing, and troubleshooting. Utilizes innovative CARBON RELAX technology for targeted heat therapy and personal comfort. |
 |
Industrial Pressure Transmitter for Absolute and Relative Pressure Measurement - B+B SENSORS Technical datasheet for B+B SENSORS industrial pressure transmitters, detailing features, specifications, connection diagrams, dimensions, and a comprehensive product range for absolute and relative pressure measurement. |
 |
PlayStation 4 Optical Drive Replacement Guide A comprehensive step-by-step guide for replacing the optical drive in a Sony PlayStation 4, detailing necessary tools, parts, and procedures. |
 |
Comunello Hardware Test Art. 4 & 4C: Technical Specifications and Installation Guide Detailed technical specifications, material information, recycling guidelines, and installation instructions for Comunello Art. 4 and Art. 4C suspended load carriage systems. |
 |
PlayStation 4 Optical Drive Replacement Guide A step-by-step guide from iFixit to replace the optical drive in a Sony PlayStation 4 (PS4). Includes tools, parts, and detailed instructions for disassembly and reassembly. |
Ask a question about this manual
Ask about setup, troubleshooting, compatibility, parts, safety, or missing instructions. Manuals+ will review the question and use this page’s manual context to help answer it.