Introduction
This instruction manual provides essential information for the installation, operation, and maintenance of your new compatible ice maker assembly. This part is designed to replace original ice makers in various Kenmore side-by-side refrigerator models, ensuring a consistent supply of ice.
Important Note: This is a compatible replacement part, not an Original Equipment Manufacturer (OEM) product. It is designed to function as a direct replacement for the specified models.
Product Overview
The ice maker assembly (Part Number 2198597) is responsible for producing ice cubes within your refrigerator. It is specifically designed for side-by-side refrigerators that feature an ice bin located in the door. The assembly includes a flat, rectangular 4-pin connection measuring approximately 10.5 inches in length.
This part replaces several other part numbers, including: AP3182733, 1016069, 2198597R, 2198597VP, 2198678, 626663, AH869316, EA869316, PS869316, W10122502, W10190960.
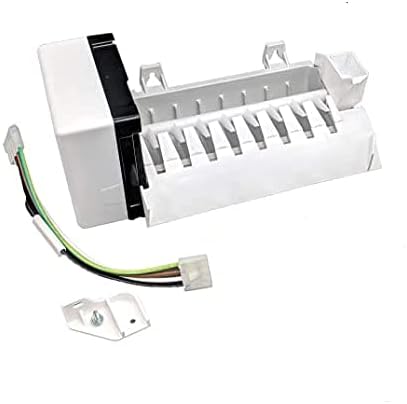
Image 1: Front view of the compatible ice maker assembly, showing the main unit and attached wiring harness.

Image 2: Side view of the compatible ice maker assembly, highlighting its compact design.

Image 3: Close-up of the wiring harness and a small mounting bracket included with the ice maker assembly.
Setup and Installation
Safety First: Before attempting any installation or repair, always disconnect power to your refrigerator by unplugging it or turning off the circuit breaker. Failure to do so can result in electrical shock or injury.
- Preparation: Ensure the refrigerator is unplugged. Clear any ice from the old ice maker and the ice bin.
- Access Old Ice Maker: Locate the existing ice maker in your refrigerator's freezer compartment. Depending on your model, you may need to remove shelves or the ice bin to gain access.
- Disconnect Wiring: Carefully disconnect the electrical wiring harness from the old ice maker. Note its orientation for reinstallation.
- Remove Old Ice Maker: Unscrew or unclip the old ice maker from its mounting brackets.
- Install New Ice Maker: Position the new ice maker assembly (Part Number 2198597) into the mounting location. Secure it with the original screws or clips.
- Connect Wiring: Connect the 4-pin electrical wiring harness to the new ice maker. Ensure a secure connection.
- Final Checks: Ensure all connections are secure and the ice maker is firmly mounted. Reinstall any removed shelves or the ice bin.
- Restore Power: Plug the refrigerator back in or turn on the circuit breaker.
Note: This ice maker assembly does not include a wire bar. It is designed to work with an emitter located in the door or ice bin of your refrigerator.
If you are not comfortable performing this installation yourself, it is recommended to contact a qualified appliance repair technician.
Operating Instructions
After installation and restoring power, the ice maker will typically begin its first cycle within 24 hours. The first few batches of ice may contain small particles or have an unusual taste; it is recommended to discard these initial batches.
- Initial Ice Production: Allow several hours for the ice maker to fill with water and freeze the first batch of ice.
- Water Supply: Ensure your refrigerator's water supply line is connected and the water valve is open for the ice maker to receive water.
- Ice Level Sensor: The ice maker uses a sensor (often a bail arm or optical sensor) to detect when the ice bin is full. When the bin is full, ice production will temporarily stop and resume when ice is removed.
Maintenance
- Regular Cleaning: Periodically remove the ice bin and clean it with mild soap and warm water. Rinse thoroughly and dry before returning it to the freezer.
- Check Water Filter: If your refrigerator has a water filter, ensure it is replaced according to the manufacturer's recommendations to maintain water quality and ice production.
- Inspect for Ice Buildup: Occasionally check the ice maker and surrounding area for excessive ice buildup, which can impede operation. Carefully remove any buildup if present.
Troubleshooting
This compatible ice maker assembly is designed to address common issues with refrigerator ice production. Refer to the table below for typical symptoms and their potential solutions.
| Symptom | Possible Cause / Solution |
|---|---|
| Insufficient ice production or no ice at all. |
|
| Leaking water from the ice maker. |
|
| Misshapen or smaller ice cubes. |
|
| Unusual noises during ice production. |
|
| Ice maker won't dispense ice. |
|
If troubleshooting steps do not resolve the issue, consider consulting a professional appliance technician.
Product Specifications
| Feature | Detail |
|---|---|
| Part Number | 2198597 |
| Compatible Refrigerator Types | Side-by-side refrigerators with ice bin in door |
| Connection Type | Flat rectangle 4-pin connection (approx. 10.5" long) |
| Material | Plastic or Metal |
| Product Dimensions | 13.7"D x 6.3"W x 7.7"H |
| Item Weight | 2.75 pounds |
| Voltage | 115 Volts |
| Wattage | 185 watts |
| UPC | 092742235321 |
Additional Resources
Video: "Quality Refrigerator Replacement Parts" by EDGEWATER PARTS. This video provides general information about quality replacement parts for refrigerators.
Warranty and Support
As a compatible replacement part, this product is not covered under any OEM manufacturer's warranty. For specific warranty information or support regarding this "Spare Part" brand ice maker, please refer to the seller's policies or contact the seller directly through the platform where the purchase was made.
For further assistance or inquiries, please visit the DOK Parts Best seller page on Amazon.