1. Introduction
Thank you for choosing the Kurzweil KA130 Digital Piano. This instrument is designed to provide an authentic piano playing experience with advanced digital features. This manual provides essential information for the proper setup, operation, and maintenance of your digital piano. Please read it thoroughly before using the instrument to ensure optimal performance and longevity.
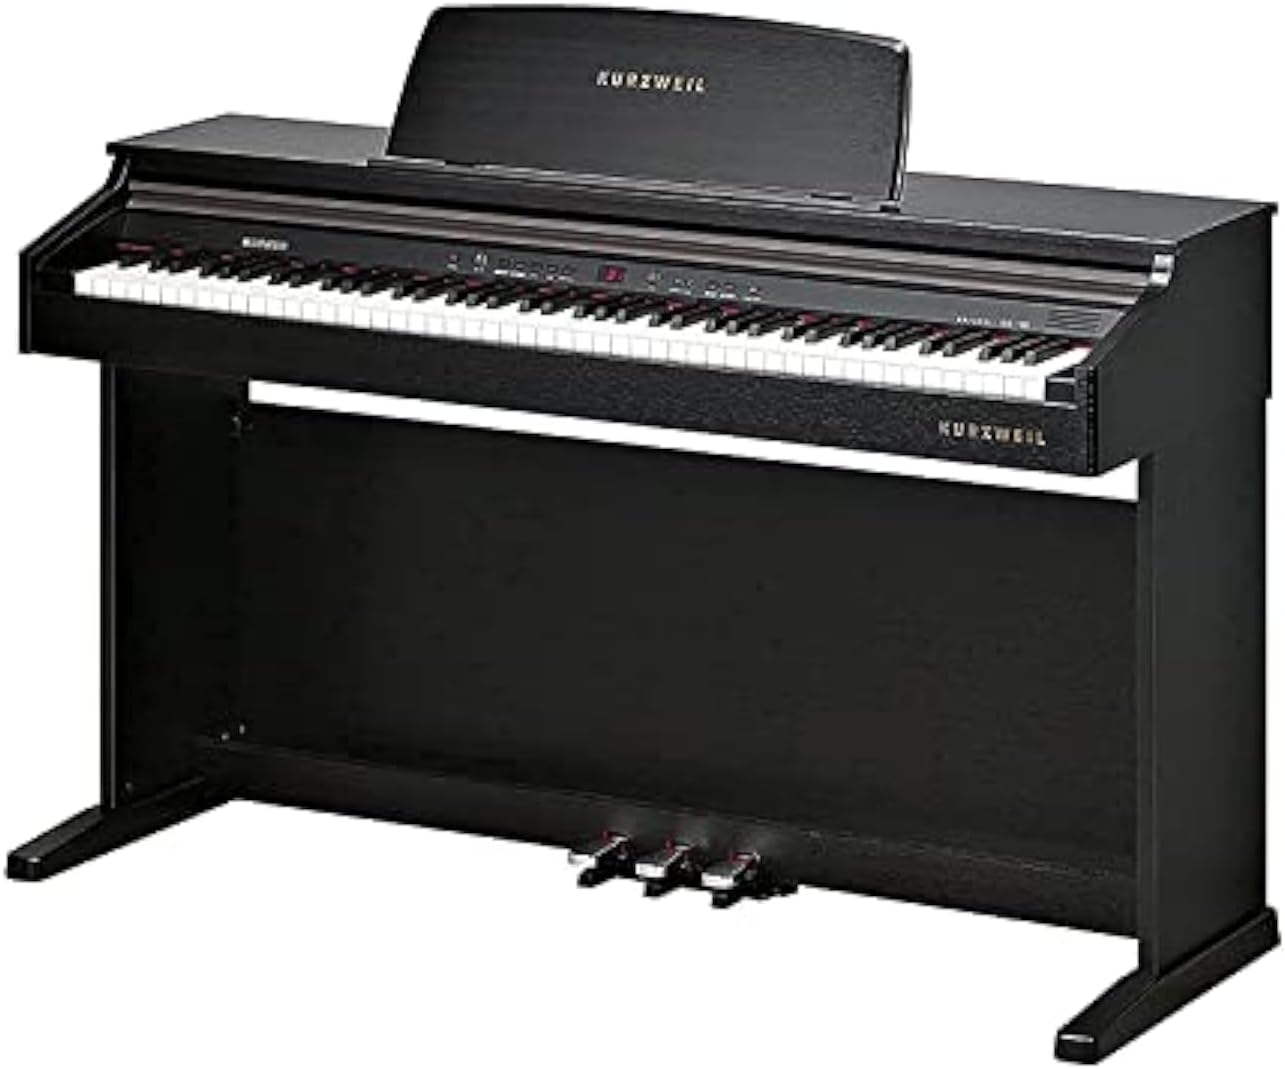
Figure 1: The Kurzweil KA130 Digital Piano. This image displays the full instrument, highlighting its black finish, 88-note keyboard, integrated music rest, and the three foot pedals (sustain, sostenuto, soft) located at the base.
2. Important Safety Information
- Power Supply: Use only the specified power adapter. Ensure the voltage matches the requirements of your region. Disconnect the power cord during lightning storms or when unused for extended periods.
- Location: Place the instrument on a stable, level surface. Avoid locations exposed to direct sunlight, extreme temperatures, high humidity, dust, or strong vibrations. Keep away from heat sources like radiators.
- Water and Moisture: Do not expose the instrument to water or moisture. Do not place containers with liquids on the piano.
- Ventilation: Do not block ventilation openings. Ensure adequate airflow around the instrument.
- Foreign Objects: Do not insert foreign objects into any openings of the instrument.
- Cleaning: Clean only with a dry, soft cloth. Avoid using chemical cleaners or solvents.
- Servicing: Do not attempt to service the instrument yourself. Refer all servicing to qualified service personnel.
3. Setup and Assembly
3.1 Package Contents
Before assembly, verify that all components are present:
- Kurzweil KA130 Digital Piano Unit
- Matching Bench
- Music Rest
- Power Adapter
- User Manual (this document)
- Assembly Hardware (screws, tools if required)
3.2 Assembly Instructions
The Kurzweil KA130 is a console-style digital piano that requires some assembly. It is recommended that two adults perform the assembly to prevent injury or damage to the instrument.
- Unpack Components: Carefully remove all parts from the packaging and lay them out on a soft, clean surface to prevent scratches.
- Attach Side Panels: Secure the left and right side panels to the main keyboard unit using the provided screws. Ensure they are oriented correctly.
- Install Pedal Unit: Connect the pedal unit to the base of the piano, ensuring the pedal cable is properly routed and connected to the main unit.
- Secure Back Panel: Attach the back panel to stabilize the structure.
- Place Music Rest: Insert the music rest into the designated slot on the top panel of the piano.
- Assemble Bench: Follow the separate instructions provided with the matching bench for its assembly.
3.3 Connections
- Power: Connect the power adapter to the DC IN jack on the piano and then to a suitable wall outlet.
- Headphones: Two 1/4" stereo headphone jacks are provided for private practice. Connect standard stereo headphones to either jack.
- Audio Out: Stereo left/right RCA line outs are available for connecting the piano to external amplification systems (e.g., an amplifier, mixer, or powered speakers).
- Audio In: Stereo left/right RCA line ins allow connection of external sound sources (e.g., an MP3 player, smartphone) to play through the piano's speakers.
- USB: The USB port provides Plug and Play MIDI over USB functionality. Connect a standard USB cable to a computer for MIDI communication without requiring additional drivers.
4. Operating Instructions
4.1 Power On/Off
Press the POWER button to turn the instrument on. Press and hold the POWER button for a few seconds to turn it off.
4.2 Keyboard and Touch Sensitivity
The KA130 features an 88-note, fully weighted, hammer action keyboard (88RGTA) designed to replicate the feel of an acoustic piano. You can adjust the keyboard's touch sensitivity with 6 selectable response levels to match your playing style.
4.3 Display and Voice Selection
The 7-segment 3-digit LED display shows current settings. The piano offers a Stereo PCM voice type with 32-voice polyphony. Select from 16 primary preset programs, with an additional 116 programs available for General MIDI (GM) compatibility.
4.4 Play Modes
- Splits: Divides the keyboard into two sections, allowing different voices to be played by each hand.
- Layers: Combines two voices to be played simultaneously when a key is pressed.
- Dual: A specific mode that might combine elements of splits and layers, or offer a predefined layered sound. Refer to the on-screen menu for specific Dual mode options.
4.5 Demo Songs and Learning Mode
The instrument includes 50 demo songs and 221 learning songs. The Education Mode supports Bayer, Czerny 100, 30, 40, and Sonatine exercises, featuring a 'Score Lesson' mode to assist with practice.
4.6 Recorder/Sequencer
Record your performances with the built-in sequencer, which has a capacity for 5 songs. Consult the detailed operational guide for recording and playback procedures.
4.7 General Functions
- General MIDI (GM): The KA130 is GM compatible, allowing it to play back MIDI files with standard instrument assignments.
- Transpose: Adjust the pitch of the entire keyboard up or down in semitone steps.
- Tune: Fine-tune the overall pitch of the instrument.
- Metronome: Use the built-in metronome for rhythm practice. Adjust tempo and beat as needed.
4.8 Pedals
The KA130 includes three built-in pedals:
- Sustain Pedal (Right): Sustains notes, similar to an acoustic piano. Features half-damper effect for nuanced control.
- Sostenuto Pedal (Middle): Sustains only the notes held down at the moment the pedal is pressed.
- Soft Pedal (Left): Softens the sound of the notes played.
5. Maintenance and Care
- Cleaning: Wipe the instrument's surface with a soft, dry cloth. For stubborn dirt, slightly dampen the cloth with water and a mild detergent, then wipe dry immediately. Avoid abrasive cleaners, waxes, or solvents.
- Keyboard Care: Keep the keys clean. If they become dirty, wipe them with a soft cloth dampened with water and a small amount of mild soap.
- Storage: When not in use for extended periods, cover the piano with a dust cover to protect it from dust and debris.
- Environmental Conditions: Maintain a stable room temperature and humidity. Extreme fluctuations can affect the instrument's components.
6. Troubleshooting
| Problem | Possible Cause | Solution |
|---|---|---|
| No sound |
|
|
| Keys not responding or inconsistent touch |
|
|
| Distorted sound |
|
|
| Pedals not working |
|
|
If the problem persists after attempting these solutions, please contact Kurzweil customer support or a qualified service technician.
7. Technical Specifications
| Feature | Detail |
|---|---|
| Keyboard | 88-Note, fully weighted, hammer action (88RGTA) |
| Keyboard Sensitivity | 6 selectable response levels |
| Display | 7-segment 3-digit LED |
| Voice Type | Stereo PCM |
| Polyphony | 32 voice |
| Preset Programs | 16 Primary (+116 for GM) |
| Play Modes | Splits, Layers, Dual |
| Demo Songs | 50 demo + 221 learning songs |
| Recorder/Sequencer | 5 Song capacity |
| General MIDI | Yes |
| Transpose | Yes |
| Tune | Yes |
| Metronome | Yes |
| Education Mode | Bayer, Czerny 100,30,40, Sonatine with 'Score Lesson' mode |
| Finish | Simulated Rosewood (Black) |
| Audio Power | 30 W (15W + 15W) |
| Speakers | 6" x 2 |
| Audio Outputs | Stereo left/right RCA line outs |
| Audio Inputs | Stereo left/right RCA line ins |
| Headphone Jacks | (2) 1/4" stereo headphone outs |
| USB Port | (1) port; Plug and Play MIDI over USB |
| Pedals | (3) built-in sustain, sostenuto, soft (with half damper effect) |
| Included Accessories | Matching bench |
| Dimensions (H x W x D) | 86 x 136 x 44 cm |
| Weight | 45 kg |
| Power Source | AC Power Adapter (Note: Product data listed "Battery Powered" which is typically incorrect for this type of instrument; AC adapter is standard.) |
| Material Type | Wood |
8. Warranty and Customer Support
For warranty information, please refer to the warranty card included with your product or visit the official Kurzweil website. For technical support, service, or inquiries, please contact Kurzweil customer support through their official channels. Keep your purchase receipt as proof of purchase for warranty claims.