1. Introduction
This instruction manual provides comprehensive guidance for the installation, operation, and maintenance of your new Owigift Dryer Heating Element Replacement Kit. Designed for compatibility with various Kenmore and Whirlpool dryer models, this kit offers a reliable solution for restoring your appliance's heating functionality. Please read this manual thoroughly before beginning any installation or repair work.
2. Important Safety Information
- Disconnect Power: Always unplug the dryer from the electrical outlet before performing any service or maintenance. Failure to do so can result in electric shock or serious injury.
- Wear Protective Gear: Wear work gloves to protect your hands from sharp edges and safety glasses to protect your eyes.
- Professional Assistance: If you are unsure about any step of the installation or repair process, consult a qualified appliance technician.
- Ventilation: Ensure the dryer area is well-ventilated during and after installation.
- Fire Hazard: Lint accumulation can be a fire hazard. Regularly clean the lint trap and inspect the dryer vent for blockages.
3. Package Contents
Your Owigift Dryer Heating Element Replacement Kit typically includes the following components:
- Dryer Heating Element Assembly
- High-Limit Thermostat
- Thermal Fuse
- Cycling Thermostat
- Thermistor (if applicable)

Figure 1: Complete Owigift Dryer Heating Element Replacement Kit, including the heating element, thermostat, and fuses.
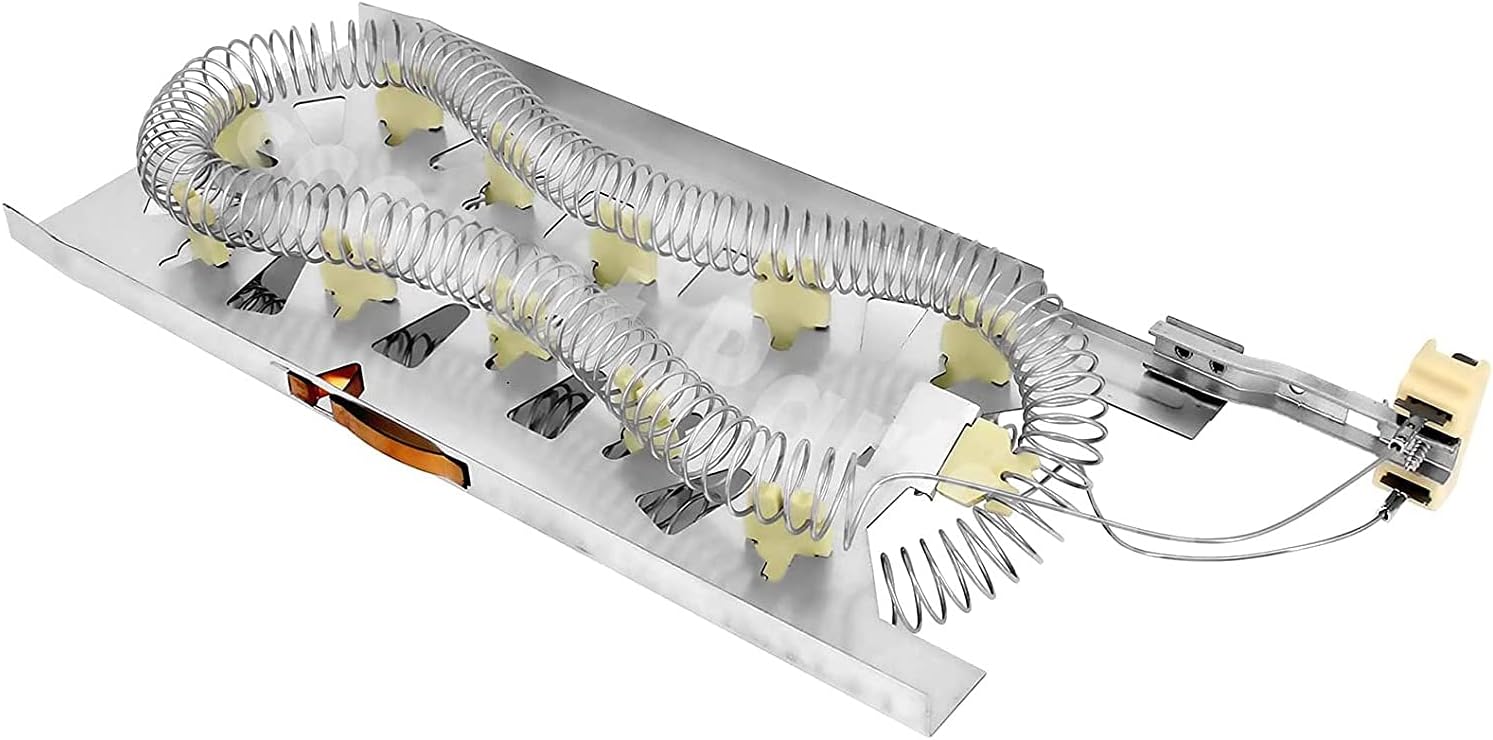
Figure 2: The main heating element assembly with coiled wires and ceramic insulators.

Figure 3: Close-up view of the electrical terminals on the heating element, showing connection points for wiring.
4. Compatibility
This Owigift Dryer Heating Element Replacement Kit is designed to be compatible with a wide range of Kenmore and Whirlpool electric dryer models. It also fits certain Maytag, Roper, Amana, KitchenAid, and Estate models. Please verify your dryer's model number against the list below or consult your appliance's manual to ensure proper fit.
Compatible Kenmore Models include:
- 110.82826103
- 110.62952100
- 110.66944501
- 110.66912690
- 110.64992300
- 110.68002011
- And many other similar models.
For specific Whirlpool models, please refer to your dryer's documentation or the product listing for a comprehensive list.
5. Installation Guide
Follow these steps carefully to replace your dryer's heating element. Always ensure the dryer is unplugged before starting.
- Disconnect Power: Unplug the dryer from the wall outlet.
- Access Rear Panel: Move the dryer away from the wall and remove the screws securing the rear access panel. Carefully remove the panel.
- Locate Heating Element: The heating element assembly is typically housed in a metal box at the bottom rear of the dryer.
- Disconnect Wires: Carefully disconnect all electrical wires connected to the heating element assembly, including those for the thermostat and thermal fuse. Note their positions for reassembly.
- Remove Old Element: Unscrew the mounting screws that hold the heating element assembly in place. Gently slide the old assembly out of its housing.
- Install New Element: Slide the new Owigift heating element assembly into the housing. Secure it with the mounting screws.
- Connect Wires: Reconnect all electrical wires to the new heating element, thermostat, and thermal fuse in their original positions. Ensure all connections are secure.
- Reattach Rear Panel: Replace the rear access panel and secure it with screws.
- Restore Power: Plug the dryer back into the electrical outlet.
Video 1: This video demonstrates the process of replacing a dryer heating element, including component identification and installation steps. (Source: Blue Stars LLC)
Video 2: This video provides a visual guide to the heating element and associated components, showing how they fit into the dryer. (Source: wsh supplier)
6. Testing the Heating Element
After installation, it is recommended to test the heating element for continuity using a multimeter to ensure it is functioning correctly before fully reassembling the dryer.
- Set Multimeter: Set your multimeter to the lowest resistance (ohms) setting.
- Test Probes: Touch the multimeter probes together to ensure the meter is working. It should read close to 0 ohms.
- Test Element: Place one probe on each terminal of the heating element. A functional heating element should show a reading between 10 and 50 ohms. If the reading is infinity (OL), the heating element is faulty and needs replacement.
- Test Thermostat/Fuses: Test the high-limit thermostat and thermal fuse for continuity. They should show a reading close to 0 ohms. If they read infinity, they are faulty.
7. Operating Instructions
Once the heating element is installed and tested, operate your dryer as usual. The new heating element should restore proper drying temperatures.
- Load clothes into the dryer.
- Select the desired drying cycle and temperature setting.
- Press the Start button.
- Monitor the dryer to ensure it is heating correctly.
8. Maintenance
Regular maintenance helps prolong the life of your dryer and its components, including the heating element.
- Clean Lint Trap: Clean the lint trap before every load to ensure proper airflow and prevent lint buildup.
- Inspect Dryer Vent: Periodically inspect and clean the dryer vent ductwork to prevent blockages. Restricted airflow can cause the heating element to overheat and fail prematurely.
- Check for Debris: Occasionally check the heating element housing for any lint or debris accumulation and clean as necessary.
9. Troubleshooting
If your dryer is still experiencing issues after replacing the heating element, consider the following common problems:
- Dryer Not Heating:
- Verify the dryer is receiving proper 240V power.
- Re-check continuity of the new heating element, thermal fuse, and thermostats. A new part can sometimes be defective.
- Inspect wiring connections for looseness or damage.
- Dryer Overheating:
- Check for blockages in the dryer vent system.
- Ensure the cycling thermostat is functioning correctly.
- Dryer Not Starting:
- Check the door switch for proper operation.
- Verify power supply and circuit breaker.
10. Specifications
- Brand: Owigift
- ASIN: B09BNW5NBB
- Date First Available: August 2, 2021
- Typical Resistance: 10-50 Ohms (for heating element)
11. Warranty and Support
For warranty information or technical support regarding your Owigift Dryer Heating Element Replacement Kit, please refer to the product packaging or contact the manufacturer directly through their official website or customer service channels. Keep your purchase receipt for warranty claims.


