1. Introduction
Thank you for choosing the WESCO WS4265.1 Orbital Sander. This manual provides essential information for the safe and efficient operation, maintenance, and troubleshooting of your new power tool. Please read these instructions carefully before use and keep them for future reference.

Image: The WESCO WS4265.1 Orbital Sander, showcasing its compact design, 400W motor, 125mm sanding disc, and variable speed control (4000-12000 RPM).
2. General Safety Instructions
Always follow basic safety precautions when using electric tools to reduce the risk of fire, electric shock, and personal injury. Keep this manual handy for reference.
- Work Area Safety: Keep your work area clean and well-lit. Cluttered or dark areas invite accidents. Do not operate power tools in explosive atmospheres, such as in the presence of flammable liquids, gases, or dust.
- Electrical Safety: Power tool plugs must match the outlet. Never modify the plug in any way. Avoid body contact with earthed or grounded surfaces. Do not expose power tools to rain or wet conditions.
- Personal Safety: Always wear appropriate personal protective equipment (PPE), including eye protection (safety glasses), hearing protection, and a dust mask. Dress properly; avoid loose clothing or jewelry. Keep hair, clothing, and gloves away from moving parts.
- Power Tool Use and Care: Do not force the power tool. Use the correct power tool for your application. Disconnect the plug from the power source before making any adjustments, changing accessories, or storing power tools. Store idle power tools out of the reach of children.
- Service: Have your power tool serviced by a qualified repair person using only identical replacement parts.
3. Product Overview
Familiarize yourself with the components of your WESCO WS4265.1 Orbital Sander:
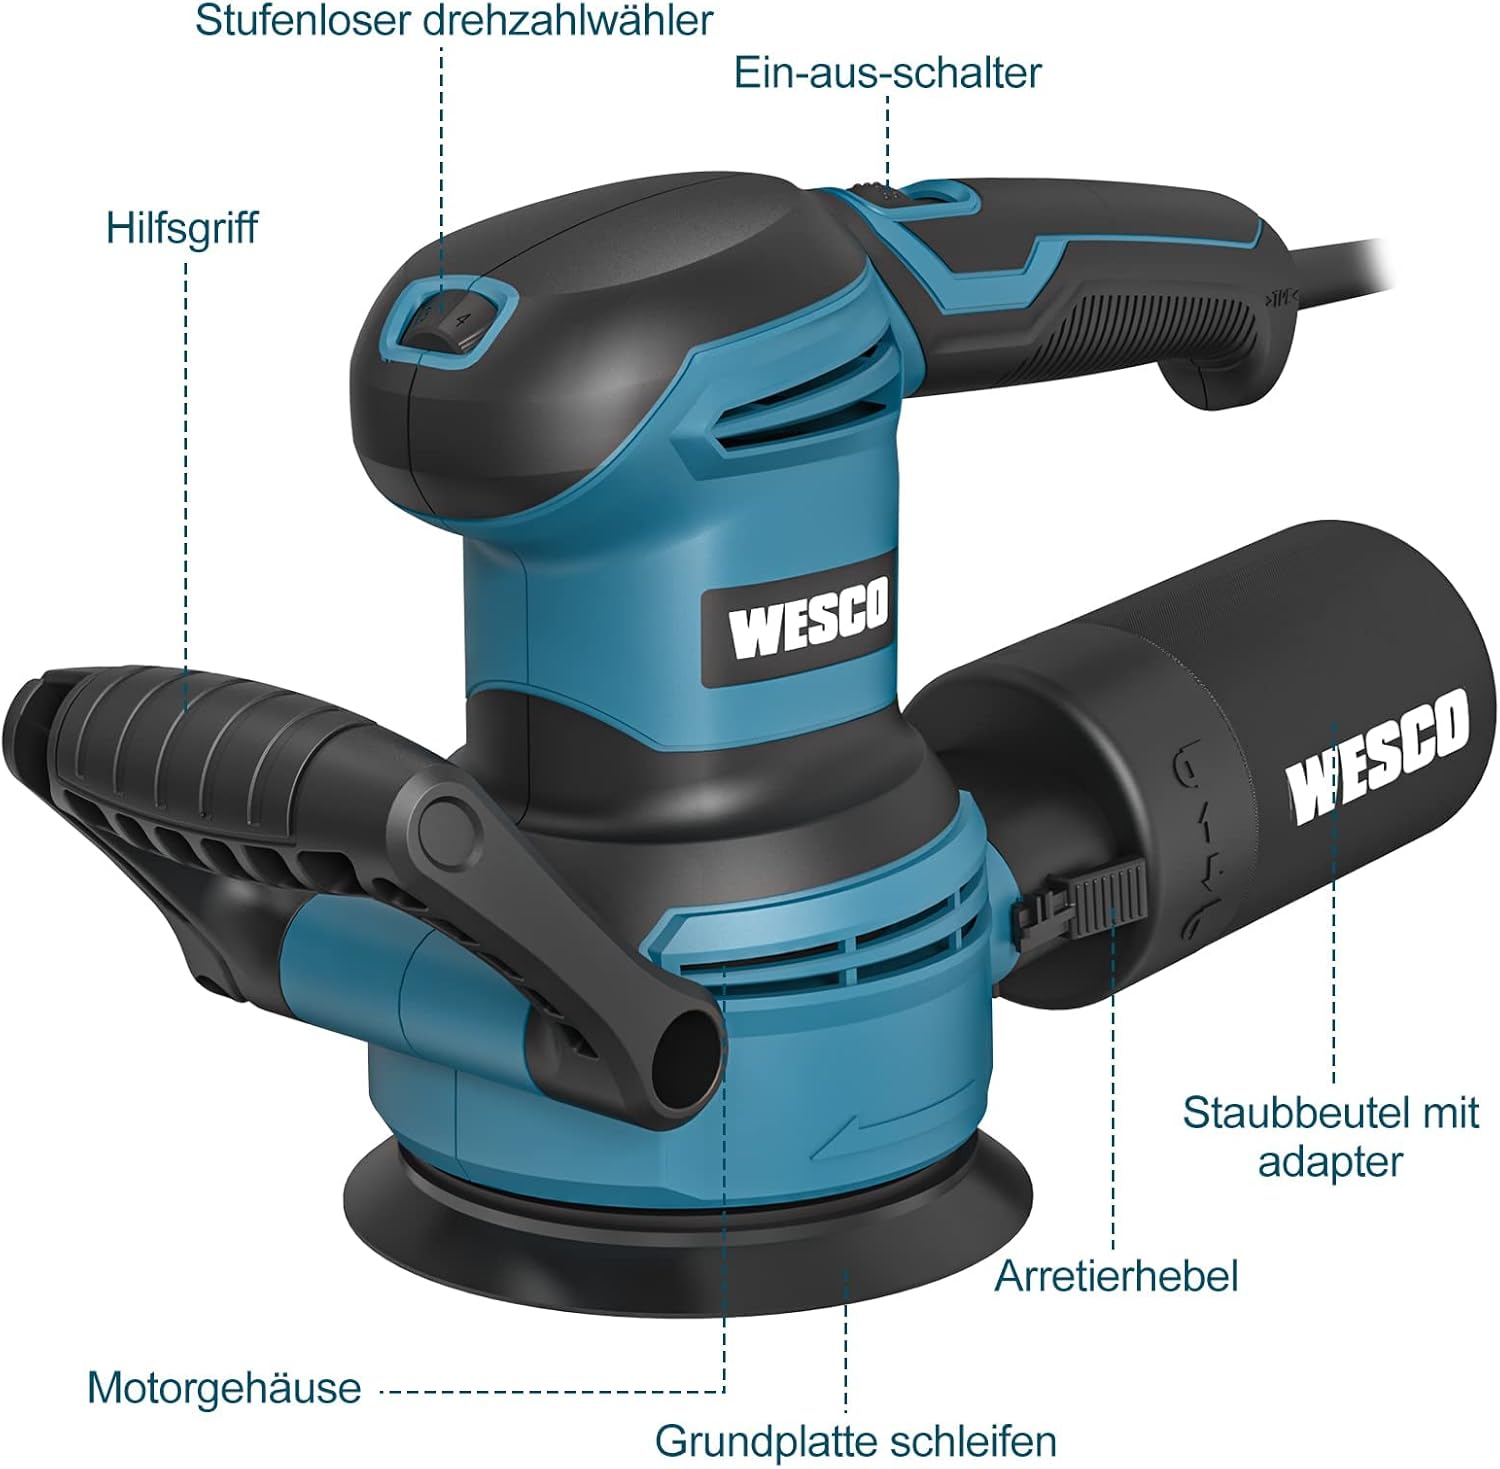
Image: Labeled diagram of the orbital sander.
- Stepless Speed Selector: Adjusts the sanding speed.
- On-Off Switch: Powers the tool on and off.
- Auxiliary Handle: Provides additional grip and control.
- Motor Housing: Encloses the motor and internal components.
- Sanding Base Plate: The circular plate where sandpaper is attached.
- Dust Bag with Adapter: Collects sanding dust.
- Locking Lever: Secures the dust bag or adapter.
4. Setup
4.1 Attaching Sandpaper
The WESCO WS4265.1 uses 125mm hook-and-loop sanding discs. Ensure the sandpaper grit is appropriate for your task (e.g., P60 for coarse removal, P100 for finer finishing).
- Ensure the sander is unplugged from the power source.
- Align the holes on the sanding disc with the holes on the sanding base plate.
- Press the sanding disc firmly onto the base plate to secure it.

Image: Various sandpaper grits (P60, P80, P100) and a hand attaching a sanding disc to the sander's base plate, aligning the holes for dust extraction.
4.2 Attaching Dust Collection
The sander comes with an integrated dust collection bag for a cleaner work environment. For enhanced dust extraction, an external vacuum cleaner can be connected.
- For Dust Bag: Align the dust bag adapter with the dust port on the sander and push it firmly until it locks into place with the locking lever.
- For External Vacuum: Remove the dust bag. Attach a suitable vacuum hose adapter to the dust port and connect it to your workshop vacuum cleaner.

Image: A hand attaching the dust collection bag to the sander's dust port.

Image: The orbital sander in use, connected to an external vacuum cleaner for efficient dust extraction.
5. Operating Instructions
5.1 Powering On/Off
To turn the sander on, press the On-Off switch. To turn it off, press the switch again. Always ensure a firm grip on the tool before starting.

Image: A close-up view of the On-Off switch located on the sander's handle.
5.2 Adjusting Speed
The sander features a stepless speed selector with 6 settings, allowing you to match the speed to the material and desired finish. Rotate the dial to increase or decrease the orbital speed.

Image: A close-up view of the speed selector dial, showing settings from 1 to Max.
5.3 Sanding Techniques
Hold the sander firmly with both hands. Apply light, even pressure and move the sander in overlapping circular or linear motions across the workpiece. Avoid pressing too hard, as this can reduce efficiency and damage the surface or the tool. The auxiliary handle can be adjusted for optimal comfort and control.

Image: The auxiliary handle demonstrating its adjustable positions for user comfort and control.
5.4 Applications
The WESCO WS4265.1 Orbital Sander is suitable for a variety of sanding and polishing tasks:
- Wood polishing and sanding
- Furniture renovation and polishing
- Rust removal from metal surfaces
- Automotive polishing (with appropriate pads)

Image: A collage illustrating the versatility of the sander for tasks such as wood polishing, rust removal, and sanding furniture.
6. Maintenance
Regular maintenance ensures the longevity and optimal performance of your sander.
6.1 Emptying the Dust Bag
Empty the dust bag regularly to maintain effective dust extraction and prevent clogging. A full dust bag reduces sanding efficiency.
- Unplug the sander from the power source.
- Release the locking lever and detach the dust bag.
- Empty the contents into a waste receptacle.
- Reattach the dust bag securely.

Image: A hand emptying collected dust from the sander's dust bag into a bucket.
6.2 Cleaning
After each use, clean the sander to remove dust and debris.
- Wipe the exterior of the tool with a damp cloth. Do not use harsh chemicals or solvents.
- Use compressed air to clear dust from ventilation openings and the sanding pad.
- Inspect the sanding base plate for wear or damage. Replace if necessary.

Image: A close-up of the sanding pad, highlighting the dust extraction holes that should be kept clear.
6.3 Storage
Store the sander in a dry, secure location, out of reach of children and away from direct sunlight or extreme temperatures.
7. Troubleshooting
If you encounter issues with your WESCO WS4265.1 Orbital Sander, refer to the following common problems and solutions:
| Problem | Possible Cause | Solution |
|---|---|---|
| Sander does not turn on | No power supply; Faulty switch | Check power cord and outlet; Ensure switch is fully engaged; Consult service if issue persists. |
| Poor sanding performance | Worn or incorrect sandpaper; Excessive pressure | Replace sandpaper; Use appropriate grit; Apply light, even pressure. |
| Excessive vibration | Improperly attached sandpaper; Damaged sanding pad | Re-attach sandpaper correctly; Inspect and replace sanding pad if damaged. |
| Ineffective dust collection | Full dust bag; Clogged dust port; Loose connection | Empty dust bag; Clear dust port; Ensure dust bag/vacuum hose is securely attached. |
| Tool overheating | Continuous heavy load; Blocked ventilation | Reduce load and allow tool to cool; Clear ventilation openings. |
8. Specifications
| Feature | Specification |
|---|---|
| Model | WS4265.1 |
| Brand | WESCO |
| Power Source | Corded Electric |
| Voltage | 230 Volt |
| Power Input | 400 W |
| No-load Speed | 4000-12000 RPM |
| Speed Settings | 6 (Stepless) |
| Sanding Disc Diameter | 125 mm |
| Weight | 2 kg |
| Included Sandpaper | 12 pieces (4x P60, 4x P80, 4x P100) |
9. Warranty and Support
WESCO products are manufactured to high-quality standards. For warranty information, technical support, or service inquiries, please refer to the warranty card included with your product or visit the official WESCO website. Keep your purchase receipt as proof of purchase.


