INFACE 02
inFace Aqua Peel Facial Device User Manual
Model: 02
1. Introduction
This manual provides detailed instructions for the safe and effective use of your INFACE Aqua Peel Facial Device, Model 02. Please read this manual thoroughly before operating the device and retain it for future reference.

Image 1.1: The INFACE Aqua Peel Facial Device, Model 02. This image displays the main unit with its sleek design and a single nozzle attached, highlighting its compact form factor.
2. Package Contents
Verify that all items listed below are present in your package:
- inFace Aqua Peel Facial Device (Main Unit)
- Facial Silicone Suction Nozzle (Large)
- T-zone Cleaning Suction Nozzle
- Precision Cleaning Suction Nozzle (Small)
- Silicone Base
- Solution Supplement Bottle
- Cleaning Brush
- Type-C Charging Cable
- User Manual (This document)

Image 2.1: Detailed view of the INFACE Aqua Peel Facial Device and its accessories. This image labels each component, including the main device, various suction nozzles, charging cable, cleaning brush, solution bottle, and silicone base.
3. Product Overview
Familiarize yourself with the components of the device:
- Facial Silicone Suction Nozzle (Large): Designed for cleaning larger areas like the forehead and cheeks.
- T-zone Cleaning Suction Nozzle: Optimized for the T-zone and chin areas to remove blackheads and aging keratin.
- Precision Cleaning Suction Nozzle (Small): For targeted cleaning of stubborn blackheads on the nose and wing areas.
- Water Tank Silicone Lid: Secures the water tank.
- Water Tank: Holds the cleaning solution.
- Level Indicator: Displays the current operating intensity level.
- ON/OFF (Function Switch) Button: Powers the device on/off and cycles through intensity levels.
- Power Indicator: Shows the device's power status.
- Sewage Tank: Collects used solution and extracted impurities.
- Silicone Base: Provides a stable resting place for the device.
Image 3.1: Labeled diagram of the INFACE Aqua Peel Facial Device, illustrating each part and its name for easy identification.
4. Setup
4.1 Charging the Device
- Connect the Type-C charging cable to the charging port on the device.
- Connect the other end of the cable to a suitable USB power adapter (not included).
- The power indicator will illuminate during charging. Ensure the device is fully charged before first use.
4.2 Preparing the Water Tank
- Remove the Water Tank Silicone Lid.
- Using the Solution Supplement Bottle, fill the Water Tank with your preferred skin care essence or cleaning solution. Do not overfill.
- Securely replace the Water Tank Silicone Lid.
4.3 Attaching a Suction Nozzle
- Select the appropriate suction nozzle for your intended cleaning area (Large, T-zone, or Small).
- Gently press the chosen nozzle onto the device's head until it is securely attached.
5. Operating Instructions
5.1 Powering On and Selecting Intensity
- Press and hold the ON/OFF (Function Switch) Button to power on the device. The device will start at the lowest intensity level.
- Press the ON/OFF (Function Switch) Button briefly to cycle through the three intensity levels:
- Low Level: Gentle mode, suitable for sensitive skin or initial use.
- Middle Level: Standard mode, for regular cleaning.
- High Level: Strength mode, for deeper cleaning on less sensitive areas.
- The Level Indicator lights will show the selected intensity.
- To power off the device, press and hold the ON/OFF (Function Switch) Button again.

Image 5.1: Illustration of the device's three intensity levels and their corresponding applications for cleaning and skin care essence delivery.
5.2 Application Areas and Nozzle Selection
Always ensure your face is clean and moist before use. Move the device continuously across the skin; do not leave it in one spot for an extended period to avoid skin irritation.
5.2.1 Large Areas Cleaning (Forehead, Cheeks)
- Use the Facial Silicone Suction Nozzle (Large).
- Gently glide the device across your forehead and cheeks. This nozzle is designed for broad coverage to clean and moisturize, effectively rejuvenating the skin.

Image 5.2: Demonstrates the use of the large suction nozzle for cleaning and moisturizing the forehead and cheek areas, showing removal of excess oil and cosmetic residues.
5.2.2 T-zone and Chin Cleaning
- Use the T-zone Cleaning Suction Nozzle.
- Focus on the T-zone (forehead, nose, chin) and chin areas. This nozzle is effective for removing blackheads and aging keratin.

Image 5.3: Illustrates the application of the T-zone cleaning suction nozzle for targeting blackheads and aging keratin in the T-zone and chin areas.
5.2.3 Precision Cleaning (Nose & Wing)
- Use the Precision Cleaning Suction Nozzle (Small).
- Target stubborn blackheads on the nose and the wings of the nose. This nozzle allows for precise application in smaller, contoured areas.
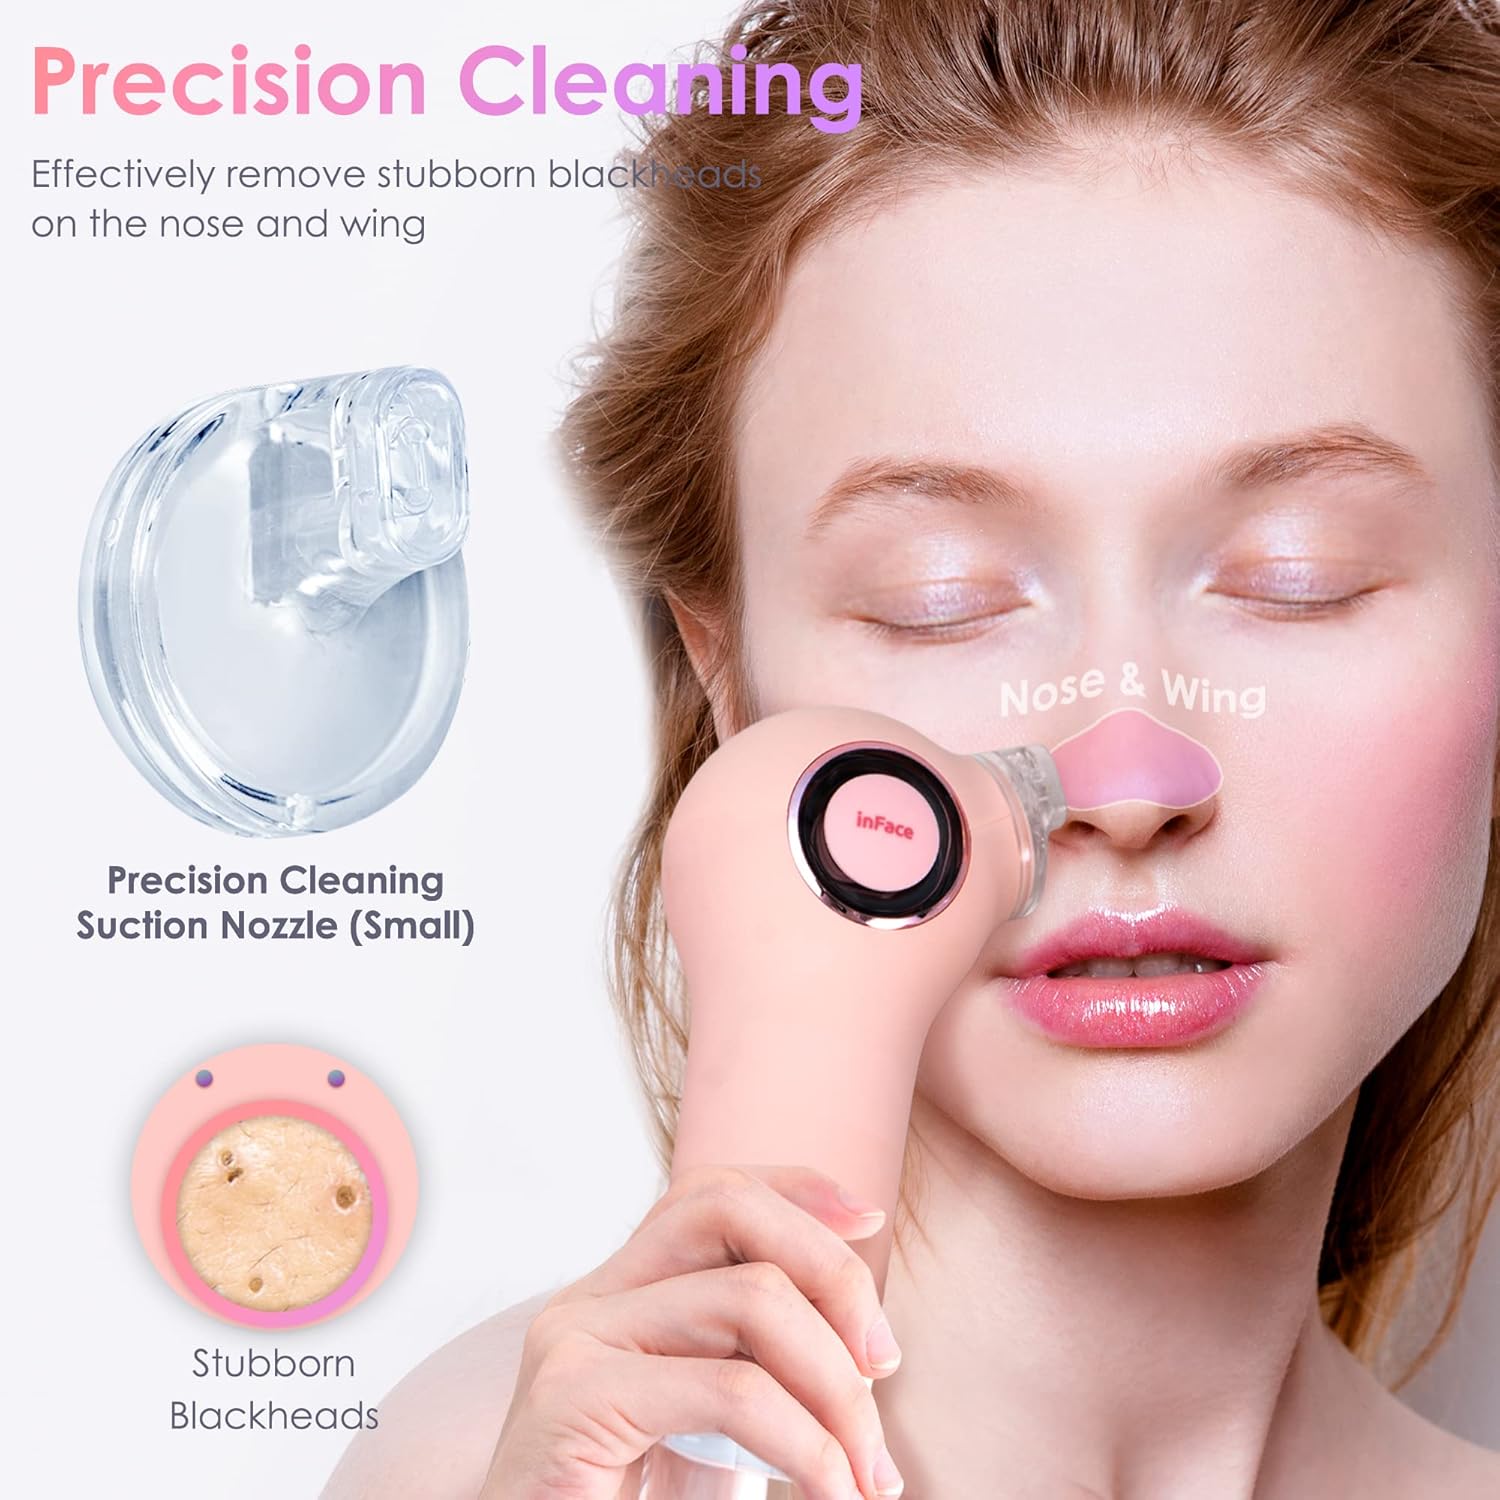
Image 5.4: Shows the small precision cleaning nozzle being used to effectively remove stubborn blackheads from the nose and its surrounding areas.
6. Maintenance
6.1 Cleaning the Device
- After each use, power off the device.
- Remove the suction nozzle and rinse it thoroughly under running water.
- Empty the Sewage Tank and rinse it with clean water.
- Use the provided Cleaning Brush to remove any residue from the nozzles and the device's head.
- Wipe the main unit with a soft, damp cloth. Do not immerse the main unit in water.
- Allow all components to air dry completely before reassembling or storing.
6.2 Storage
Store the device in a cool, dry place, away from direct sunlight and out of reach of children.
7. Troubleshooting
| Problem | Possible Cause | Solution |
|---|---|---|
| Device does not turn on. | Battery is low or depleted. | Charge the device fully using the provided Type-C cable. |
| Weak suction. |
|
|
| Red marks or irritation on skin. |
|
|
8. Specifications
| Brand | INFACE |
| Model Number | 02 |
| Item Form | Pen |
| Material | Silicone |
| Color | Aqua |
| Item Weight | 712 g |
| Package Dimensions | 24.2 x 13 x 8.6 cm |
| Batteries | 1 Lithium Ion battery (included) |
| Country of Origin | China |
9. Warranty and Support
For warranty information or technical support, please refer to the documentation provided with your purchase or contact the retailer where the device was acquired. Keep your proof of purchase for warranty claims.