Introduction
This manual provides essential information for the proper use and maintenance of your replacement paddle for the Magic Chef Bread Maker Model CBM-310 (CBM310). This paddle is designed specifically for the aforementioned model to ensure optimal performance in your bread-making process.
Product Overview
The bread maker paddle is a crucial component responsible for kneading dough within the bread machine pan. Its design ensures thorough mixing and kneading for various bread types.
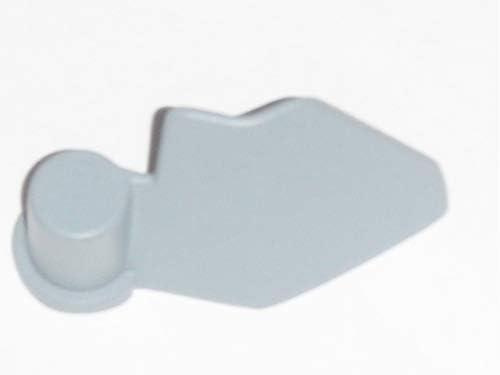
Figure 1: Front view of the replacement bread maker paddle, showing its distinct shape for kneading.

Figure 2: Side view of the bread maker paddle, highlighting the shaft for attachment to the bread machine.
Compatibility and Model Verification
This replacement paddle is specifically designed for the Magic Chef Bread Maker Model CBM-310 (CBM310) ONLY. It is crucial to verify your bread maker's model number to ensure proper fit and function. Using an incorrect paddle may damage your appliance or result in poor bread quality.
To identify your bread maker's model number, please check the outer exterior surface of your machine. This information is typically found on an adhesive decal, ink stamp, or embedded impression on the sides, bottom, or push-button control panel.

Figure 3: Important notice regarding model number verification. Always confirm your bread maker's model before acquiring replacement parts.

Figure 4: Example of a bread maker label indicating the model number CBM-310 (310), typically found on the appliance's underside or rear.
Installation and Setup
- Ensure Safety: Before handling any parts of your bread maker, ensure the appliance is unplugged from the power outlet and completely cool.
- Remove Old Paddle (if applicable): If replacing an existing paddle, gently pull the old paddle upwards from the kneading shaft inside the bread pan. If it's stuck, you may need to wiggle it slightly or apply a small amount of cooking oil around the shaft base to loosen it.
- Clean the Shaft: Clean any dough residue or debris from the kneading shaft inside the bread pan. A small brush or damp cloth can be used. Ensure the shaft is dry before installing the new paddle.
- Install New Paddle: Align the new paddle with the kneading shaft at the bottom of the bread pan. Push the paddle down firmly until it clicks into place or sits securely on the shaft. Ensure it can rotate freely.
- Verify Installation: Gently try to pull the paddle up to ensure it is securely attached. It should not come off easily.
Operation
Once the paddle is correctly installed in the bread pan, it will function automatically as part of your bread maker's programmed cycles. The paddle's primary role is to mix and knead the ingredients thoroughly during the dough preparation phases.
- Ingredient Placement: Always place the paddle in the bread pan before adding liquid and dry ingredients according to your recipe.
- Kneading Process: The paddle will rotate during the kneading cycles, ensuring all ingredients are well combined and the dough develops the correct consistency.
- Paddle Removal (Optional): For some recipes, or to avoid a hole in the finished loaf, the paddle can be removed after the final kneading cycle and before the baking cycle begins. Always unplug the machine and allow it to cool before attempting to remove the paddle.
Maintenance and Care
Proper maintenance of your bread maker paddle will extend its lifespan and ensure hygienic operation.
- Cleaning After Each Use: After each use, remove the paddle from the bread pan. Wash it immediately with warm, soapy water to prevent dough from drying and sticking. Use a soft sponge or cloth.
- Removing Stuck Dough: If dough is stuck, soak the paddle in warm water for 10-15 minutes to loosen residue before cleaning. Avoid using abrasive scrubbers or harsh chemicals, as these can damage the non-stick coating (if applicable) or material.
- Drying: Thoroughly dry the paddle before storing it to prevent rust or mineral buildup.
- Storage: Store the paddle in a clean, dry place, preferably with your bread maker or its accessories.
Troubleshooting
Here are some common issues related to the bread maker paddle and their potential solutions:
| Problem | Possible Cause | Solution |
|---|---|---|
| Paddle not kneading or rotating. | Paddle not properly seated on the shaft; shaft or paddle is damaged; bread maker malfunction. | Ensure paddle is pushed down firmly. Inspect paddle and shaft for damage. If damaged, replace the paddle. If the bread maker is malfunctioning, consult its main instruction manual or contact the manufacturer. |
| Dough sticking to the paddle excessively. | Insufficient cleaning; worn non-stick coating (if applicable); recipe issues. | Clean paddle thoroughly after each use. Soak in warm water if dough is dried on. If coating is worn, consider replacement. Adjust recipe ingredients if dough is too sticky. |
| Paddle comes off during kneading. | Paddle not securely installed; worn paddle shaft opening; worn bread pan shaft. | Reinstall paddle, ensuring it is pushed down firmly. If the paddle or shaft opening is worn, replace the paddle. If the bread pan shaft is worn, the bread pan may need replacement. |
Specifications
- Product Type: Replacement Bread Maker Paddle
- Compatibility: Magic Chef Bread Maker Model CBM-310 (CBM310)
- Manufacturer: Generic
- Country of Origin: China
- Item Model Number: CBM-310, CBM310
- ASIN: B09BK12VB6
- Package Dimensions: 10 x 8 x 1 inches (approximate)
Support
For further assistance or inquiries regarding this replacement paddle, please refer to the original bread maker's instruction manual or contact the seller from whom you purchased this part. Ensure you have your bread maker's model number and the paddle's ASIN (B09BK12VB6) ready when seeking support.


