1. Introduction
The Blackmagic Design HyperDeck Studio HD Mini is a compact and professional studio recorder designed for high-quality video recording and playback. It supports various video formats and offers robust performance for both studio and mobile production environments. This manual provides essential information to help you maximize the functionality and longevity of your device.
2. Safety Information
Please read and follow these safety guidelines to ensure safe operation and prevent damage to the device or injury to yourself.
- Power Supply: Use only the specified power adapter. Ensure the power cable is securely connected and not damaged. Note that a power cable may not be included and might need to be sourced separately.
- Ventilation: Do not block ventilation openings. Ensure adequate airflow around the unit to prevent overheating.
- Liquid Exposure: Keep the device away from water or other liquids. Do not operate in damp or wet conditions.
- Cleaning: Disconnect power before cleaning. Use a dry, soft cloth. Do not use liquid or aerosol cleaners.
- Servicing: Do not attempt to service the unit yourself. Refer all servicing to qualified service personnel.
3. Product Overview
The HyperDeck Studio HD Mini features a robust design with intuitive controls and comprehensive connectivity options. Its compact size allows for easy integration into various production setups.
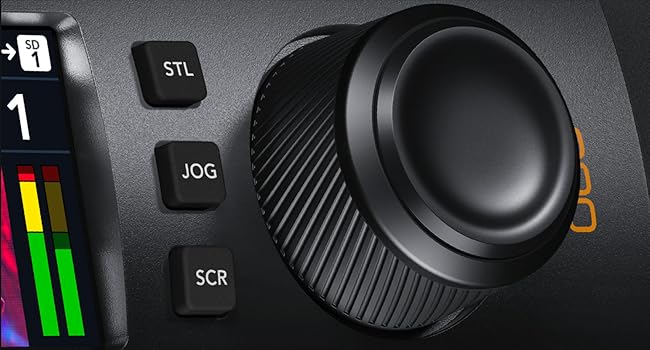
3.1 Front Panel

The front panel includes transport controls (Play, Stop, Record, Fast Forward, Rewind), Search button, Menu and Set buttons, dual SD card slots, and an LCD screen for status and preview.
3.2 Rear Panel
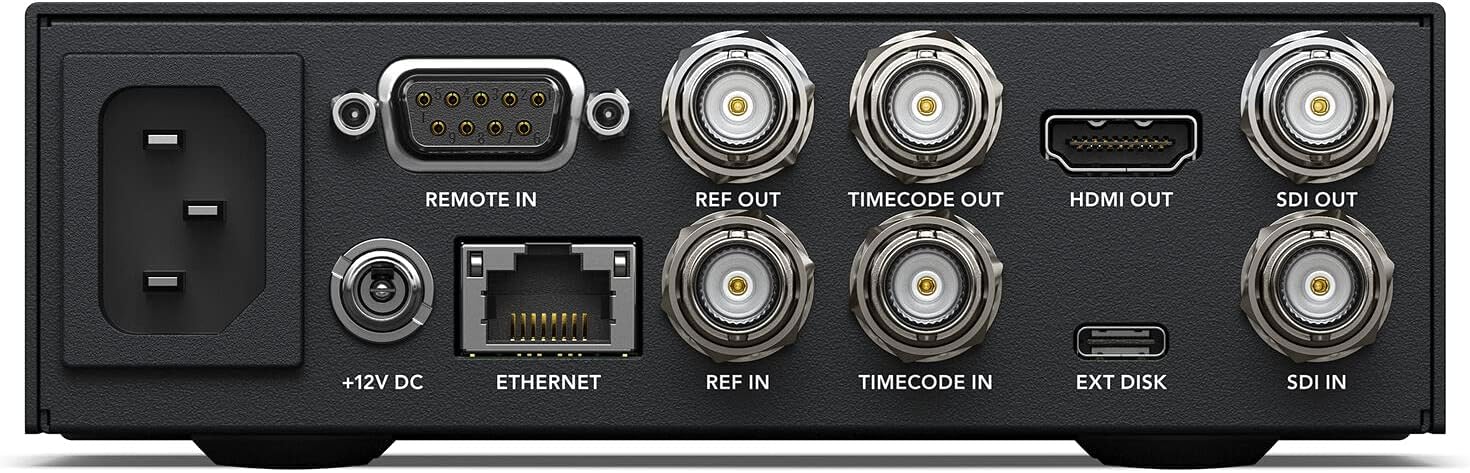
The rear panel provides extensive connectivity, including AC power input, +12V DC input, Ethernet, USB-C for external recording and webcam output, Remote In, Ref In/Out, Timecode In/Out, HDMI Out, and SDI In/Out.
3.3 Port and Control Diagram

This diagram highlights the location and function of each port and control for easy reference.
3.4 Dimensions and Weight
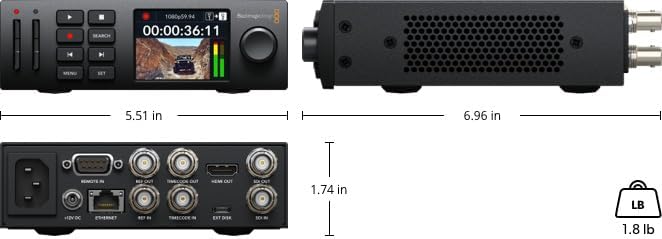
The unit measures approximately 9.1 x 9.1 x 9.1 inches and weighs 2.1 pounds (953 grams), making it highly portable and suitable for various setups.
4. Setup
Follow these steps to set up your Blackmagic Design HyperDeck Studio HD Mini.
- Unboxing: Carefully remove the HyperDeck Studio HD Mini from its packaging. Inspect for any physical damage.
- Power Connection: Connect the appropriate power cable (not always included) to the AC power input on the rear panel. Plug the other end into a suitable power outlet. Alternatively, use a +12V DC power source.
- Video Input: Connect your video source (e.g., camera, switcher) to the SDI IN or HDMI IN port on the rear panel using appropriate cables.
- Video Output: Connect the SDI OUT or HDMI OUT port to your monitor or downstream equipment.
- Storage Media: Insert compatible SD/UHS-II cards into the front panel slots. For external recording, connect a USB disk to the USB-C port.
- Network Connection (Optional): For remote control or network file transfer, connect an Ethernet cable to the Ethernet port.
- Initial Power On: Once all connections are secure, power on the device. The LCD screen will display the startup sequence.
4.1 Setup Demonstration
5. Operating Instructions
This section details the primary functions of the HyperDeck Studio HD Mini.
5.1 Recording
- Insert Media: Ensure a formatted SD card or external USB disk is connected.
- Select Input: Use the MENU and SET buttons to navigate the LCD menu and select your desired input source (SDI or HDMI).
- Configure Settings: Adjust recording format, codec (H.264, ProRes, DNxHD), and other parameters via the menu.
- Start Recording: Press the REC button. The record indicator will illuminate, and the timecode on the LCD will begin counting.
- Stop Recording: Press the STOP button to end the recording. The device will finalize the file on the storage medium.
5.2 Playback
- Select Clip: Use the SEARCH dial or SKIP buttons to navigate and select the desired clip from your storage media.
- Start Playback: Press the PLAY button. The video will be output to the connected monitor.
- Pause/Stop: Use the PLAY button to pause and the STOP button to end playback.
6. Maintenance
Proper maintenance ensures the longevity and optimal performance of your HyperDeck Studio HD Mini.
- Cleaning: Regularly wipe the exterior with a soft, dry, lint-free cloth. Avoid abrasive cleaners or solvents.
- Firmware Updates: Periodically check the Blackmagic Design website for firmware updates. Updates can improve performance, add features, and fix bugs.
- Storage Media Care: Always eject SD cards and external drives safely. Format SD cards fully (not quick format) as recommended for optimal performance and recognition by the device.
- Environmental Conditions: Operate and store the device in a clean, dry environment within the recommended temperature and humidity ranges.
7. Troubleshooting
Refer to this section for solutions to common issues.
| Issue | Possible Cause | Solution |
|---|---|---|
| Device does not power on | No power cable connected or faulty cable/outlet. | Ensure power cable is securely connected and functional. Verify power outlet. |
| SD card not recognized / "No card" message | Incorrect card format (e.g., quick format instead of full exFAT). Incompatible card type. | Perform a full exFAT format on the SD card using a computer. Ensure the card is UHS-II compatible. |
| No video signal on output | Incorrect input selection, faulty cables, or incompatible video format. | Check input source selection in the menu. Verify cable connections. Ensure input video format is supported. |
| Recorded files not playing back on other devices | Codec incompatibility on playback device. | Ensure your playback software/device supports the codec used for recording (H.264, ProRes, DNxHD). |
| Overheating during extended use | Blocked ventilation or poor ambient airflow. | Ensure the unit has clear space around its ventilation grilles. Operate in a well-ventilated area. |
8. Specifications
Key technical specifications for the Blackmagic Design HyperDeck Studio HD Mini.
- Model Number: HYPERD/ST/DAHM
- Dimensions: 9.1 x 9.1 x 9.1 inches
- Weight: 2.1 pounds (953 Grams)
- Connectivity: HDMI, USB-C, SDI, Ethernet, Remote In, Ref In/Out, Timecode In/Out
- Storage Media: Dual SD/UHS-II card slots, External USB Disk via USB-C
- Supported Codecs: H.264, ProRes, DNxHD
- Supported Resolutions: Up to 1080p60 (HD Mini)
- Number of Channels: 16 (Audio)
- Compatible Devices: Canon EOS R5, Sony A7S III, Nikon Z6 II (examples)
9. Warranty and Support
Blackmagic Design products are manufactured to high standards. For specific warranty details, please refer to the warranty card included with your product or visit the official Blackmagic Design website. Technical support and additional resources can be found on the Blackmagic Design support page.
For further assistance, please visit: www.blackmagicdesign.com/support


