Introduction
The Waveshare 2-Channel Isolated CAN Bus FD Expansion HAT is designed for Raspberry Pi series boards and Jetson Nano, providing two independent CAN FD channels. It features the MCP2518FD CAN controller and MCP2562FD CAN transceiver, supporting both original CAN2.0 and CAN FD protocols. This HAT incorporates multiple protection circuits to ensure safe and reliable communication in various applications.

Image: Top view of the Waveshare 2-Channel CAN FD HAT, showing the Waveshare logo and "2-CH CAN FD HAT" text.
Features
- 2-Channel CAN FD Support: Equipped with MCP2518FD CAN Controller and MCP2562FD CAN Transceiver, supporting CAN with Flexible Data-Rate for high anti-interference capability and stable operation.
- Raspberry Pi Compatibility: Standard Raspberry Pi 40PIN GPIO header, compatible with Raspberry Pi series boards and Jetson Nano. Includes breakout SPI control pins for host control boards like Arduino/STM32.
- Multi Onboard Protection Circuits: Features 500W lightning/surge protection, ESD protection, short circuit protection, and electrical isolation for enhanced communication safety and reliability.
- Electrical Isolation Circuitry: Utilizes SM24CANB TVS Diode, ESD Protection, and Transient Peak Voltage Protection to provide isolated and stable CAN FD capability.
- Flexible Jumper Settings: Easily select 3.3V / 5V operating voltage and enable/disable the 120Ω terminal resistor via onboard jumpers.
Product Overview and Pinout

Image: Detailed view of the HAT's components and pinout definitions.
What's On Board
- MCP2518FD controller
- MCP2562FD transceiver
- S18642ED digital isolator
- MP1584EN power chip
- RT9193-33 power chip
- B0505LS-1W power supply isolation module
- Standard Raspberry Pi 40PIN GPIO header
- CAN bus screw terminal
- External power supply terminal (8-28V DC input)
- MCU control pins (for use with host boards like Arduino)
- 120Ω terminal resistor switch
- 3.3V/5V logic level switch
- CAN operating mode selection
- 2A fast resettable fuse
- Power supply reverse-proof diode
- Power supply flow backward proof diode
- Freewheeling diode
- SM24CANB TVS diode
Pinout Definition (HAT Specific Functions)
| HAT Function | Raspberry Pi GPIO Pin(s) |
|---|---|
| CAN0 SPI MISO | GPIO9 (Pin 19) |
| CAN0 SPI MOSI | GPIO10 (Pin 21) |
| CAN0 SPI SCK | GPIO11 (Pin 23) |
| CAN0 Chip Select (CS0) | GPIO8 (Pin 24) |
| CAN0 Interrupt (INT0) | GPIO5 (Pin 29) |
| CAN1 SPI MISO | GPIO19 (Pin 35) |
| CAN1 SPI MOSI | GPIO20 (Pin 37) |
| CAN1 SPI SCK | GPIO21 (Pin 39) |
| CAN1 Chip Select (CS1) | GPIO7 (Pin 26) |
| CAN1 Interrupt (INT1) | GPIO6 (Pin 31) |
| Power | 5V (Pin 2, 4), 3.3V (Pin 1, 17) |
| Ground | GND (Pin 6, 9, 14, 20, 25, 30, 34, 40) |
Note: This table highlights the primary functional pins used by the HAT. Refer to the image above for a complete Raspberry Pi 40PIN GPIO header pinout.
Setup and Installation
1. Physical Installation
Align the 40-pin GPIO header of the CAN FD HAT with the corresponding header on your Raspberry Pi or Jetson Nano board. Gently press down to ensure a secure connection. The HAT is designed to fit directly onto the Raspberry Pi's GPIO pins.
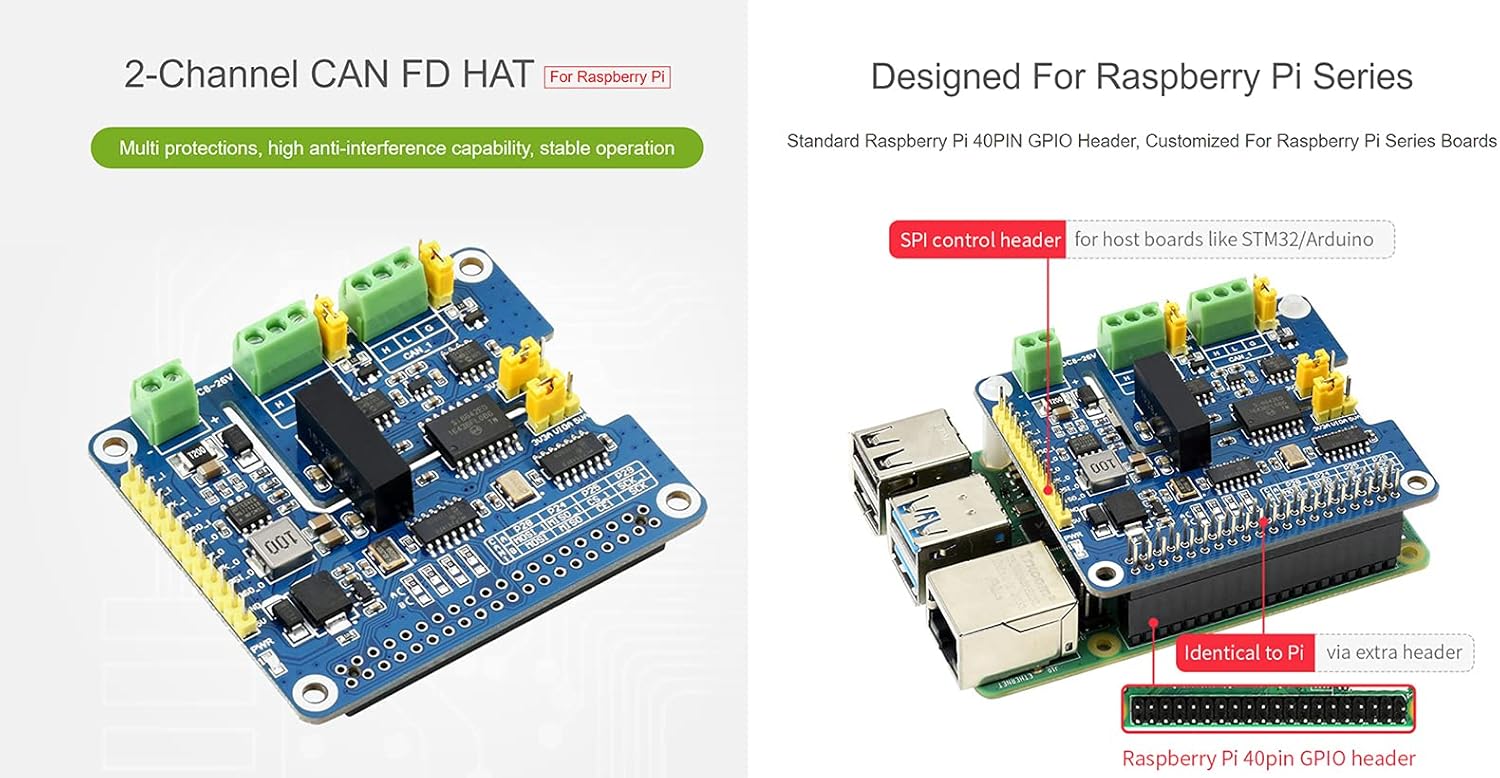
Image: The 2-Channel CAN FD HAT securely mounted on a Raspberry Pi board, showing the SPI control header breakout for other host boards.
2. Jumper Configuration
Before connecting power or CAN devices, configure the onboard jumpers according to your application requirements.
- Logic Level Selection (3.3V / 5V): Use the "3.3V/5V logic level switch" (labeled 12 in the overview) to select the appropriate operating voltage for the logic signals, matching your host board (e.g., Raspberry Pi uses 3.3V).
- 120Ω Terminal Resistor: The CAN bus requires a 120Ω termination resistor at each end of the bus. Use the "120Ω terminal resistor switch" (labeled 11 in the overview) for each CAN channel to enable or disable this resistor as needed. Ensure only two 120Ω resistors are active on the entire CAN bus network.
- CAN Operating Mode Selection: The "CAN operating mode selection" jumper (labeled 13 in the overview) allows configuration for single or dual SPI operation. By default, CAN0 and CAN1 use two separate SPI interfaces.

Image: Close-up of the HAT showing the 120Ω terminal resistor switches and the 3.3V/5V logic level switch.
3. Connecting CAN Devices and Power
Connect your CAN devices to the "CAN bus screw terminal" (labeled 8 in the overview). Each CAN channel (CAN_0 and CAN_1) has dedicated H (High), L (Low), and G (Ground) terminals. Ensure correct polarity.
For external power, connect an 8-28V DC power supply to the "External power supply terminal" (labeled 9 in the overview). This is optional if your Raspberry Pi can adequately power the HAT and connected devices, but recommended for stable operation, especially with multiple CAN devices or long bus lines.

Image: Diagram illustrating connections for external power supply and two CAN devices to the HAT.
Operating Instructions
Once physically installed and configured, the Waveshare 2-Channel CAN FD HAT communicates with your Raspberry Pi via the SPI interface. You will need to enable SPI on your Raspberry Pi and install the necessary drivers and libraries to interact with the MCP2518FD CAN controller.
- Software Configuration: Refer to the Waveshare product wiki or documentation for specific software setup instructions, including enabling SPI, installing
can-utils, and configuring the CAN interfaces (e.g.,ip link set can0 up type can bitrate 500000 dbitrate 2000000 sample-point 0.75 dsample-point 0.75). - CAN FD Protocol: The HAT supports CAN with Flexible Data-Rate (CAN FD), allowing for higher data rates and larger data payloads compared to classic CAN 2.0. Ensure your software and connected CAN devices are configured to utilize CAN FD if desired.
- Communication: Use standard CAN communication tools and libraries in your chosen programming language (e.g., Python with
python-can) to send and receive CAN messages through thecan0andcan1interfaces.
Maintenance
The Waveshare 2-Channel CAN FD HAT is a robust electronic component designed for long-term operation. Minimal maintenance is required.
- Environmental Conditions: Operate the HAT within its specified temperature and humidity ranges. Avoid exposure to extreme temperatures, moisture, or corrosive environments.
- Cleaning: If necessary, gently clean the board with a soft, dry, anti-static brush or cloth. Do not use liquids or abrasive cleaners.
- Static Discharge: Always handle the HAT with proper ESD (Electrostatic Discharge) precautions to prevent damage to sensitive components.
- Firmware/Software Updates: Regularly check the Waveshare official website or product wiki for any updated drivers, firmware, or software libraries that may improve performance or add new features.
Troubleshooting
If you encounter issues with your Waveshare 2-Channel CAN FD HAT, consider the following troubleshooting steps:
- No CAN Communication:
- Verify that the HAT is securely seated on the Raspberry Pi's GPIO header.
- Check all CAN bus wiring for correct polarity (CAN_H, CAN_L, GND) and secure connections.
- Ensure the 120Ω terminal resistors are correctly enabled/disabled for your network topology. Only two terminators should be active on the entire bus.
- Confirm that SPI is enabled on your Raspberry Pi and the necessary CAN drivers are loaded.
- Check the logic level jumper (3.3V/5V) matches your Raspberry Pi's GPIO voltage.
- Verify the external power supply (if used) is providing the correct voltage (8-28V DC) and is properly connected.
- HAT Not Detected:
- Ensure the Raspberry Pi is powered off before installing or removing the HAT.
- Double-check the physical connection to the Raspberry Pi's GPIO header.
- Confirm that the Raspberry Pi's operating system is correctly configured to recognize SPI devices.
- Intermittent Communication:
- Check for electromagnetic interference (EMI) sources near the CAN bus cables.
- Ensure CAN bus cable length is within specifications for your chosen bitrate.
- Verify the stability of the power supply to both the Raspberry Pi and the HAT.
For further assistance, refer to the official Waveshare product documentation or contact their technical support.
Specifications
| Feature | Description |
|---|---|
| CAN Controller | MCP2518FD |
| CAN Transceiver | MCP2562FD |
| CAN Channels | 2 (Independent) |
| Supported Protocols | CAN 2.0, CAN FD |
| Host Interface | SPI |
| Compatibility | Raspberry Pi series boards, Jetson Nano, Arduino/STM32 (via breakout SPI) |
| Operating Voltage (Logic) | 3.3V / 5V (selectable) |
| External Power Input | 8-28V DC (via screw terminal) |
| Protection Circuits | 500W lightning/surge, ESD, short circuit, electrical isolation (SM24CANB TVS Diode, S18642ED digital isolator, B0505LS-1W power isolation) |
| Terminal Resistor | 120Ω (selectable for each channel) |
Outline Dimensions

Image: Technical drawing showing the outline dimensions of the HAT in millimeters.
- Length: 65.00 mm
- Width: 56.50 mm
- Height (approx): 17.00 mm (from PCB to top of tallest component)
Warranty and Support
This Waveshare product is covered by a standard manufacturer's warranty. For specific warranty terms, duration, and conditions, please refer to the official Waveshare website or contact their customer service directly.
For technical support, documentation, and software resources, please visit the Waveshare product wiki or support portal. You can also reach out to their technical support team for assistance with installation, configuration, or troubleshooting.


