
1. Introduction
The Sonoro Easy is a compact and portable digital radio designed to provide powerful sound for various occasions. It features FM, DAB+, and Bluetooth connectivity, along with an AUX input for external devices. Its small footprint allows for easy placement in any room, and the intuitive controls ensure straightforward operation. The integrated LED night light and USB charging port add to its versatility, making it an ideal companion for your bedroom, kitchen, or on the go.
2. Setup
2.1 Unpacking
Carefully remove the Sonoro Easy radio from its packaging. Ensure all components are present:
- Sonoro Easy Digital Radio
- Power Adapter
- User Manual (this document)
2.2 Powering On
The Sonoro Easy can be powered via the included mains adapter or by batteries for portable use.
Mains Power:
- Connect the power adapter to the "12V - 2.5A" DC input port on the rear of the radio.
- Plug the power adapter into a suitable wall outlet.
- Press the Power button on the front panel to turn on the device.
Battery Power:
The radio supports alkaline or NiMH rechargeable batteries (not included). The battery compartment is located on the bottom of the unit.
- Open the battery compartment cover.
- Insert the required batteries, ensuring correct polarity.
- Close the battery compartment cover securely.
- Press the Power button to turn on the device.

Figure 1: Rear panel connections including power input and antenna.
2.3 Initial Setup and Antenna
Upon first power-on, the radio may perform an initial scan for DAB+ stations. Extend the telescopic antenna for optimal reception for both FM and DAB+ radio.

Figure 2: Front display and controls of the Sonoro Easy radio.
3. Operating Instructions
3.1 Basic Controls
The Sonoro Easy features intuitive controls located on the top and front panels.
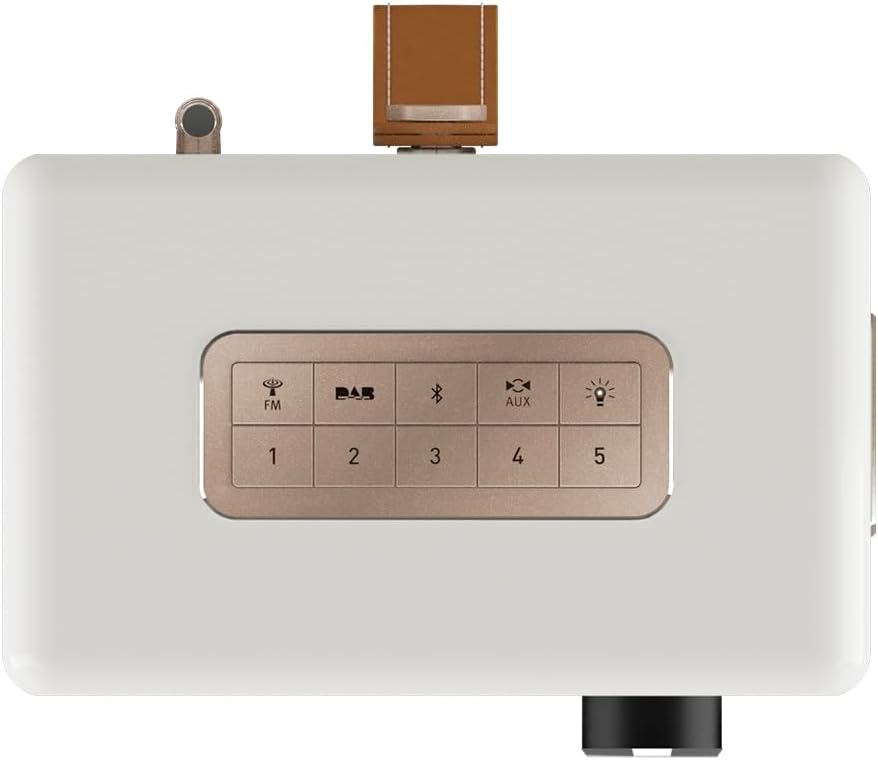
Figure 3: Top panel controls including preset and function buttons.
- Power Button: Turns the radio on or off.
- Rotary Knob: Used for volume control, menu navigation, and selection.
- Preset Buttons (1-5): Store and recall your favorite radio stations.
- Function Buttons (FM, DAB, Bluetooth, AUX, Night Light): Select the desired operating mode.
3.2 Radio Modes (DAB+ / FM)
DAB+ Radio:
- Press the DAB button to enter DAB+ mode.
- The radio will automatically scan for available stations.
- Use the rotary knob to scroll through the station list and press to select.
- To save a station as a preset, press and hold one of the Preset Buttons (1-5) until the display confirms.
FM Radio:
- Press the FM button to enter FM mode.
- Use the rotary knob to manually tune to a frequency or press and hold to auto-scan for the next available station.
- To save a station as a preset, press and hold one of the Preset Buttons (1-5) until the display confirms.
3.3 Bluetooth Connectivity
- Press the Bluetooth button to activate Bluetooth pairing mode. The display will show "Pairing".
- On your mobile device, enable Bluetooth and search for "Sonoro Easy".
- Select "Sonoro Easy" from the list of available devices to connect.
- Once connected, you can stream audio from your device to the radio.
3.4 AUX Input
- Connect an external audio device (e.g., MP3 player) to the "AUX IN" port on the rear of the radio using a 3.5mm audio cable (not included).
- Press the AUX button to select AUX input mode.
- Control playback from your external device.
3.5 Alarm Clock and Sleep Timer
The Sonoro Easy features a dual alarm function and a sleep timer.
- Setting Alarms: Access the alarm settings through the menu (usually by pressing the rotary knob and navigating). Follow on-screen prompts to set alarm time, source (buzzer, FM, DAB+), and volume.
- Sleep Timer: The sleep timer allows the radio to turn off automatically after a set period. This function is typically accessed via the menu.
- Snooze Function: When an alarm sounds, pressing the rotary knob or a designated snooze button will temporarily pause the alarm.
3.6 Night Light and USB Charging
- Night Light: Press the Night Light button (often represented by a light bulb icon) to activate the integrated LED night light on the rear of the unit. This provides subtle background illumination.
- USB Charging: The USB port (5V - 2.1A) on the side of the radio can be used to charge compatible smartphones or other small devices. Connect your device using its charging cable.
4. Maintenance
4.1 Cleaning
To maintain the appearance of your Sonoro Easy radio:
- Ensure the device is powered off and unplugged before cleaning.
- Use a soft, dry, lint-free cloth to wipe the surfaces.
- For stubborn marks, slightly dampen the cloth with water. Avoid abrasive cleaners, solvents, or chemical sprays.
4.2 Storage
When not in use for extended periods, store the radio in a cool, dry place away from direct sunlight and extreme temperatures. If using batteries, remove them to prevent leakage.
5. Troubleshooting
| Problem | Possible Cause | Solution |
|---|---|---|
| No power / Radio does not turn on. | Power adapter not connected or faulty. Batteries depleted or incorrectly inserted. | Check power adapter connection and wall outlet. Replace or recharge batteries, ensuring correct polarity. |
| Poor radio reception (DAB+ / FM). | Antenna not extended. Weak signal in the area. Interference from other electronics. | Fully extend the telescopic antenna. Try repositioning the radio. Move away from other electronic devices. |
| Bluetooth device cannot connect. | Radio not in pairing mode. Device too far away. Bluetooth disabled on source device. | Ensure radio is in Bluetooth pairing mode. Move device closer to the radio. Enable Bluetooth on your source device. |
| No sound from AUX input. | AUX cable not connected properly. Radio not in AUX mode. Volume too low on radio or source device. | Check AUX cable connection. Select AUX mode on the radio. Increase volume on both the radio and the external device. |
| Display is too bright or too dim. | Display brightness setting needs adjustment. | Adjust display brightness through the radio's menu settings. |
6. Specifications
| Feature | Detail |
|---|---|
| Brand | Sonoro |
| Model Number | 88f59bc4-6f28-4e95-95de-ba49a597f237 |
| Color | White Matte |
| Tuning Technology | DAB+, FM |
| Connectivity | Bluetooth, AUX In, USB (charging) |
| Special Features | Portable, Dual Alarm, Sleep Timer, Snooze, Dimmable Display, LED Night Light, USB Charging Port |
| Power Source | Mains (12V - 2.5A), Battery (Alkaline or NiMH, not included) |
| USB Output | 5V - 2.1A (for charging external devices) |
| Dimensions (L x W x H) | 18.6 cm x 15.6 cm x 11.8 cm |
| Speaker | 3" Full-range speaker with Bass Reflex tube |
| Material | Hand-polished wooden cabinet |
7. Warranty & Support
7.1 Product Warranty
The Sonoro Easy Digital Radio comes with a 2-year manufacturer's warranty from the date of purchase. This warranty covers defects in materials and workmanship under normal use. Please retain your proof of purchase for warranty claims.
The warranty does not cover:
- Damage caused by accident, abuse, misuse, flood, fire, earthquake, or other external causes.
- Damage caused by operating the product outside the permitted or intended uses described in this manual.
- Damage caused by service performed by anyone who is not an authorized representative of Sonoro.
- Products or parts that have been modified to alter functionality or capability without the written permission of Sonoro.
7.2 Customer Support
For technical assistance, warranty claims, or further information, please contact Sonoro customer support. Contact details can typically be found on the official Sonoro website or on the product packaging.
Please visit the official Sonoro website for the most up-to-date support information and contact options.


