
StarTech SV231DHU34K6
StarTech.com 2 Port Dual Monitor HDMI KVM Switch
Model: SV231DHU34K6
1. Introduction
This instruction manual provides detailed information on the installation, operation, and maintenance of your StarTech.com 2 Port Dual Monitor HDMI KVM Switch. This device allows you to control two computers from a single set of peripherals, including two HDMI monitors, a keyboard, a mouse, and other USB devices, supporting resolutions up to 4K at 60Hz.
2. Safety Information
Please read and understand all instructions before using this product. Failure to follow these instructions may result in electric shock, fire, or serious injury.
- Electrical Hazards: Do not use damaged or frayed cables. Exposed wires can lead to electric shocks. Ensure all cables are properly connected and secured to prevent accidental disconnection.
- Heat Buildup: Overloaded or tightly bundled cables can overheat and pose a fire hazard. Ensure adequate ventilation and avoid bundling power cables.
- Damage: Always unplug adapters by holding the plug, not the cable. Pulling by the cable can expose live wires, which could lead to electrical shocks or burns.
3. Product Overview
The StarTech.com SV231DHU34K6 KVM switch is designed to streamline your workspace by enabling control of two computers with dual 4K HDMI displays and shared USB peripherals. Its robust steel housing ensures durability.
3.1. Key Features
- Supports dual 4K (3840 x 2160) resolution at 60Hz per monitor.
- HDMI 2.0, HDCP 2.2, and HDR10 support.
- Integrated 2-port USB 3.0 Hub (5Gbps) for sharing peripherals.
- Four USB 2.0 HID ports for keyboard and mouse.
- Hotkey and front-panel push-button switching.
- EDID and HDCP signal emulation for fast, seamless switching.
- Supports stereo analog and 7.1 digital audio.
- OS Independent compatibility (Windows, Mac, Linux).
3.2. Front Panel

Figure 1: Front Panel Layout
- HID USB Port: For connecting a keyboard or mouse.
- 5G USB Port: For connecting high-speed USB 3.0 devices.
- Computer Selection Buttons (1, 2): Press to switch to the corresponding computer.
- SELECT Button: Used for various functions, including auto-scan activation.
3.3. Rear Panel
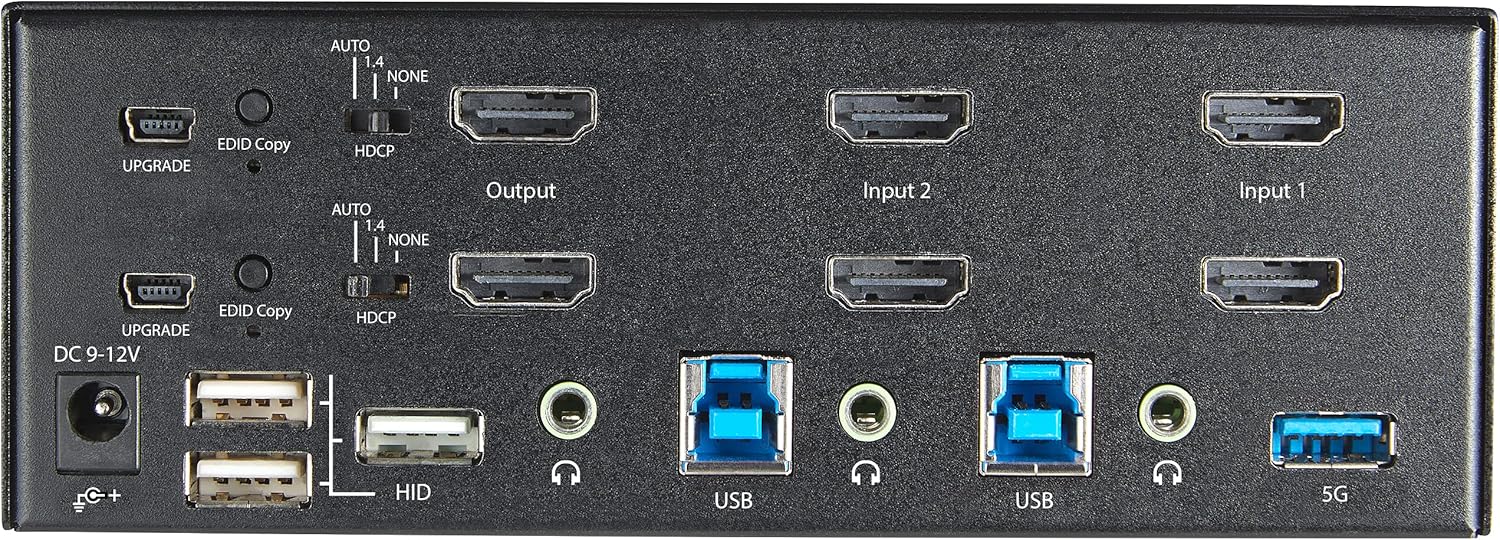
Figure 2: Rear Panel Layout
- DC 9-12V Power Input: Connect the included power adapter.
- UPGRADE Port: For firmware updates.
- EDID Copy Button/Switch: Manages Extended Display Identification Data.
- HDCP Switch: Manages High-bandwidth Digital Content Protection.
- Output (HDMI): Connect to your monitors.
- Input 1/Input 2 (HDMI): Connect to the HDMI outputs of your computers.
- USB (Type-B): Connect to the USB 3.0 ports of your computers.
- HID USB Ports (Type-A): For additional keyboard/mouse connections or other low-power USB devices.
- Audio Jacks (3.5mm): For connecting speakers/headphones and microphones.
- 5G USB Port (Type-A): For connecting high-speed USB 3.0 devices.
4. Setup
4.1. What's in the Box
- 1 x KVM Switch (SV231DHU34K6)
- 1 x Universal Power Adapter (NA/JP, EU, UK, ANZ)
- 4 x Rubber Feet
- 1 x Quick-Start Guide
Note: HDMI cables, USB 3.0 Type-A to Type-B cables, and audio cables are not included and must be purchased separately.
4.2. Connection Instructions
Follow these steps to connect your KVM switch:
- Connect Monitors: Connect your two HDMI monitors to the 'Output' HDMI ports on the rear panel of the KVM switch.
- Connect Computers (HDMI): Connect the HDMI outputs from Computer 1 to the 'Input 1' HDMI ports on the KVM switch. Repeat for Computer 2 and 'Input 2'. Ensure both HDMI outputs from each computer are connected for dual monitor support.
- Connect Computers (USB): Connect the USB 3.0 Type-B ports on the KVM switch to the USB 3.0 Type-A ports on Computer 1 and Computer 2 using appropriate USB 3.0 cables. These connections enable keyboard, mouse, and USB hub functionality.
- Connect Peripherals:
- Connect your keyboard and mouse to the 'HID' USB ports on the front or rear panel.
- Connect other USB devices (e.g., printer, scanner, webcam) to the '5G' USB 3.0 ports on the front or rear panel.
- Connect Audio (Optional): If desired, connect your speakers/headphones and microphone to the 3.5mm audio jacks on the rear panel.
- Connect Power: Connect the included universal power adapter to the 'DC 9-12V' power input on the rear panel, then plug it into a power outlet. The KVM switch will power on automatically.

Figure 3: KVM Switch with Ports for Connection
5. Operating the KVM Switch
5.1. Switching Between Computers
You can switch between connected computers using either the front-panel push buttons or hotkey commands.
- Front-Panel Buttons: Press the '1' or '2' button on the front panel to directly switch to Computer 1 or Computer 2, respectively.
- Hotkey Switching: Use keyboard hotkey combinations to switch computers. The default hotkey sequence is typically Scroll Lock, Scroll Lock, [1 or 2]. Refer to the Quick-Start Guide for a complete list of hotkey commands and customization options. A buzzer sound confirms the switch.
5.2. EDID and HDCP Emulation
The KVM switch includes EDID (Extended Display Identification Data) and HDCP (High-bandwidth Digital Content Protection) signal emulation. This feature ensures that your monitors remain synced and desktop settings are maintained when switching between computers, preventing display resolution changes or window rearrangement.
5.3. USB Hub Functionality
The integrated USB 3.0 hub allows you to share two USB 3.0 peripherals (connected to the 5G ports) and four USB 2.0 HID peripherals (connected to the HID ports) between the connected computers. Devices connected to these ports will function as if directly connected to the currently selected host computer.
5.4. Audio Support
The KVM switch supports both digital audio (via HDMI, 7.1 Channel Audio) and separate 3.5mm stereo analog audio (2 Channel Audio). Ensure your displays and sources support the desired audio format for full compatibility.
6. Maintenance
To ensure the longevity and optimal performance of your KVM switch, follow these maintenance guidelines:
- Cleaning: Use a soft, dry cloth to clean the exterior of the device. Do not use liquid or aerosol cleaners.
- Ventilation: Ensure the KVM switch is placed in a well-ventilated area. Do not block any ventilation openings.
- Cable Management: Keep cables organized and untangled to prevent damage and ensure proper airflow. Avoid excessive bending or crimping of cables.
- Storage: When not in use for extended periods, store the device in a cool, dry place away from direct sunlight and extreme temperatures.
7. Troubleshooting
If you encounter issues with your KVM switch, refer to the following common problems and solutions:
- No Display or Incorrect Resolution:
- Ensure all HDMI cables are securely connected to both the KVM switch and your computers/monitors.
- Verify that your HDMI cables are rated for 4K 60Hz if you are using 4K displays. Longer cables (e.g., over 3m/10ft) may require higher quality or active cables.
- Check the display settings on your computers to ensure they are configured for the correct resolution and refresh rate.
- Try power cycling the KVM switch and monitors.
- Keyboard/Mouse Not Responding:
- Ensure the USB Type-B cables are securely connected from the KVM switch to your computers.
- Verify that your keyboard and mouse are connected to the designated HID USB ports.
- Try connecting the keyboard/mouse directly to the computer to confirm they are functional.
- Some specialized keyboards/mice with advanced features may require direct connection or specific drivers.
- USB Devices Not Detected:
- Ensure the USB Type-B cables are connected from the KVM switch to your computers.
- Verify that the USB device is connected to the appropriate 5G USB 3.0 port.
- Some high-power USB devices may require an external power source or a powered USB hub connected to the KVM's 5G port.
- Audio Issues:
- Check all 3.5mm audio cable connections.
- Verify audio output settings on your computers.
- Ensure your monitors or audio devices support the HDMI audio format being sent.
- Slow Switching Time:
- The KVM switch is designed for fast switching. If experiencing delays, ensure EDID and HDCP emulation are functioning correctly.
- Ensure all cables are of good quality and properly seated.
If the problem persists after attempting these solutions, please contact StarTech.com technical support.
8. Specifications
| Category | Specification |
|---|---|
| Model Number | SV231DHU34K6 |
| KVM Ports | 2 |
| Monitors Supported | 2 |
| Video Type | HDMI 2.0 |
| Supported Resolutions | Up to 3840 x 2160 @ 60Hz |
| HDCP Support | HDCP 2.2 |
| HDR Support | HDR10 |
| USB Hub | 2-Port USB 3.0 (5Gbps) |
| USB HID Ports | 4x USB 2.0 |
| Audio Support | HDMI (7.1 Channel), Analog Stereo (3.5mm) |
| Port Selection | Push Button, Hotkeys |
| Material | Steel |
| Color | Black |
| Product Dimensions (L x W x H) | 6.3 x 3.9 x 2.3 inches (16.0 x 10.0 x 5.8 cm) |
| Product Weight | 1.8 lb (0.8 kg) |
| Power Source | AC Adapter (Included) |
| Input Voltage | 100 - 240 AC |
| Power Consumption | 36W |
| Operating Temperature | 0℃ to 40℃ (32℉ to 104℉) |
| Storage Temperature | -10℃ to 60℃ (14℉ to 140℉) |
| Humidity | 0% to 80% RH (non-condensing) |
9. Warranty and Support
This StarTech.com KVM Switch (Model: SV231DHU34K6) is backed by a 2-year warranty. StarTech.com also provides free lifetime technical support. For technical assistance or warranty claims, please visit the official StarTech.com website or contact their customer support team.
For more information, visit: www.startech.com
Related documentsSV231DHU34K6


Ask a question about this manual
Ask about setup, troubleshooting, compatibility, parts, safety, or missing instructions. Manuals+ will review the question and use this page’s manual context to help answer it.