1. Introduction
This manual provides instructions for the safe and efficient operation of the MLGB JT-18 1000W Vacuum Forming Machine. Please read this manual thoroughly before operating the machine and retain it for future reference.
The JT-18 Vacuum Forming Machine is designed for laboratory and clinical applications, utilizing a heavy-duty vacuum motor for precise heat molding and laminating processes. It is compatible with various thermoplastics.

Figure 1: Front view of the MLGB JT-18 Vacuum Forming Machine.
2. Safety Instructions
- Always ensure the machine is connected to a grounded power outlet with the correct voltage (220V).
- Exercise caution as the heating element reaches high temperatures during operation. Avoid direct contact.
- Do not operate the machine in wet or damp conditions.
- Keep hands and loose clothing away from moving parts.
- Unplug the machine from the power source before cleaning or maintenance.
- Ensure adequate ventilation in the work area to dissipate heat and any fumes from thermoplastic materials.
- Use appropriate personal protective equipment (PPE) such as heat-resistant gloves and safety glasses.
3. Product Components and Structure
Familiarize yourself with the various parts of the JT-18 Vacuum Forming Machine for proper operation and maintenance.
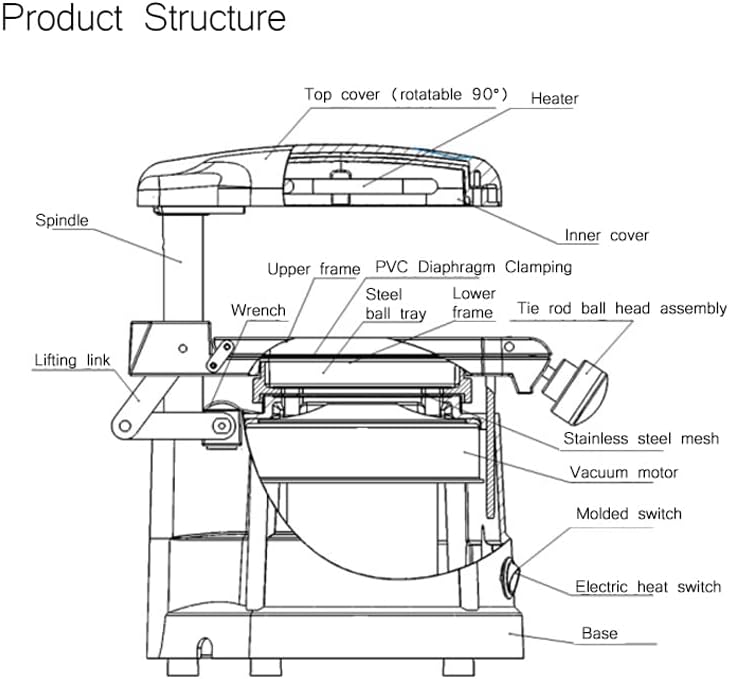
Figure 2: Labeled diagram of the vacuum forming machine's internal and external components.
Key components include:
- Top Cover (Heater): Contains the heating element, rotatable 90 degrees for material placement.
- Spindle: Supports the upper frame and allows vertical movement.
- Upper Frame: Holds the thermoplastic sheet.
- Lower Frame: Supports the material tray.
- PVC Diaphragm Clamping: Mechanism to secure the thermoplastic sheet.
- Steel Ball Tray: Holds the material to be formed (e.g., dental model).
- Vacuum Motor: Located below the perforated stage, provides suction.
- Molded Switch (MODEL): Activates the vacuum motor.
- Electric Heat Switch (HEAT): Activates the heating element.
- Lifting Link & Wrench: For adjusting and operating the clamping and forming mechanism.
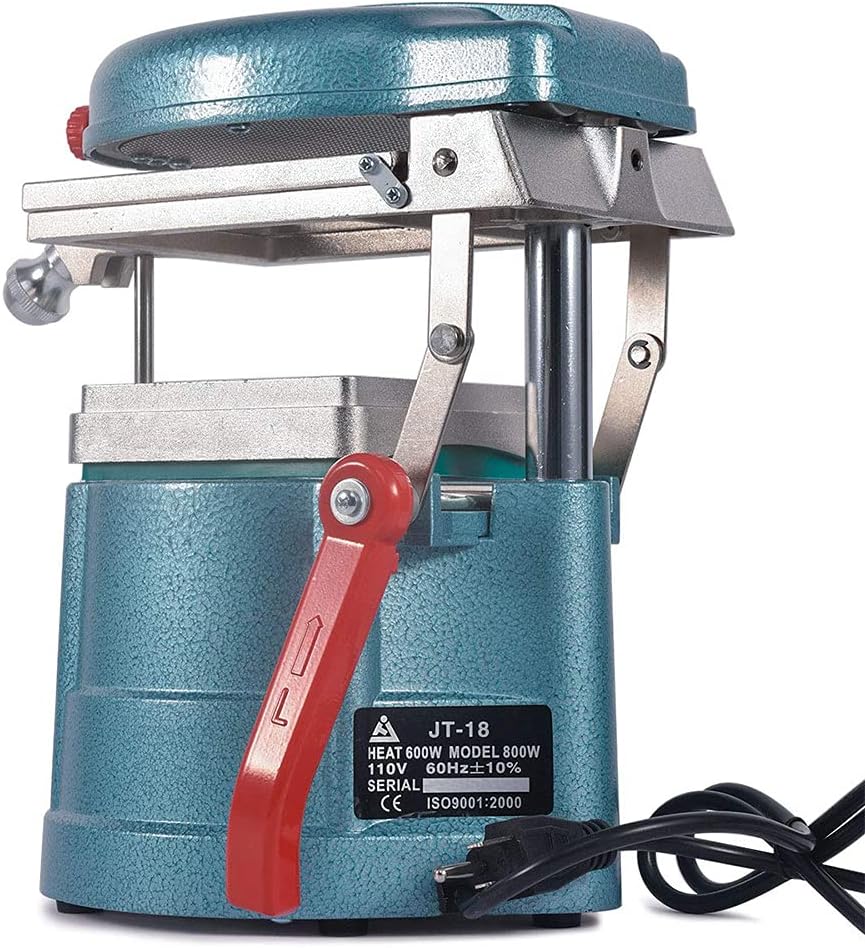
Figure 3: Control panel showing the 'MODEL' (vacuum) and 'HEAT' (heating) switches.
4. Setup Instructions
- Unpacking: Carefully remove the vacuum forming machine from its packaging. Inspect for any damage during transit.
- Placement: Place the machine on a stable, level, and heat-resistant surface. Ensure there is sufficient space around the machine for ventilation and operation.
- Power Connection: Connect the power cord to the machine and then to a grounded 220V power outlet. Verify that the power supply matches the machine's requirements.
- Initial Inspection: Before first use, ensure all moving parts operate smoothly and that the clamping mechanism is secure.

Figure 4: The vacuum forming machine with its power cord, ready for connection.
5. Operating Instructions
Follow these steps for effective vacuum forming:
- Prepare the Model: Place the object or model to be formed (e.g., dental impression) onto the steel ball tray. Ensure it is centered and stable.
- Insert Thermoplastic Sheet: Lift the upper frame and insert a thermoplastic sheet into the PVC diaphragm clamping mechanism. Securely clamp the sheet.
- Position for Heating: Rotate the top cover (heater) over the thermoplastic sheet.
- Activate Heating: Turn on the HEAT switch. Allow the thermoplastic sheet to heat until it sags approximately 1-2 cm below the clamping frame. The heating time will vary depending on the material thickness and type.
- Initiate Vacuum Forming: Once the sheet has softened sufficiently, quickly lower the upper frame with the softened sheet over the model. Simultaneously, turn on the MODEL (vacuum) switch. The vacuum motor will activate, drawing the softened sheet tightly around the model.
- Cooling: Keep the vacuum active for approximately 15-20 seconds to allow the material to cool and set around the model.
- Release and Remove: Turn off both the HEAT and MODEL switches. Lift the upper frame and carefully remove the formed thermoplastic from the machine.

Figure 5: Example of a dental model placed on the steel ball tray for vacuum forming.
6. Maintenance
- Cleaning: Regularly clean the exterior of the machine with a soft, dry cloth. Ensure the machine is unplugged before cleaning.
- Heating Element: Periodically inspect the heating element for any signs of damage or debris. Do not attempt to clean the heating element while it is hot.
- Vacuum System: Ensure the perforated stage and vacuum motor intake are free from obstructions to maintain optimal suction.
- Moving Parts: Lubricate moving parts, such as the spindle and lifting link, as needed with a suitable lubricant to ensure smooth operation.
- Storage: Store the machine in a dry, dust-free environment when not in use.
7. Troubleshooting
| Problem | Possible Cause | Solution |
|---|---|---|
| Machine does not power on. | No power supply; loose connection; faulty power cord. | Check power outlet and connections. Ensure power cord is fully inserted. |
| Heating element not working. | HEAT switch off; faulty heating element. | Ensure HEAT switch is on. If problem persists, contact support. |
| No vacuum suction. | MODEL switch off; vacuum motor obstructed; air leak. | Ensure MODEL switch is on. Check for obstructions in the vacuum area. Verify thermoplastic sheet is properly clamped. |
| Poorly formed results. | Insufficient heating time; incorrect material thickness; model not centered. | Increase heating time. Use appropriate thermoplastic sheet for the application. Ensure model is centered and stable. |
8. Specifications
| Model | JT-18 |
| Brand | MLGB |
| Power (Wattage) | 1000W |
| Voltage | 220V |
| Material | Metal, Plastic |
| Item Weight | 5.63 kg (12.38 lbs) |
| Package Dimensions | 14.2 x 11.6 x 10.2 inches |
9. Warranty Information
Specific warranty details are typically provided at the point of purchase or within separate documentation included with the product. Please refer to your purchase receipt or contact the retailer for information regarding warranty coverage and terms.
Generally, products are warranted against defects in materials and workmanship for a specified period from the date of purchase. This warranty typically does not cover damage resulting from misuse, accident, unauthorized modification, or normal wear and tear.
10. Customer Support
For technical assistance, troubleshooting beyond this manual, or inquiries regarding parts and service, please contact your retailer or the manufacturer directly.
When contacting support, please have the following information ready:
- Product Model: JT-18
- Date of Purchase
- Description of the issue
Manufacturer: MLGB
Note: Contact information for MLGB is not provided in the product data. Please refer to your purchase documentation for specific contact details.


