1. Safety Information
Please read all instructions and warnings carefully before installation and operation. Failure to do so may result in damage to the controller, battery, or other components, and may cause personal injury.
- Ensure all connections are correct and secure before applying power. Incorrect polarity can damage the controller.
- Always connect the battery to the charge controller first, then the solar panel, and finally the load. Disconnect in the reverse order.
- The controller is designed for 12V/24V systems. Do not exceed the maximum input voltage or current ratings.
- Install the controller in a well-ventilated area, away from flammable materials and direct sunlight.
- This device is equipped with integrated protection against short circuits, open circuits, reverse polarity, and overloads. However, proper installation is crucial.
- Do not attempt to disassemble or repair the controller yourself. Contact qualified personnel for service.
2. Product Overview
2.1 Features
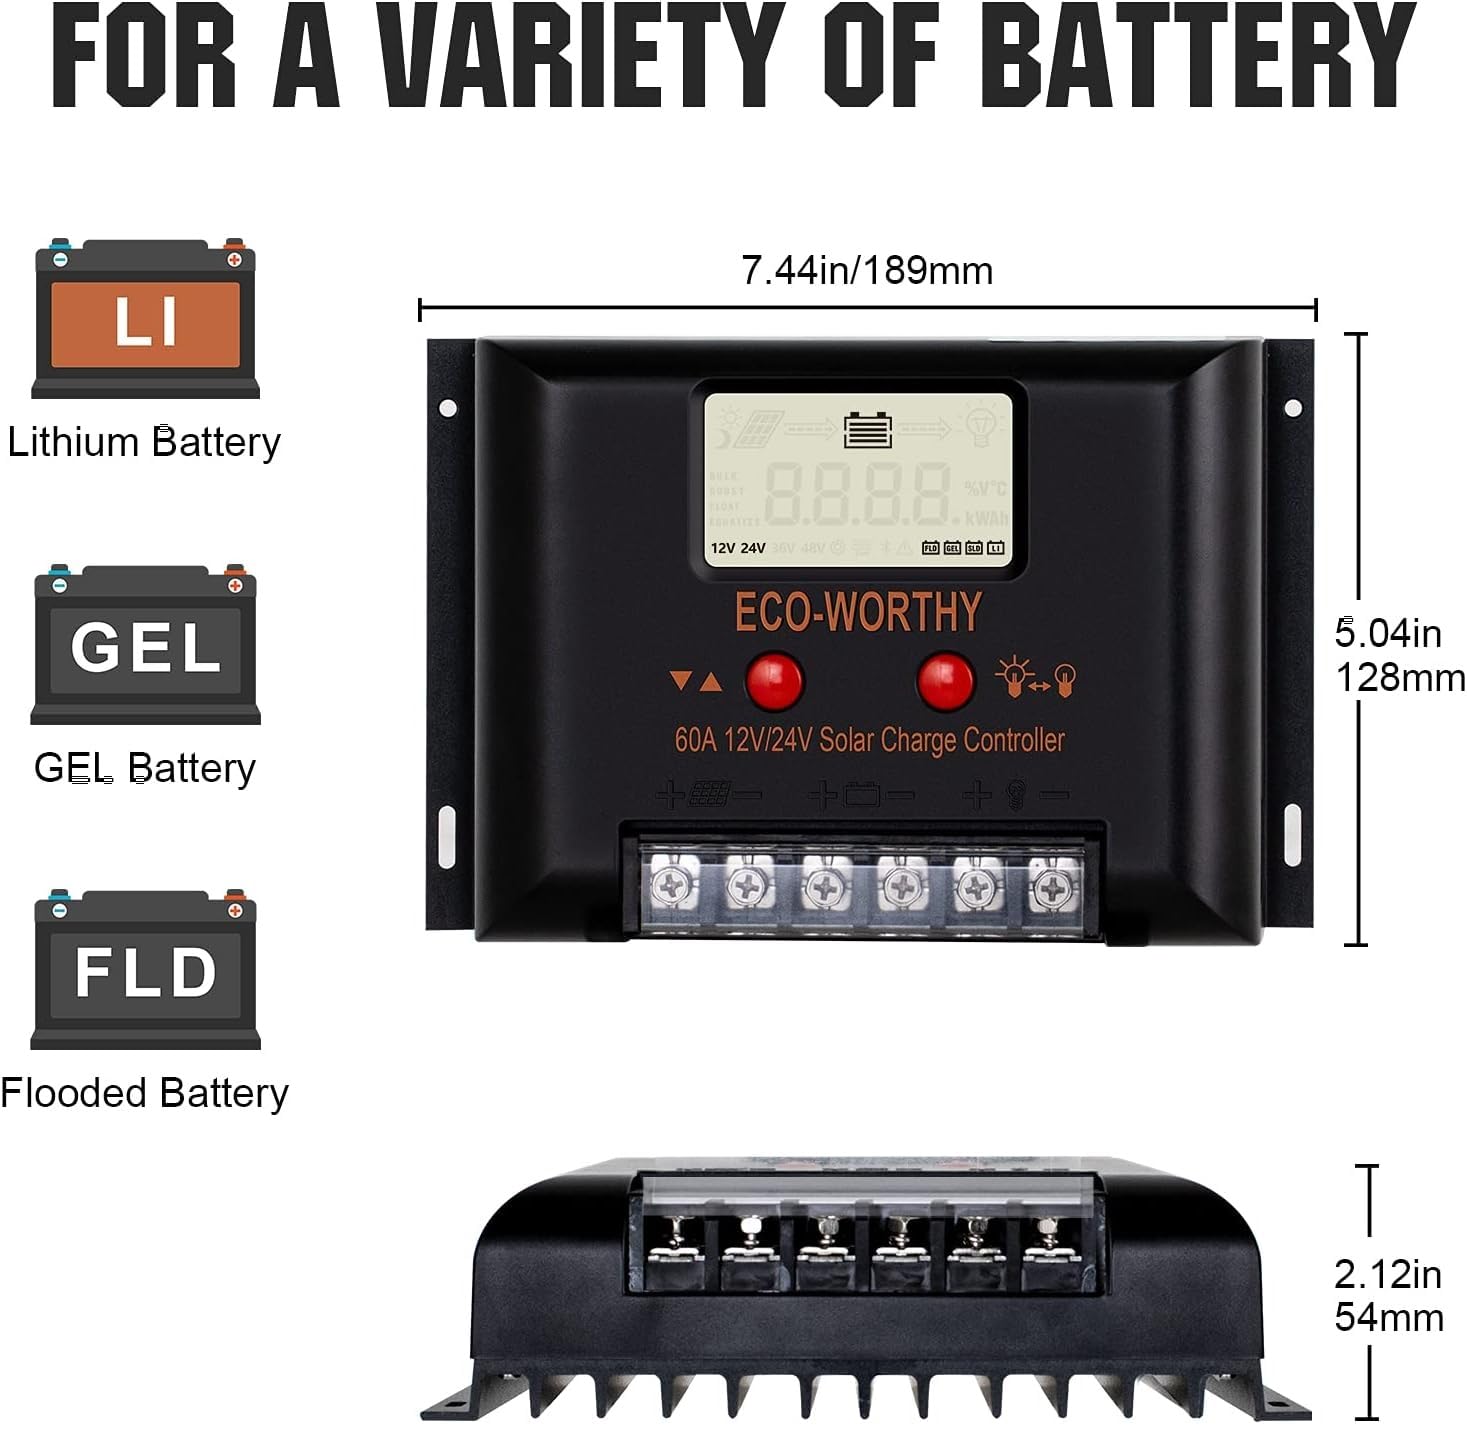
- Versatile Battery Compatibility: Supports Lead-Acid (SLA), GEL, Flooded (FLD), and Lithium (LI) batteries.
- Comprehensive Protection: Built-in safeguards against overcharge, over-discharge, over-current, short-circuit, and reverse polarity.
- Automatic 12V/24V System Recognition: Automatically adapts to 12V or 24V systems, supporting up to 1000W for 12V and 2000W for 24V.
- Intelligent Control: Features an intelligent chip for customizable light control and time control settings.
- Real-time Monitoring: Large LCD screen displays real-time input and output data, allowing for easy status monitoring.
- Efficient Heat Dissipation: High-quality aluminum alloy base and grille design ensure effective heat dissipation.
- User-Friendly Connections: U-type connectors facilitate easy and secure wiring.
2.2 Package Contents
- ECO-WORTHY 12V/24V 60A Solar Charge Controller
- User Manual
2.3 Product Diagram


3. Setup and Installation
3.1 Wiring Diagram and Sequence

Follow these steps for proper installation:
- Connect the Battery: Connect the battery to the charge controller's battery terminals. Ensure correct polarity (+ to + and - to -). The controller will automatically detect the system voltage (12V or 24V).
- Connect the Solar Panels: Connect the solar panels to the charge controller's solar panel terminals. Ensure correct polarity.
- Connect the DC Load (Optional): Connect your DC load to the charge controller's load terminals. Ensure correct polarity.
- Connect the Inverter (Optional): If using an inverter, connect it to the battery terminals, not directly to the controller's load terminals.
- Secure Connections: Double-check all connections to ensure they are tight and secure to prevent loose contacts and potential damage.
3.2 Battery Type Setting
The controller is compatible with Lead-Acid, GEL, Flooded, and Lithium batteries. It is crucial to set the correct battery type for optimal charging and battery longevity. Refer to the LCD display and control buttons to navigate the settings menu and select your battery type. Incorrect battery type settings can lead to improper charging and reduced battery lifespan.

4. Operating Instructions
4.1 LCD Display Overview

The LCD provides real-time data on your solar system's performance. Use the buttons below the screen to navigate through different display modes and settings.
4.2 Parameter Settings

The intelligent chip allows for various customizable settings:
- Light Control: Set the controller to automatically turn the load on/off based on ambient light conditions.
- Time Control: Program specific times for the load to be active.
- Voltage Settings: Adjust charging and discharging voltage parameters for specific battery types or system requirements.
- Monitoring: View real-time voltage, current, and power readings for solar input, battery, and load.
Refer to the detailed instructions in the full manual (if provided separately) for specific button functions and menu navigation to adjust these parameters.
5. Maintenance
Regular maintenance ensures the longevity and optimal performance of your solar charge controller.
- Cleanliness: Keep the controller clean and free from dust and debris. Use a dry cloth for cleaning.
- Connection Check: Periodically inspect all wiring connections to ensure they are tight and free from corrosion. Loose connections can cause overheating and poor performance.
- Ventilation: Ensure the installation area has adequate ventilation to allow for proper heat dissipation. Do not block the cooling fins.
- Visual Inspection: Check for any signs of physical damage, such as cracked casing or frayed wires.
- Environmental Conditions: Ensure the controller is not exposed to excessive moisture, extreme temperatures, or corrosive environments.
6. Troubleshooting
This section provides solutions to common issues you might encounter.
| Problem | Possible Cause | Solution |
|---|---|---|
| No display on LCD | Battery not connected or low voltage; reverse polarity. | Check battery connections and voltage. Ensure battery voltage is above minimum operating voltage. Correct polarity if reversed. |
| Battery not charging | No solar input; solar panel reversed; faulty solar panel; incorrect battery type setting. | Check solar panel connections and ensure sufficient sunlight. Verify solar panel polarity. Check battery type setting on controller. |
| Load not working | Load disconnected; battery low; overload protection activated; load setting incorrect. | Check load connections. Ensure battery has sufficient charge. Reduce load if overloaded. Verify load control settings (e.g., light/time control). |
| Error code displayed | Specific system fault. | Refer to the full manual for a list of error codes and their corresponding solutions. Common errors include over-voltage, under-voltage, or short-circuit. |
7. Specifications
| Specification | Value |
|---|---|
| Product Dimensions (L x W x H) | 18.9 x 12.9 x 5.2 cm |
| Product Weight | 790 grams |
| Manufacturer | ECO-WORTHY |
| ASIN | B09BCS53Z6 |
| Model Number | 60A Solar Charge Controller |
| Color | Aluminum |
| Voltage | 12V/24V (DC) Auto-sensing |
| Material | Aluminum |
| Display Type | LCD |
| Max Solar Input (12V System) | 1000W |
| Max Solar Input (24V System) | 2000W |
8. Warranty and Support
ECO-WORTHY products are designed for reliability and performance. For any questions, technical assistance, or warranty claims, please contact ECO-WORTHY customer support.
You can typically find support contact information on the ECO-WORTHY official website or through your purchase platform. Please have your model number and purchase details ready when contacting support.