Introduction
This user manual provides detailed instructions for the installation and operation of the ViaBecs 16PIN Car Radio Wiring Harness with CANBUS Adapter. This harness is designed to facilitate the installation of an aftermarket car stereo in compatible Toyota vehicles, ensuring retention of key factory features such as JBL amplifier support, steering wheel controls, backup camera functionality, and original USB & AUX ports.
Please read this manual thoroughly before installation to ensure proper setup and to avoid any potential issues.
Safety Information
- Always turn off the car ignition and disconnect the vehicle's battery before beginning any electrical installation to prevent short circuits or damage to components.
- Ensure all connections are secure and properly insulated to prevent electrical hazards.
- If you are unsure about any step of the installation process, consult a qualified automotive technician.
- Do not cut or modify the wiring harness unless explicitly instructed. Improper modifications can lead to system malfunction or damage.
- When connecting the CANBUS box, ensure the car is turned off and the unit is powered off. Failure to do so may damage the CANBUS box or affect rear view camera functionality.
Product Overview & What's in the Box
The ViaBecs 16PIN Car Radio Wiring Harness is a plug-and-play solution designed for seamless integration. The package includes the following components:
- 1 x 16 PIN Aftermarket Radio Wire Harness
- Integrated CANBUS Adapter
- USB Adapter Cable

Image: Complete ViaBecs 16PIN Car Radio Wiring Harness with CANBUS Adapter and various connectors.
Compatibility
Compatible Toyota Models (2014-2018):
- Toyota Corolla 2014-2018
- Toyota RAV4 2013-2018
- Toyota Camry 2014-2018
- Toyota 4Runner 2014-2018
- Toyota Prado 2014-2019
- Toyota Tundra 2014-2018
- Toyota Highlander 2015-2018
- Toyota CHR 2015-2018
- Toyota Tacoma 2011-2019
- Toyota Sienna 2014-2017
- Toyota Prius 2016-2018
- Toyota Sequoia 2014-2019
Important Note: This harness is designed for aftermarket car stereos with a 16-pin power socket. It is not compatible with major brand stereos such as Kenwood, Pioneer, Alpine, Sony, JVC, or BOSS Audio Systems, as these typically use proprietary connectors. Please verify your stereo's wiring diagram and connector type before purchase to avoid incompatibility and unnecessary returns.
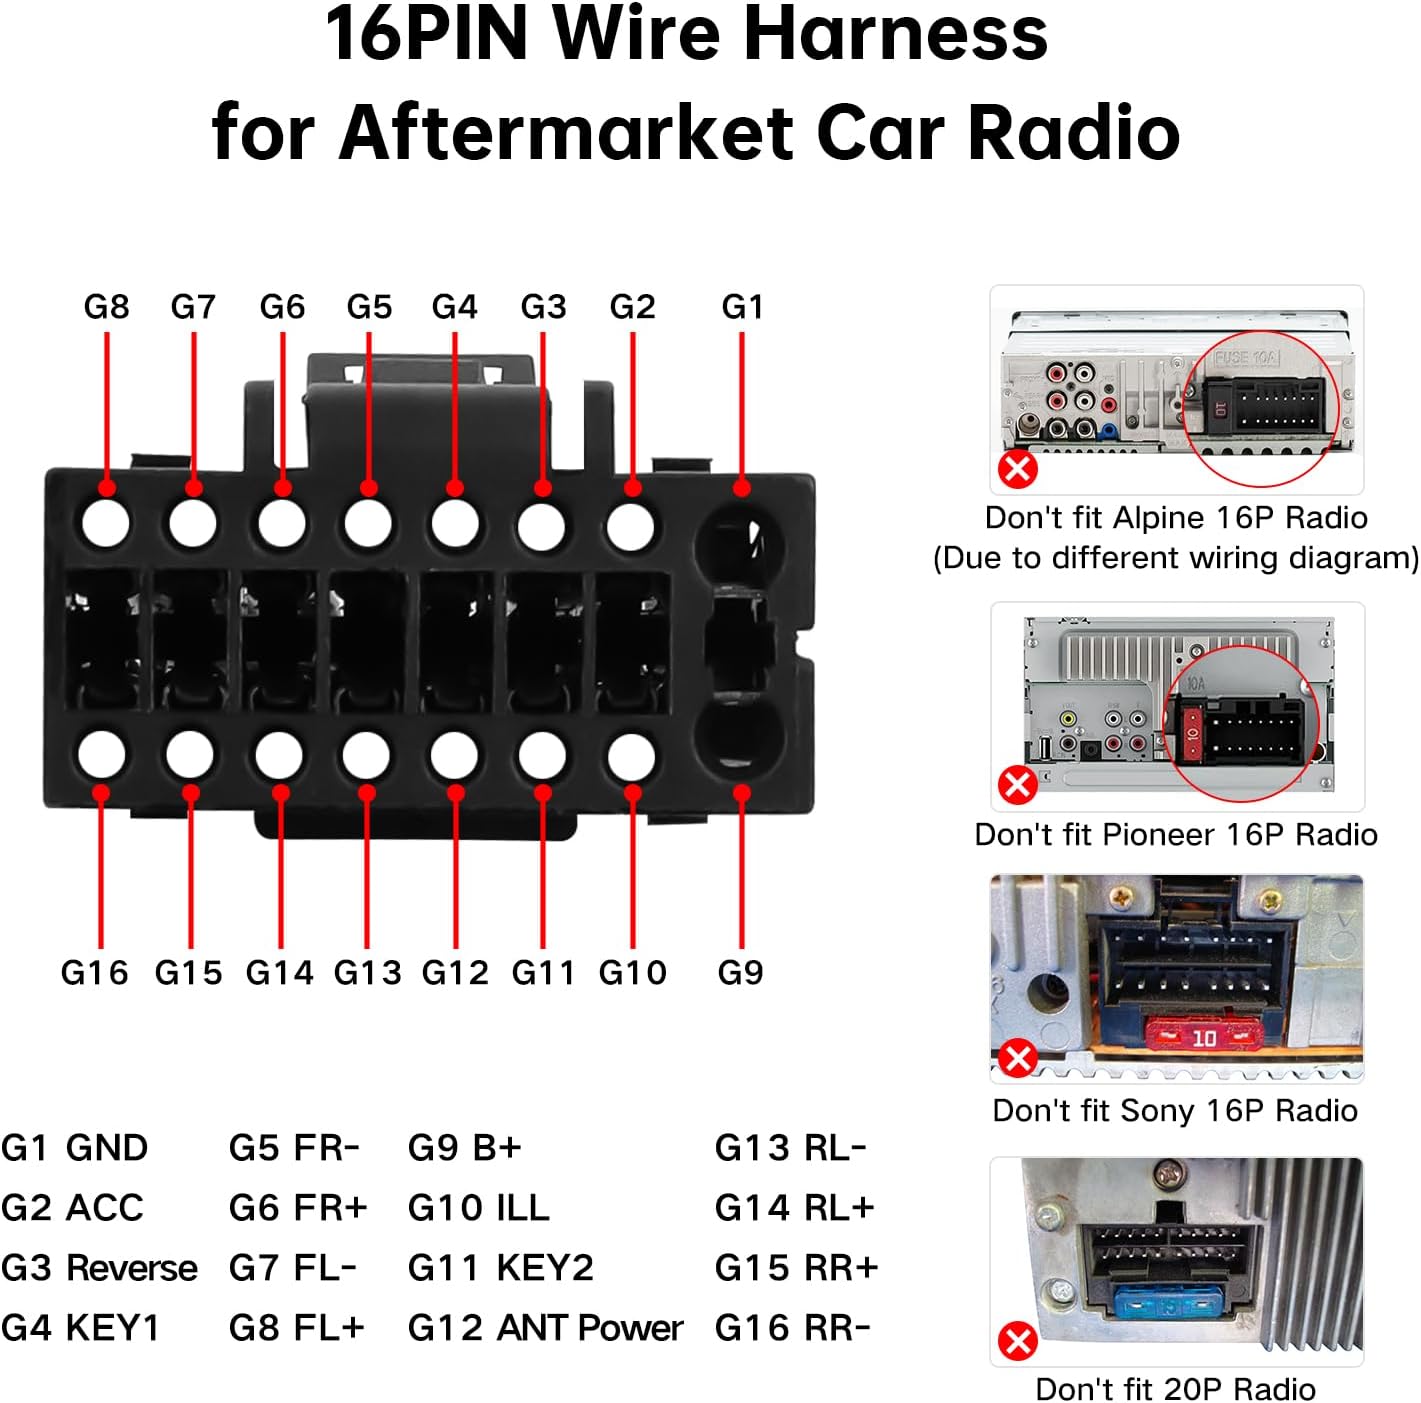
Image: Detailed pinout diagram for the 16PIN wire harness and visual examples of incompatible stereo head units (Alpine, Pioneer, Sony, 20PIN radios).

Image: Visual guide showing compatible Toyota dashboard types, indicating support for both JBL and Non-JBL systems across various models and years.
Setup and Installation
Pre-Installation Checklist:
- Ensure your vehicle's ignition is off and the battery is disconnected.
- Confirm your aftermarket stereo has a 16-pin power socket.
- Identify the OEM radio back connectors in your vehicle.
Installation Steps:
- Remove OEM Radio: Carefully remove your vehicle's existing factory radio. Refer to your vehicle's service manual for specific instructions on dashboard disassembly.
- Identify OEM Connectors: Locate the corresponding connectors on the back of your OEM radio. The harness is designed to plug directly into these.

Image: Guide illustrating various OEM radio back connectors (labeled 1-12) and their typical locations on different Toyota OEM radio models (Model A and Model B).
- Connect Main Harness: Connect the main 16-pin power plug of the ViaBecs harness to the corresponding 16-pin power socket on your aftermarket head unit.

Image: Diagram showing the connection points of the ViaBecs harness to an aftermarket Android car stereo, including the Canbus box, camera inputs, AUX, USB, and FM/AM antenna.
- Connect CANBUS Box: Locate the 8PIN CANBUS port on the harness and connect the CANBUS box (labeled as '1' in the connection guide image). Ensure the car is turned off and the unit is powered off before connecting the CANBUS box to prevent damage.
- Connect Rear Camera (if applicable): If your vehicle has a factory backup camera, connect either the 16PIN male rear camera line (No. 4) or the 24PIN male rear camera line (No. 5) from the harness to the corresponding input on your aftermarket stereo. Only one of these connections is needed.
- Connect AUX Inputs (if applicable): Connect the male AUX L OUT (white) and male AUX R OUT (red) cables from the harness to the female AUX L IN and AUX R IN ports on your aftermarket stereo, respectively.
- Connect USB Adapter: Use the provided 4PIN USB adapter (No. 9) to connect to your vehicle's OEM USB port, if desired.

Image: Close-up view of the USB adapter cable, showing its connection points for integrating with the Toyota OEM USB port.
- Connect FM/AM Radio Antenna: Connect the FM/AM radio antenna cable (No. 8) to the antenna input on your aftermarket stereo.
- Secure Connections: Ensure all connections are firm and properly seated. Avoid leaving loose wires.
- Test Functionality: Before fully reassembling the dashboard, reconnect the vehicle's battery and test the aftermarket stereo's functionality, including audio, steering wheel controls, backup camera, and USB/AUX inputs.
- Reassemble Dashboard: Once all functions are verified, carefully reassemble the dashboard components.
The installation process is designed to be plug-and-play, minimizing the need for wire cutting. Most connections can be completed in minutes.

Image: An in-car view of the harness being connected, demonstrating the plug-and-play nature of the installation.
Operating Features
This wiring harness is designed to retain and enable the following factory features with your aftermarket car stereo:
- Steering Wheel Controls (SWC): Maintain control over audio functions directly from your steering wheel.
- Factory JBL Amplifier: Supports the original JBL amplifier system for enhanced audio output.
- Factory Backup Camera: Integrates with the vehicle's existing backup camera system.
- Original USB & AUX: Retains the functionality of the factory USB and AUX ports.
- Original TPMS (Tire Pressure Monitoring System): Allows TPMS information to be displayed on compatible aftermarket units.
- Parking Sensor Information: Displays parking sensor data on compatible aftermarket units.
- A/C Information: Provides A/C system information to compatible aftermarket units.
- 360° Camera Support: For vehicles equipped with a 360° camera system.
- Door Open Hint: Displays door open warnings on compatible aftermarket units.

Image: Visual examples of retained factory features, including Steering Wheel Controls, Factory Backup Camera, 360° Camera, Factory JBL AMP, Door Open Hint, and Factory USB/AUX.
Maintenance
The ViaBecs wiring harness requires minimal maintenance. Once installed, ensure all connections remain secure. Avoid exposing the harness to excessive moisture or extreme temperatures. Periodically check for any signs of wear or damage, especially if you experience any electrical issues with your car stereo system.
Troubleshooting
- No Power to Stereo:
- Check all power connections from the harness to the aftermarket stereo and to the vehicle's OEM connectors.
- Ensure the vehicle's battery is properly connected and charged.
- Verify vehicle fuses related to the radio are intact.
- Steering Wheel Controls Not Working:
- Confirm the CANBUS box is correctly connected to the 8PIN CANBUS port on the harness.
- Ensure your aftermarket stereo supports steering wheel controls and that the SWC function is enabled in its settings.
- Some aftermarket stereos require a learning process for SWC; refer to your stereo's manual.
- Backup Camera Not Displaying:
- Ensure the correct male rear camera line (16PIN or 24PIN) is connected to your aftermarket stereo's camera input.
- Verify the CANBUS box is properly connected and functioning, as it often controls camera activation.
- Check the camera settings on your aftermarket stereo.
- No Sound or Poor Sound Quality (especially with JBL system):
- Confirm the harness is fully compatible with your vehicle's JBL amplifier system.
- Check all speaker wire connections between the harness and the aftermarket stereo.
- Ensure the amplifier turn-on wire (usually blue/white) is correctly connected.
- USB/AUX Ports Not Functioning:
- Verify the USB adapter cable is securely connected to both the harness and the OEM USB port.
- Check the settings on your aftermarket stereo to ensure the correct input source (USB/AUX) is selected.
If you encounter persistent issues, please refer to the "Warranty and Support" section for assistance.
Specifications
| Brand | ViaBecs |
| Model | CAN004-X Harness + Simple Soft Canbus |
| Material | Plastic, Copper |
| Cable Type | USB (for adapter) |
| Connector Type | 16-pin Power Plug for Head Unit |
| Item Weight | 6.4 ounces |
| Package Dimensions | 9.21 x 7.32 x 1.34 inches |
| UPC | 711620029844 |
| ASIN | B09BBB5B83 |
| Country of Origin | China |
Warranty and Support
ViaBecs offers a 60-day return policy and lifetime technical support for this product.
If you encounter any issues with connection, compatibility, or require technical assistance, please do not hesitate to reach out to our support team. You can typically find contact information or a support portal via the order page on the platform where you purchased the product.
For purchases made on Amazon, you can contact the seller, Kasa Offical Store, through your order details page for direct assistance.