1. Introduction
This manual provides detailed instructions for the safe and effective operation, setup, and maintenance of your SUGON 2020D Hot Air Rework Station. Please read this manual thoroughly before using the device to ensure proper function and to prevent damage or injury.
The SUGON 2020D is a high-power 700W hot air rework station designed for precision soldering and desoldering tasks. It features rapid heating, adjustable temperature and airflow, three memory storage channels, and an automatic sleep function for enhanced safety and efficiency.
2. Safety Instructions
WARNING: Failure to follow these safety instructions may result in electric shock, fire, or serious injury.
- Always operate the rework station in a well-ventilated area to avoid inhaling fumes.
- Do not touch the hot air gun nozzle or heated components directly. They can reach very high temperatures.
- Ensure the power supply voltage matches the requirements of the station (110V).
- Keep the work area clean and free of flammable materials.
- Never leave the rework station unattended while it is powered on or hot.
- Allow the hot air gun to cool down completely before storing.
- Do not use the station if the power cord or any part of the unit is damaged.
- Keep out of reach of children.
3. Package Contents
Verify that all items are present in the package:
- SUGON 2020D Hot Air Rework Station Main Unit
- Hot Air Gun Handle
- Hot Air Gun Holder/Bracket
- Power Cord
- 5 x Hot Air Nozzles (various sizes)
- User Manual (this document)
4. Product Overview
The SUGON 2020D Hot Air Rework Station consists of a main control unit and a hot air gun. The main unit features a digital display for temperature and airflow, control buttons, and a rotary knob for adjustments. A side bracket provides convenient storage for the hot air gun and nozzles.

Figure 4.1: SUGON 2020D Hot Air Rework Station. This image displays the complete rework station, including the main control unit, the hot air gun, and a set of five interchangeable nozzles.

Figure 4.2: Station in use. The rework station is shown on a workbench, positioned next to a circuit board, illustrating a typical operational setup.
4.1 Main Unit Controls and Display
- Digital Display: Shows current temperature and airflow settings.
- Temperature Adjustment Buttons: Up/Down arrows for precise temperature control.
- Airflow Adjustment Knob: Rotary knob to adjust air volume.
- Memory Channels (CH1, CH2, CH3): Buttons to save and recall frequently used temperature and airflow settings.
- Power Switch: Main power on/off.
4.2 Hot Air Gun and Nozzles
The hot air gun features a comfortable grip and a quick-change nozzle bracket. The station includes five different nozzles for various applications.

Figure 4.3: Assortment of Hot Air Nozzles. This image displays the five different hot air nozzles included with the rework station, designed for various applications.

Figure 4.4: Hot Air Gun Handle Holder. A close-up view of the holder designed to securely store the hot air gun when not in active use, activating the automatic sleep function.

Figure 4.5: Integrated Nozzle Storage Rack. This image shows the side-mounted rack with five slots for convenient storage and quick access to different hot air nozzles.
5. Setup
- Unpacking: Carefully remove all components from the packaging and inspect for any damage.
- Placement: Place the rework station on a stable, heat-resistant surface in a well-ventilated area.
- Connect Hot Air Gun: Plug the hot air gun cable securely into the designated port on the main unit.
- Install Handle Holder: Attach the hot air gun holder to the side of the main unit.
- Connect Power: Plug the power cord into the main unit and then into a grounded 110V AC power outlet.
- Initial Nozzle Installation: Select a desired nozzle and attach it to the hot air gun. Ensure it is securely fastened.
6. Operating Instructions
6.1 Power On/Off
Flip the main power switch located on the front panel to the "ON" position to power on the station. The display will illuminate. Flip to "OFF" to power down.
6.2 Temperature and Airflow Adjustment
- Temperature: Use the ▲ and ▼ buttons next to "TEMP" on the display to adjust the desired temperature. The range is 212°F to 932°F (100°C to 500°C).
- Airflow: Rotate the large "AIR" knob on the front panel to increase or decrease the air volume. The display will show the current airflow level.
6.3 Memory Channels (CH1, CH2, CH3)
The station allows you to save and recall three different temperature and airflow presets.
- To Save a Preset: Adjust the temperature and airflow to your desired settings. Press and hold the desired channel button (CH1, CH2, or CH3) for a few seconds until the display indicates the setting has been saved.
- To Recall a Preset: Briefly press the desired channel button (CH1, CH2, or CH3). The station will automatically adjust to the saved settings.

Figure 6.1: Memory Channel Buttons. This image highlights the CH1, CH2, and CH3 buttons used for saving and recalling temperature and airflow presets.
6.4 Fahrenheit/Celsius Switching
To switch between Fahrenheit (°F) and Celsius (°C) temperature display:
- Press and hold both the ▲ (up) and ▼ (down) temperature adjustment buttons simultaneously.
- The display will show "C-C" for Celsius or "F-F" for Fahrenheit to confirm the change.

Figure 6.2: Temperature Unit Switching. This image illustrates the display showing "C-C" for Celsius and "F-F" for Fahrenheit, indicating the selected temperature unit.
6.5 Automatic Sleep Function
The SUGON 2020D features a magnetic induction automatic sleep function. When the hot air gun handle is placed back into its holder, the station will automatically enter sleep mode, reducing temperature and airflow to save energy and prolong heating element life. Lifting the handle from the holder will reactivate the station to its last used settings.
6.6 Nozzle Changing
The quick-change nozzle bracket allows for easy and safe nozzle replacement without waiting for the gun to cool down completely.
- To Remove a Nozzle:
- Place the hot air gun into the nozzle storage rack on the left side of the machine.
- Align the air gun handle with the air nozzle.
- Turn the wind nozzle to the left to detach it.
- Move the detached nozzle to the edge of the rack for removal.
- To Install a Nozzle:
- Select the desired nozzle from the storage rack.
- Align the nozzle with the hot air gun's tip.
- Connect the air nozzle and air gun, then turn the nozzle to the right until it is securely fastened.
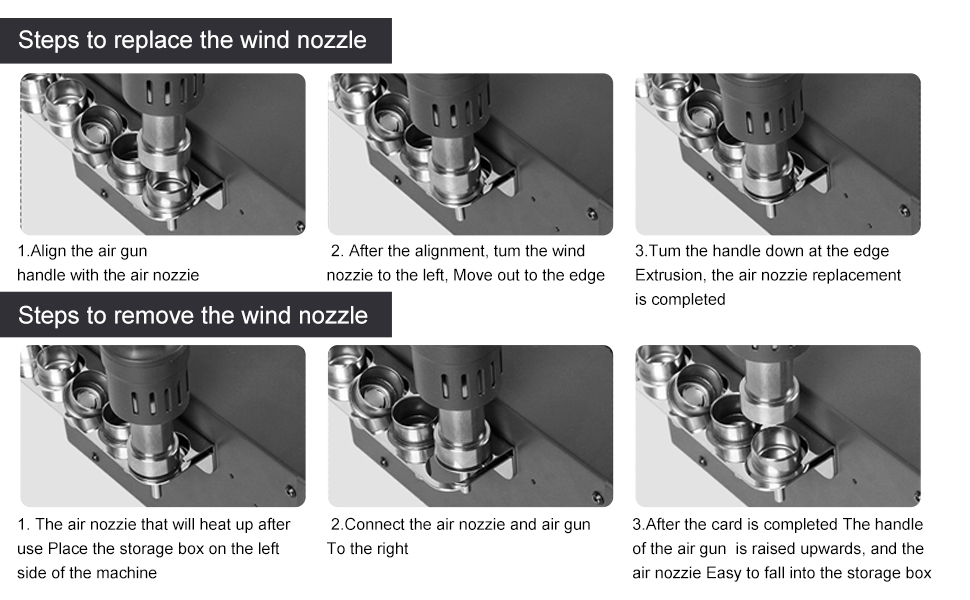
Figure 6.3: Nozzle Replacement Procedure. This diagram illustrates the step-by-step process for both removing and installing hot air nozzles using the integrated quick-change bracket.

Figure 6.4: Dual Mode Nozzle Switching. This image shows the difference between spiral wind nozzles and straight wind nozzles, indicating the two primary airflow types available.
7. Maintenance
- Cleaning: Ensure the unit is powered off and cooled down before cleaning. Wipe the exterior with a soft, damp cloth. Do not use abrasive cleaners or solvents.
- Nozzle Cleaning: Periodically clean the nozzles to prevent blockages and ensure optimal airflow.
- Heating Element: The heating element is a consumable part. If the station experiences reduced heating performance or inconsistent temperatures, the heating element may need replacement. Refer to the manufacturer's guidelines or contact support for replacement procedures and parts. The unit typically includes spare heating elements.
- Air Filter: Check and clean the air intake filter (if present) regularly to maintain proper airflow and prevent dust accumulation.
8. Troubleshooting
| Problem | Possible Cause | Solution |
|---|---|---|
| Station does not power on. | No power supply; power cord loose; power switch off. | Check power outlet and connections. Ensure power switch is ON. |
| Hot air gun not heating or heating slowly. | Faulty heating element; incorrect temperature setting; air gun not properly connected. | Verify temperature setting. Check hot air gun connection. Consider replacing the heating element (refer to Maintenance section). |
| No or weak airflow. | Airflow setting too low; blocked nozzle; fan malfunction. | Increase airflow setting. Clean or replace nozzle. Contact support if fan issue persists. |
| Automatic sleep function not working. | Hot air gun not placed correctly in holder; sensor malfunction. | Ensure the hot air gun is fully seated in its holder. |
9. Specifications
- Model: 2020D
- Power: 700 Watts
- Voltage: 110 Volts AC
- Temperature Range: 212°F - 932°F (100°C - 500°C)
- Temperature Stability: ±2°C (static)
- Display Type: LED
- Airflow Type: Brushless fan, soft wind
- Automatic Sleep: Yes, magnetic induction
- Memory Channels: 3 (CH1, CH2, CH3)
- Dimensions (Package): 11.5 x 11 x 9 inches
- Item Weight: 7.28 pounds
- Material: Copper (heating element components)
- Certifications: FCC, CE, RoHS
10. Warranty and Support
For warranty information, technical support, or service inquiries, please contact the retailer or manufacturer directly. Keep your purchase receipt as proof of purchase.
For further assistance, you may visit the HengTianMei Store on Amazon.