1. Introduction
This manual provides instructions for the installation, operation, and maintenance of your Pro Chaser PC210101 carburetor. This carburetor is designed as a replacement part for various snow blower models equipped with LCT StormForce 208cc engines. Please read this manual thoroughly before attempting any installation or maintenance procedures to ensure safe and correct usage.
2. Product Compatibility
The Pro Chaser PC210101 carburetor is compatible with the following snow blower models and part numbers:
- Ariens Sno-Tek: 920401, 920402 (24" Snow Blower with LCT StormForce 208cc)
- Ariens: 920021, 920022, 920024, 920025, 920406, 938034, 920403 Snow Blower
- Poulan Pro: PR241, PR624ES, PR270, 961940010
- Husqvarna: 924HV
- Replaces Part Numbers: 587154101, 585020402, 532436565, 20001368, 20001027, LCT03121, LCT03122, SKSN0312.1, SKSN0312.2
3. Package Contents
Verify that all items listed below are included in your package:
- 1 x Carburetor
- 3 x Gaskets
- 1 x Shut-off Valve
- 1 x Spark Plug
- 1 x Fuel Filter
- 1 x Primer Bulb
- 1 x Insulator
- 2 x Fitted Clamps
- 1 x Fuel Hose

Image 3.1: Complete Pro Chaser PC210101 Carburetor replacement kit, including the carburetor, gaskets, shut-off valve, spark plug, fuel filter, primer bulb, insulator, clamps, and fuel hose.
4. Safety Information
Always observe the following safety precautions when working with fuel systems and internal combustion engines:
- Ensure the engine is cool before beginning any work.
- Disconnect the spark plug wire to prevent accidental starting.
- Work in a well-ventilated area to avoid inhaling fuel fumes.
- Have a fire extinguisher readily available.
- Wear appropriate personal protective equipment, such as gloves and eye protection.
- Handle gasoline with extreme care; it is highly flammable.
- Dispose of old fuel and parts according to local regulations.
5. Installation
Follow these general steps for replacing your snow blower's carburetor. Specific steps may vary slightly depending on your snow blower model. Refer to your snow blower's service manual for detailed instructions.
5.1 Preparation
- Park the snow blower on a level surface and ensure the engine is off and cool.
- Disconnect the spark plug wire.
- Turn off the fuel supply valve, if equipped.
- Drain the fuel tank into an approved container.
5.2 Removing the Old Carburetor
- Locate the carburetor, typically found between the air filter and the engine intake manifold.
- Carefully disconnect the fuel line(s) from the carburetor. Be prepared for residual fuel to spill.
- Disconnect any linkages, springs, or electrical connections attached to the carburetor (e.g., throttle, choke, primer bulb hose). Note their positions for reassembly.
- Remove the mounting bolts or nuts that secure the carburetor to the engine.
- Carefully remove the old carburetor and any old gaskets.
5.3 Installing the New Carburetor

Image 5.1: Front view of the Pro Chaser PC210101 carburetor, showing key dimensions for fitment, including the 40mm (1.6") mounting width and 8.37mm (0.32") fuel inlet diameter.

Image 5.2: Side view of the Pro Chaser PC210101 carburetor, illustrating the fuel inlet and choke mechanism.

Image 5.3: Another front view of the Pro Chaser PC210101 carburetor, highlighting the throttle plate and mounting points.

Image 5.4: Alternate side view of the Pro Chaser PC210101 carburetor, showing the fuel bowl and drain screw.
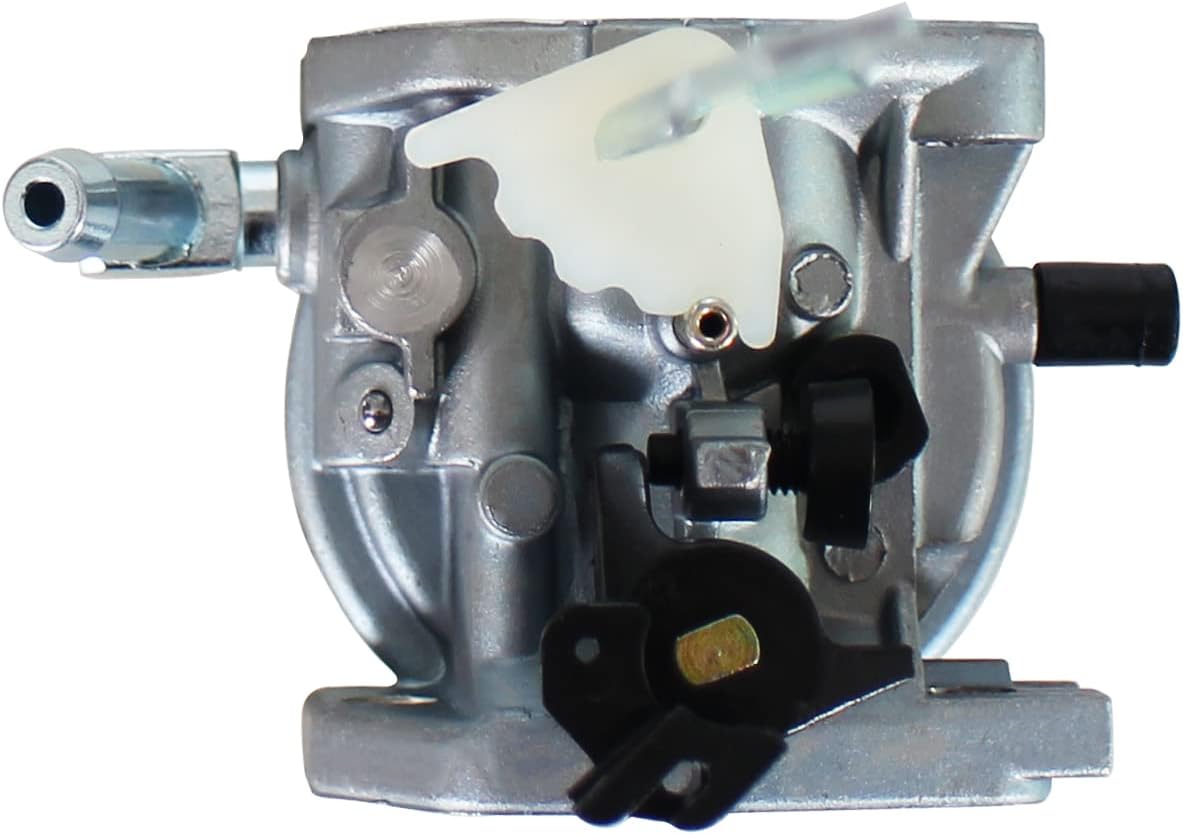
Image 5.5: Top view of the Pro Chaser PC210101 carburetor, displaying the linkage points for throttle and choke controls.
- Install new gaskets (provided) on both sides of the new carburetor. Ensure they are correctly aligned.
- Mount the new carburetor to the engine, securing it with the original bolts or nuts. Do not overtighten.
- Reconnect all linkages, springs, and electrical connections to their original positions. Double-check that the throttle and choke operate smoothly.
- Install the new fuel filter (if replacing) and connect the new fuel hose to the carburetor and fuel tank. Secure with fitted clamps.
- Install the new shut-off valve and primer bulb as needed.
- Replace the old spark plug with the new one provided.
5.4 Post-Installation
- Refill the fuel tank with fresh, appropriate fuel.
- Open the fuel supply valve.
- Reconnect the spark plug wire.
- Check for any fuel leaks. Address any leaks before proceeding.
6. Operation
After successful installation, your snow blower should start and run as expected. Follow your snow blower's manufacturer instructions for starting procedures. Typically, this involves:
- Ensuring the fuel valve is open.
- Setting the choke to the 'Full Choke' position.
- Priming the engine using the primer bulb (usually 3-5 pushes).
- Setting the throttle to the 'Fast' position.
- Starting the engine using the recoil starter or electric start.
- Gradually moving the choke to the 'Run' position as the engine warms up.
7. Maintenance
Proper maintenance of your carburetor and fuel system will ensure optimal performance and longevity of your snow blower.
- Fuel Quality: Always use fresh, clean gasoline. Stale fuel can cause deposits and clog the carburetor.
- Fuel Stabilizer: Use a high-quality fuel stabilizer, especially when storing the snow blower for extended periods (e.g., off-season). This prevents fuel degradation and gumming in the carburetor.
- Fuel Filter: Regularly inspect and replace the fuel filter as part of routine maintenance to prevent contaminants from reaching the carburetor.
- Cleaning: If the carburetor becomes clogged, it may require cleaning. This typically involves disassembling the carburetor and cleaning jets and passages with carburetor cleaner. This procedure should only be performed by individuals with appropriate mechanical knowledge.
- Spark Plug: Replace the spark plug annually or as recommended by your snow blower's manufacturer to ensure efficient combustion.
8. Troubleshooting
If your snow blower experiences issues after carburetor replacement, consider the following common troubleshooting steps:
- Engine Not Starting:
- Check fuel level and ensure the fuel valve is open.
- Verify spark plug connection and condition.
- Ensure choke is set correctly for starting.
- Check for proper fuel flow to the carburetor.
- Engine Runs Rough or Stalls:
- Ensure the choke is fully open after warm-up.
- Check for air leaks around the carburetor mounting gaskets.
- Inspect fuel lines for kinks or blockages.
- Verify that all linkages are correctly connected and operating freely.
- Fuel Leaks:
- Tighten all fuel line connections and clamps.
- Inspect gaskets for proper seating and damage.
- Check the fuel bowl for tightness.
If issues persist, consult a qualified service technician or your snow blower's service manual.
9. Specifications
| Brand | Pro Chaser |
| Model Number | PC210101 |
| Item Weight | 15.5 ounces |
| Package Dimensions | 8.46 x 3.46 x 3.03 inches |
| Manufacturer Part Number | LAWN |
| UPC | 721703342562 |
| Vehicle Service Type | Snow Blower |
| Recommended Uses | Snowblower |
10. Warranty and Support
For warranty information or technical support regarding your Pro Chaser PC210101 carburetor, please contact the manufacturer directly. Keep your purchase receipt as proof of purchase.
For assistance with your specific snow blower model, refer to the original equipment manufacturer's documentation or contact their customer support.