1. Safety Information
Always prioritize safety when operating the plasma cutter. Failure to follow safety guidelines can result in serious injury or property damage.
- Eye Protection: Always wear appropriate welding helmets or safety glasses with the correct shade filter to protect against intense light and sparks.
- Body Protection: Wear flame-resistant clothing, gloves, and sturdy footwear to protect against burns and electrical shock.
- Ventilation: Ensure adequate ventilation to remove fumes and gases produced during cutting. Work in a well-ventilated area or use a fume extractor.
- Electrical Safety: Ensure the machine is properly grounded. Do not operate in wet conditions. Inspect cables and connections for damage before each use.
- Fire Hazards: Keep flammable materials away from the cutting area. Have a fire extinguisher readily available.
- Air Supply: Ensure the air compressor is clean, dry, and provides the correct pressure.
- Children and Bystanders: Keep children and unauthorized personnel away from the work area.
2. Product Overview
The Reboot RBC-4000 is an IGBT Inverter 40 Amps plasma cutting machine designed for efficient cutting of various metals. It operates on 110V AC power and features high-frequency arc starting.
Key Features:
- Input Voltage: 110V AC
- Output Current: 40 Amps (60% duty cycle at 40A, 100% duty cycle at 28A)
- Max Clean Cutting Thickness: 9mm
- Air Pressure Requirement: 60-70 psi
- Cutting Materials: Aluminum, stainless steel, alloy steel, mild steel, copper, cast iron, chrome.
Package Contents:
- RBC-4000 Plasma Cutter Unit
- 13ft PT31 Cutting Torch
- Earth Clamp with 6.56 ft Cable
- Air Hose (6.5 ft)
- Air Pressure Valve (Regulator)

Figure 2.1: The Reboot RBC-4000 plasma cutter with its complete set of accessories, including the cutting torch, ground clamp, air hose, and air pressure regulator.
3. Setup Instructions
3.1 Front Panel Connections
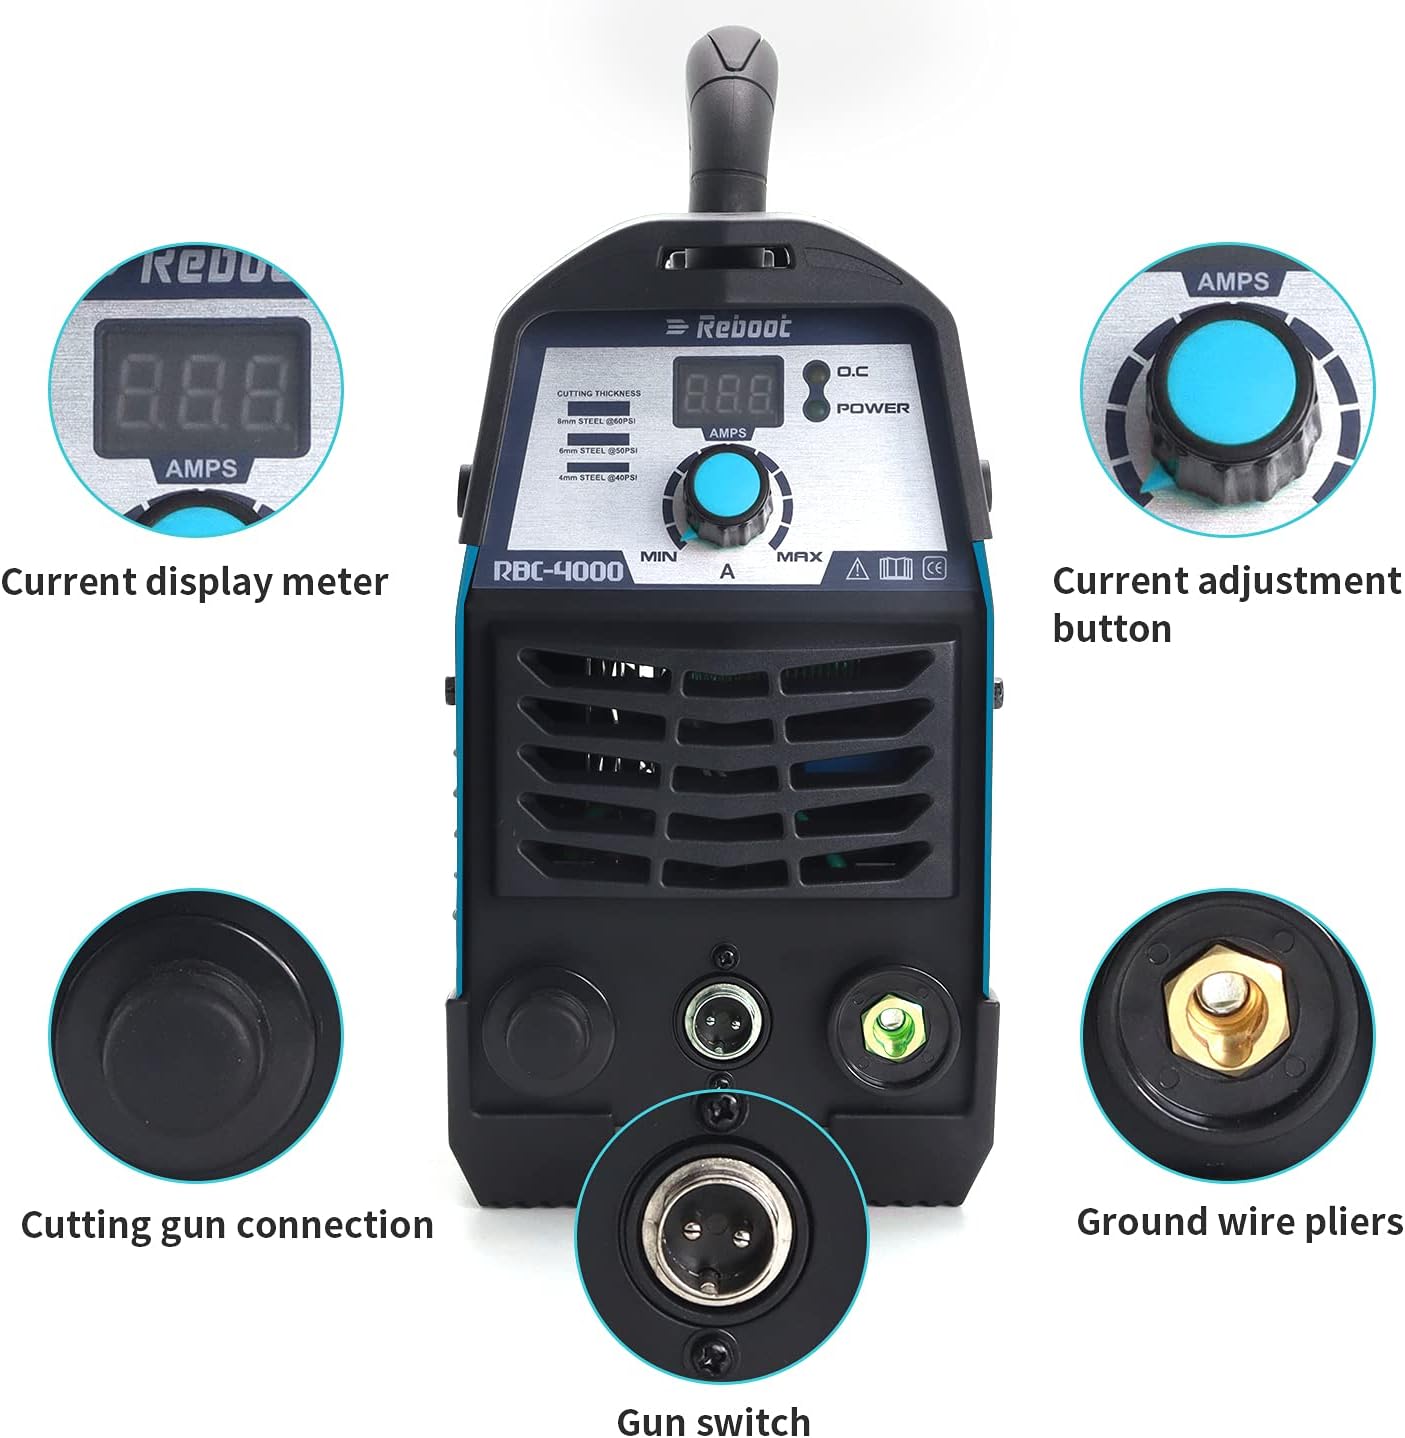
Figure 3.1: Front panel controls and connections. This image highlights the current display meter, current adjustment button, cutting gun connection, gun switch, and ground wire pliers connection point.
- Connect Cutting Torch: Insert the cutting gun connection into its designated port on the front panel and secure it.
- Connect Gun Switch: Plug the gun switch cable into the corresponding port on the front panel.
- Connect Ground Clamp: Attach the ground wire pliers cable to the ground connection terminal on the front panel. Ensure a secure connection.
3.2 Rear Panel Connections

Figure 3.2: Rear panel connections. This image shows the waterproof power switch, the air inlet (AIR IN), and the high-speed cooling fan.
- Install Air Pressure Reducing Valve: Connect the air pressure reducing valve (regulator) to the 'AIR IN' port on the rear panel.
- Connect Air Hose: Attach the air hose from your air compressor to the air pressure reducing valve. Ensure all air connections are tight to prevent leaks.
- Power Connection: Plug the plasma cutter into a suitable 110V AC power outlet. A 50A breaker is suggested for optimal performance.
4. Operating Instructions
4.1 Pre-Operation Checklist
- Ensure all connections (torch, ground, air, power) are secure.
- Verify the air compressor is on and providing the required air pressure (60-70 psi).
- Confirm appropriate safety gear is worn.
- Clear the work area of flammable materials.
4.2 Powering On and Adjusting Settings
- Turn on the waterproof power switch located on the rear panel.
- Use the current adjustment button on the front panel to set the desired amperage for your cutting task. Refer to the cutting chart below for guidance. The current display meter will show the selected amperage.
4.3 Cutting Procedure
- Attach the ground clamp securely to the workpiece or a metal workbench connected to the workpiece.
- Position the cutting torch nozzle close to the edge of the material to be cut.
- Press the trigger on the cutting torch to initiate the plasma arc. Maintain a consistent standoff distance and travel speed for a clean cut.
- Guide the torch along the desired cutting line.
- Release the trigger to stop the arc.

Figure 4.1: Examples of plasma cutting results on materials of varying thicknesses (1mm, 5mm, 12mm).
4.4 Cutting Torch Components

Figure 4.2: Exploded view of the PT31 cutting torch components, including the shielded cup, extended tip, gas ring, and extended electrode. These are consumables that will need periodic replacement.
5. Maintenance
Regular maintenance ensures optimal performance and extends the lifespan of your plasma cutter.
- Consumables Inspection: Regularly inspect the cutting torch consumables (electrode, tip, shielded cup, gas ring) for wear. Replace them when they show signs of degradation to maintain cut quality.
- Air Filter/Regulator: Check and drain the moisture trap on the air pressure regulator periodically. Replace the air filter element if it becomes clogged.
- Cleaning: Keep the plasma cutter unit clean and free from dust and metal particles. Use compressed air to blow out internal components if necessary, ensuring the unit is unplugged first.
- Cable Inspection: Inspect all cables (power, torch, ground) for cuts, abrasions, or loose connections. Repair or replace damaged cables immediately.
- Cooling Fan: Ensure the cooling fan on the rear panel is free from obstructions to allow proper airflow.
6. Troubleshooting
This section addresses common issues you might encounter with your RBC-4000 plasma cutter.
| Problem | Possible Cause | Solution |
|---|---|---|
| No arc when trigger is pressed | No power; loose connections; faulty torch consumables; insufficient air pressure; ground clamp not connected. | Check power supply and switch; ensure all cables are secure; replace torch consumables; verify air pressure; connect ground clamp properly. |
| Poor cut quality (rough, dross) | Worn consumables; incorrect amperage; incorrect air pressure; too fast/slow travel speed; improper standoff distance. | Replace consumables; adjust amperage according to material; set correct air pressure; adjust travel speed; maintain proper standoff distance. |
| Machine overheats (thermal overload light on) | Exceeded duty cycle; insufficient ventilation; clogged cooling fan. | Allow machine to cool down; ensure adequate ventilation; clean cooling fan and vents. |
| Air leaks | Loose air hose connections; damaged air hose or regulator. | Tighten all air connections; inspect and replace damaged components. |
7. Specifications
| Feature | Specification |
|---|---|
| Model Number | RBC-4000 |
| Input Voltage | AC 110V |
| Output Current | 40 Amps |
| Duty Cycle | 60% at 40A, 100% at 28A |
| Recommended Breaker | 50A (for 110V) |
| Air Pressure | 60-70 psi |
| Max Clean Cutting Thickness | 9mm |
| Item Weight | 6.26 kg |
| Parcel Dimensions | 37.34 x 28.19 x 24.13 cm |
7.1 Cutting Thickness Chart (RBC4000D-110V)

Figure 7.1: Recommended amperage and air pressure settings for various cutting thicknesses.
| Amps | Thickness (mm) | Air Pressure (psi) |
|---|---|---|
| 20 Amps | 5mm | 40-50psi |
| 30 Amps | 6mm | 40-50psi |
| 35 Amps | 8mm | 50-60psi |
8. Warranty and Support
Reboot offers a 1-year limited warranty on the RBC-4000 plasma cutter. Additionally, a 30-day 100% satisfaction or money-back guarantee is provided.
For technical support, warranty claims, or further assistance, please refer to the contact information provided with your product packaging or visit the official Reboot website.


