
QPKING LM110
QPKING LM110 Digital Manifold Gauge User Manual
Model: LM110 (MMT211832)
1. Introduction
Thank you for choosing the QPKING LM110 Digital Manifold Gauge. This device is designed for precise measurement and analysis of refrigeration systems, offering functions for refrigerant filling, vacuuming, and leak testing. This manual provides detailed instructions for safe and efficient operation of your device.
Please read this manual thoroughly before operating the device and keep it for future reference.
2. Safety Information
- Always wear appropriate personal protective equipment (PPE) such as safety glasses and gloves when working with refrigerants.
- Ensure proper ventilation in the work area to prevent accumulation of refrigerant gases.
- Do not expose the device to extreme temperatures, direct sunlight, or corrosive environments.
- Avoid dropping or subjecting the device to severe impact.
- Only use the device for its intended purpose as described in this manual.
- Refer to local regulations and industry standards for handling refrigerants.
3. Product Overview
3.1 Package Contents
The QPKING LM110 Digital Manifold Gauge package typically includes:
- QPKING LM110 Digital Manifold Gauge Unit
- Refrigerant Hoses (typically 3, color-coded)
- User Manual
- Storage Box

Image: The QPKING LM110 Digital Manifold Gauge unit, along with its included refrigerant hoses, user manual, and packaging box.
3.2 Key Features
- Three Major Functions: Supports Refrigerant Filling & Testing, Vacuuming Operation & Testing, and Leak Testing of Refrigeration System Pressure.
- Built-in Refrigerant Data: Contains data for 89 types of refrigerants.
- Multi-unit Switching: Supports various pressure units (KPa, MPa, Bar, PSI, inHg) and temperature units (°C, °F).
- Manual Brightness Adjustment: Adjustable display brightness for different working environments.
- Refrigerant Observation Window: Allows visual inspection of refrigerant flow.
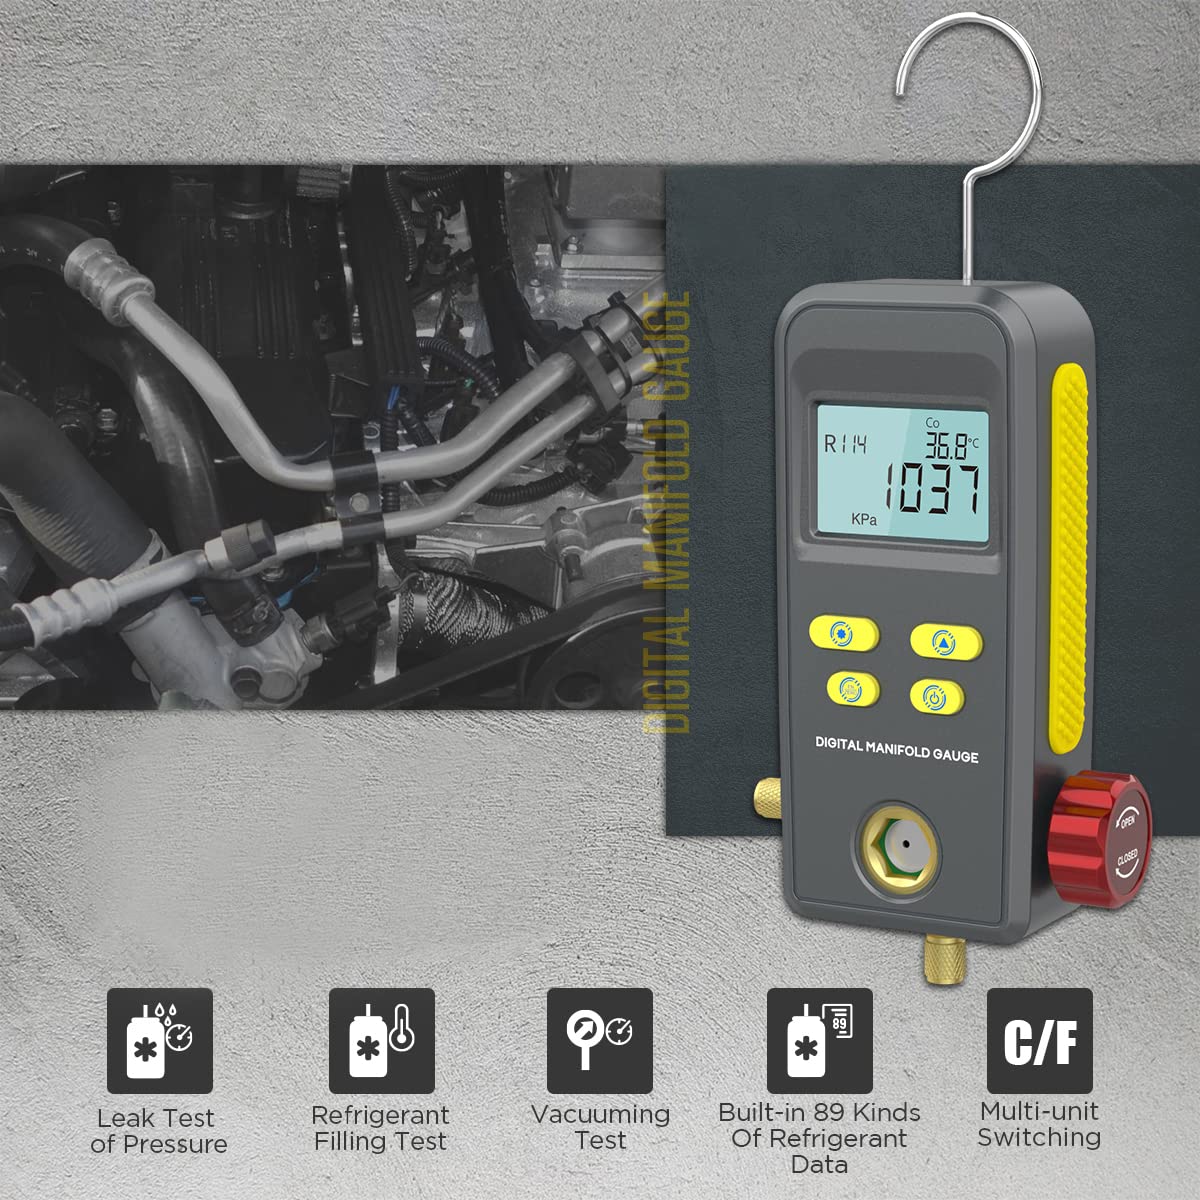
Image: The digital manifold gauge highlighting its main capabilities: leak testing, refrigerant filling, vacuum testing, built-in refrigerant data, and multi-unit switching.

Image: The digital manifold gauge displaying screens for refrigerant filling, vacuuming, and leak testing, illustrating its three primary operational modes.
4. Setup
4.1 Battery Installation
- Locate the battery cover on the back of the device (refer to component diagram if available).
- Open the battery cover.
- Insert the required batteries, ensuring correct polarity.
- Close the battery cover securely.
4.2 Connecting Hoses
- Identify the high-pressure, low-pressure, and service port connections on the manifold gauge.
- Connect the appropriate color-coded hoses to the corresponding ports on the manifold gauge.
- Ensure all connections are tight to prevent leaks.
5. Operating Instructions
5.1 Power On/Off
Press and hold the Power button (usually marked with a power symbol) to turn the device on or off.
5.2 Refrigerant Selection
Use the "Refrigerant Select" button (or similar, refer to button labels on device) to cycle through the built-in refrigerant types (e.g., R11, R12, R134a). Select the refrigerant relevant to your system.
5.3 Unit Switching
Press the "Unit" button (or similar) to switch between different pressure units (KPa, MPa, Bar, PSI, inHg) and temperature units (°C, °F) as needed for your measurements.

Image: The digital manifold gauge screen illustrating the selection of multiple pressure units (KPa, MPa, Bar, PSI, inHg) and temperature units (°C, °F).
5.4 Brightness Adjustment
Short press the Power button to cycle through different brightness levels of the display.

Image: A hand pressing the power button on the digital manifold gauge, demonstrating the manual brightness adjustment feature with a visual change in screen illumination.
5.5 Refrigerant Filling & Testing
This mode allows for simultaneous pressure, evaporation temperature, and condensation temperature tests while filling refrigerant. Ensure the correct refrigerant type is selected.

Image: The digital manifold gauge screen showing refrigerant selection (R114), condensation temperature (Co 86.8°C), measured pressure (1037 KPa), and evaporation temperature (Ev 36.8°C) during filling and testing.
5.6 Vacuuming Operation & Testing
Use this function to vacuum refrigeration systems. The device displays current vacuum pressure and the percentage of the vacuum level in real-time.

Image: The digital manifold gauge screen showing vacuum degree (VAC 78%) and measured vacuum pressure (69 KPa) during a vacuuming operation.
5.7 Leak Testing of Pressure
This mode detects pressure leaks in refrigeration systems. It displays the original pressure, current pressure, leak pressure, and the testing time.

Image: The digital manifold gauge screen showing leak pressure (ΔP 16, 1095 KPa), original pressure (Strt 1045 KPa), and testing time (El tAE 00:16) during a pressure leak test.
6. Built-in Refrigerant Data
The QPKING LM110 comes with pre-programmed data for 89 different refrigerants, allowing for accurate measurements across a wide range of systems. A partial list is shown below:

Image: A table listing 89 different refrigerants (R11, R113, R114, etc.) that are pre-programmed into the QPKING LM110 Digital Manifold Gauge.
7. Maintenance
- Cleaning: Wipe the device with a soft, damp cloth. Do not use abrasive cleaners or solvents.
- Storage: Store the device in its original packaging or a protective case in a dry, cool place when not in use.
- Battery Replacement: Replace batteries promptly when the low battery indicator appears to ensure accurate readings.
- Hose Inspection: Regularly inspect refrigerant hoses for cracks, wear, or damage. Replace damaged hoses immediately.
8. Troubleshooting
| Problem | Possible Cause | Solution |
|---|---|---|
| Device does not power on | Low or dead batteries; incorrect battery installation. | Replace batteries; ensure correct polarity. |
| Inaccurate readings | Incorrect refrigerant selected; sensor contamination; loose hose connections. | Verify refrigerant type; clean sensors if accessible; tighten all hose connections. |
| Display is dim or unreadable | Low battery; brightness setting too low. | Replace batteries; adjust display brightness using the power button. |
| Leak test fails unexpectedly | Loose connections; damaged hoses; actual system leak. | Check and tighten all connections; inspect hoses for damage; perform a thorough system leak detection. |
9. Specifications
Detailed technical specifications for the QPKING LM110 Digital Manifold Gauge:

Image: A table detailing the technical specifications of the QPKING LM110, including pressure test units, ranges, resolution, accuracy, vacuum test units, range, resolution, main unit dimensions, and weight.
| Parameter | Value |
|---|---|
| Model Number | MMT211832 |
| Pressure Test Unit | KPa, MPa, Bar, PSI, inHg |
| Pressure Test Range | 0 KPa - 6000 KPa |
| Pressure Test Resolution | 1 KPa |
| Pressure Test Accuracy | ±0.5%(FS)+5dgt |
| Pressure Overload Limit | 10 MPa |
| Vacuum Test Unit | KPa, MPa, Bar, PSI, inHg |
| Vacuum Test Range | -101 KPa - 0 KPa |
| Vacuum Resolution | 1 KPa |
| Main Unit Dimensions | 184 x 107 x 45 mm (7.24 x 4.21 x 1.77 inches) |
| Weight | 0.446 kg (1.04 lbs) |
| Power Source | (Battery type not specified, assuming standard AA/AAA) |
10. Warranty and Support
QPKING products are manufactured to high-quality standards. For warranty information and technical support, please refer to the warranty card included with your product or visit the official QPKING website. Please retain your proof of purchase for warranty claims.
For further assistance, contact QPKING customer service.
Ask a question about this manual
Ask about setup, troubleshooting, compatibility, parts, safety, or missing instructions. Manuals+ will review the question and use this page’s manual context to help answer it.