
1. Introduction
Thank you for choosing the AVPLAY Cayin MT-35 MK2 Plus Integrated Tube Amplifier. This amplifier is designed to deliver high-fidelity audio performance with the characteristic warmth and richness of vacuum tube amplification. It features both triode and ultralinear operating states, a dedicated headphone output, and multiple input options to integrate seamlessly into your audio system.

Front view of the Cayin MT-35 MK2 Plus Integrated Tube Amplifier, showcasing the illuminated vacuum tubes.
2. Important Safety Instructions
- Read all instructions carefully before operating the amplifier.
- Keep the amplifier away from water, moisture, and excessive heat.
- Ensure proper ventilation around the unit to prevent overheating.
- Do not open the amplifier casing. Refer all servicing to qualified personnel.
- Disconnect the power cord during lightning storms or when unused for long periods.
- Handle vacuum tubes with care as they can become hot during operation.
3. Package Contents
Verify that all items are present in the package:
- Cayin MT-35 MK2 Plus Integrated Tube Amplifier
- Power Cord
- Vacuum Tubes (5BK7Ax3, EL34x4)
- User Manual (this document)
4. Setup
4.1. Unpacking and Placement
Carefully remove the amplifier from its packaging. Place the unit on a stable, level surface with adequate ventilation. Avoid placing it near heat sources or in direct sunlight.
4.2. Tube Installation
The vacuum tubes may be packed separately. Gently insert each tube into its corresponding socket, aligning the pins with the holes. Ensure they are firmly seated. Refer to the markings on the amplifier for correct tube placement (e.g., EL34x4, 5BK7Ax3).

Front view of the amplifier with protective tube cages, ready for tube installation.
4.3. Connecting Speakers
Connect your speakers to the appropriate output terminals on the rear panel. The amplifier supports 4Ω and 8Ω speakers. Ensure correct polarity (+ to + and - to -) for each speaker. Use high-quality speaker cables for optimal sound.

Rear panel connections, including speaker terminals and various input options.
4.4. Connecting Audio Sources
The amplifier provides three LINE inputs (LINE1, LINE2, LINE3) for connecting external audio sources such as CD players, DACs, or other line-level devices. Use RCA cables to connect your sources to the corresponding input jacks on the rear panel.
4.5. Power Connection
After all audio connections are made, connect the power cord to the amplifier's power inlet and then to a suitable AC power outlet. Ensure the power switch is in the OFF position before plugging in.
5. Operating Instructions
5.1. Power On/Off
To power on the amplifier, flip the power switch located on the front panel to the ON position. The tubes will begin to glow as they warm up. Allow a few moments for the tubes to stabilize before playing audio. To power off, flip the switch to OFF.
5.2. Volume Control
The large knob on the front panel controls the master volume. Rotate clockwise to increase volume and counter-clockwise to decrease it. Start with a low volume setting to avoid sudden loud sounds.
5.3. Input Selection
Use the input selector knob on the front panel to choose between LINE1, LINE2, and LINE3 inputs. Select the input corresponding to your active audio source.
5.4. Headphone Output
The amplifier includes a 6.35mm headphone jack on the front panel. Connect your headphones here for private listening. When headphones are plugged in, speaker output will typically be muted.
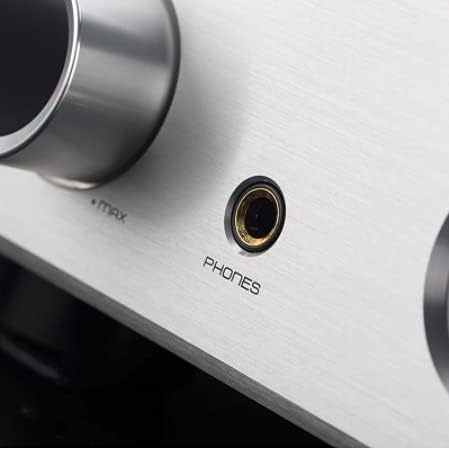
Detailed view of the 6.35mm headphone output jack.
5.5. Triode/Ultralinear Mode Selection
The Cayin MT-35 MK2 Plus offers both Triode (TR) and Ultralinear (UL) operating modes. The Triode mode typically provides a warmer, more intimate sound with lower power output (18W+18W RMS). The Ultralinear mode offers higher power output (35W+35W RMS) and a more dynamic, detailed sound. Consult the amplifier's front panel or remote control for the switch to toggle between these modes, if available.
Official product video showcasing the Cayin MT-35 MK2 Plus Integrated Tube Amplifier in operation, highlighting its design and features.
6. Maintenance
6.1. Cleaning
Regularly clean the amplifier with a soft, dry cloth. Do not use liquid cleaners or abrasive materials, as they may damage the finish or internal components. Ensure the unit is powered off and unplugged before cleaning.
6.2. Tube Replacement
Vacuum tubes have a finite lifespan and may need replacement over time. If you notice a degradation in sound quality or if a tube fails, consult a qualified technician for replacement. Always use tubes of the correct type and specification (5BK7Ax3, EL34x4) as recommended by the manufacturer.
7. Troubleshooting
- No Sound: Check all cable connections (power, speakers, audio sources). Ensure the correct input is selected and the volume is turned up. Verify that the tubes are glowing.
- Distorted Sound: Check speaker connections for proper polarity. Ensure the audio source is not overdriving the input. Inspect tubes for any visible damage or signs of wear.
- Humming/Buzzing: Ensure all cables are securely connected. Try moving the amplifier or audio cables away from other electronic devices that may cause interference. Check for proper grounding.
- One Channel Not Working: Check speaker cable connections for that channel. Swap input cables to determine if the issue is with the source or the amplifier. Inspect the tubes for that channel.
If problems persist, contact customer support or a qualified service technician.
8. Specifications
| Feature | Specification |
|---|---|
| Rated Output Power (Triode) | 18W+18W (RMS) |
| Rated Output Power (Ultralinear) | 35W+35W (RMS) |
| Frequency Response | 8Hz ~ 55KHz (-3dB) |
| Harmonic Distortion | 1% (1kHz) |
| Signal to Noise Ratio | 89dB |
| Input Sensitivity | 300mV |
| Input Impedance | 100kΩ |
| Output Impedance | 4Ω, 8Ω |
| Headphone Output Impedance | 16Ω ~ 300Ω |
| Input Terminals | LINE1, LINE2, LINE3 |
| Vacuum Tubes Used | 5BK7Ax3, EL34x4 |
| Machine Volume (W*H*D) | 326x272x184mm (12.83 x 10.71 x 7.24 inches) |
| Net Weight | 13.5kg (29.7 pounds) |
| Whole Machine Power Consumption | 260W |
| Material Type | Aluminum (Front Panel) |

Diagram illustrating the dimensions of the amplifier.
9. Warranty and Support
For warranty information and technical support, please refer to the documentation provided with your purchase or contact the retailer/manufacturer directly. Keep your proof of purchase for any warranty claims.