Goalake 5 Port
Goalake 5-Port Ethernet PoE Switch (4 PoE Ports, 1 Uplink) User Manual
Model: 5 Port
1. Introduction
This manual provides detailed instructions for the installation, operation, and maintenance of your Goalake 5-Port Ethernet PoE Switch. This device is designed to simplify network expansion and power delivery for compatible devices.

Image 1: Goalake 5-Port Ethernet PoE Switch, front view showing the five Ethernet ports and LED indicators.
2. Product Overview
2.1 Key Features
- 5 Ports Easy Managed PoE Switch: Includes 4 managed PoE ports (2*1000M + 2*100M) and 1*1000M uplink port.
- PoE Standard: Compliant with IEEE802.3af/at standard, delivering up to 30W per PoE port, with a total PoE power budget of up to 52W.
- Data and Power Transmission: Data and power are transferred over a single Ethernet cable.
- Easy Smart Management: Configure and monitor your network via a comprehensive web interface or a mobile application.
- Flexible Installation: Compact design suitable for desktop or wall mounting.
- Advanced Features: Supports 802.1Q VLAN, QoS optimization, static MAC addressing, storm control, port mirroring, auto MDI/MDI-X, IEEE802.3X full-duplex flow control, and backpressure half-duplex flow control.
- AI Extended Mode: Extends power and data transmission distance up to 250 meters (820 feet) at 10/10Mbps.
- Durable Design: Features a built-in industrial power supply and a fanless metal housing for silent operation and longevity.
- Professional Lightning Protection: 4KV lightning protection safeguards devices from electrical surges.
2.2 Package Contents
- 1 x Goalake 5-Port PoE Switch
- 1 x Power Cord
- 1 x User Manual
3. Setup
3.1 Connecting the Switch
- Power Connection: Connect the provided power cord to the switch's power input and then to a standard electrical outlet. The PWR LED indicator will illuminate.
- Uplink Connection: Connect your router or network source to the "Uplink: 1000Mbps" port (often labeled LAN) on the switch using a standard Ethernet cable.
- PoE Device Connection: Connect your PoE-compatible devices (e.g., IP cameras, wireless access points, IP phones) to the PoE ports (1-4) on the switch using Ethernet cables. These ports will provide both data and power to the connected devices.
- Non-PoE Device Connection: Non-PoE devices (e.g., computers, NVRs, routers) can be connected to any port (1-4 or Uplink) for data transmission. For non-PoE devices requiring power, an independent power supply or an active PoE splitter must be used.

Image 2: Diagram illustrating the connection of power and data cables to the Goalake 5-Port PoE Switch, highlighting the uplink and PoE ports.

Image 3: Visual guide for plug-and-play setup, showing power cord connection, router to uplink, and devices to PoE ports.
Note: If your device is a passive PoE or non-PoE device, the switch will only transmit data, not power. In such cases, connected devices need an independent power supply. Alternatively, you can use an active PoE splitter to power your devices.
3.2 Physical Installation
The Goalake PoE switch offers flexible installation options:
- Desktop Placement: Place the switch on a flat, stable surface.
- Wall Mounting: The switch features two wall-hanging holes on the bottom for secure wall mounting. Use appropriate screws (not included) for installation.
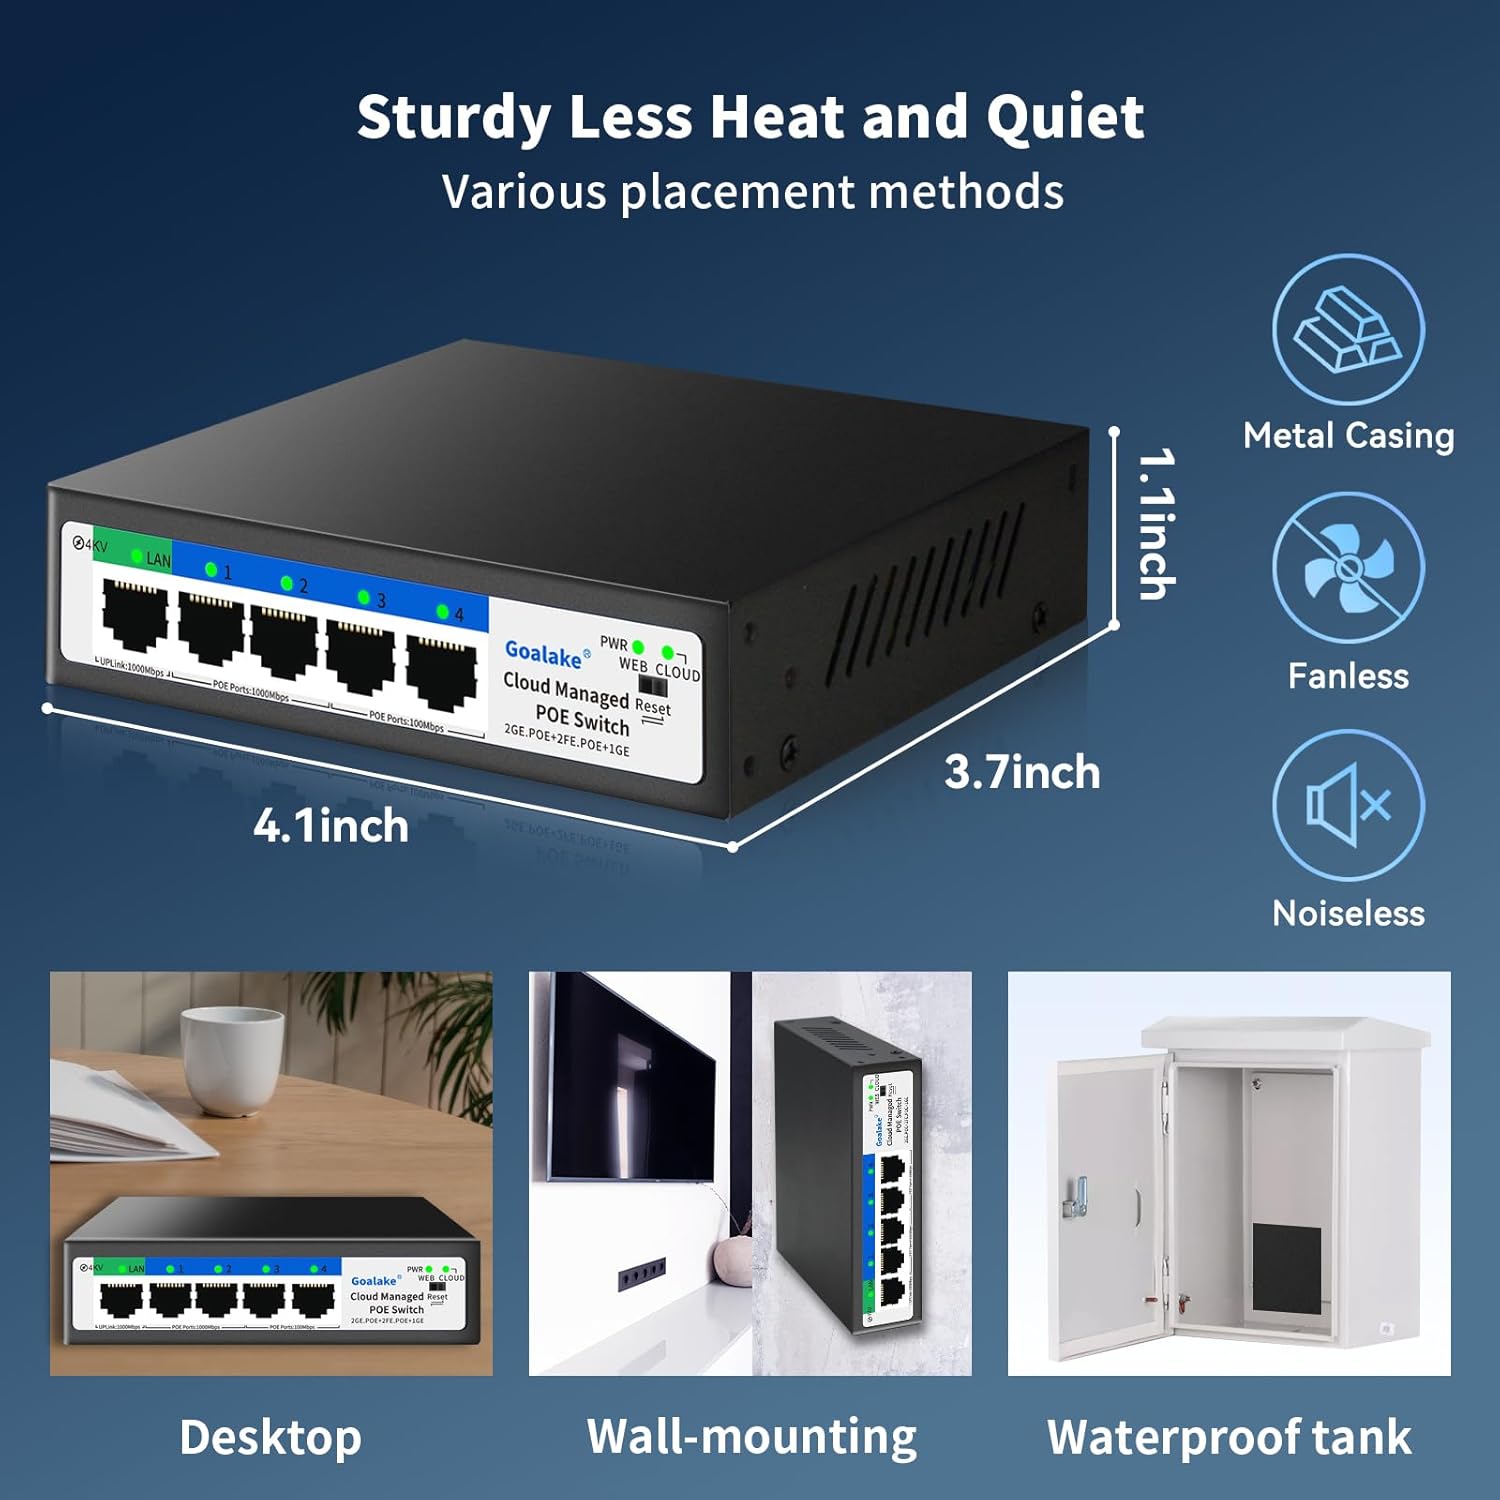
Image 4: Visual representation of the switch dimensions (4.1"L x 3.7"W x 1.1"H) and various placement methods including desktop, wall-mounting, and inside a waterproof tank.
4. Operating Instructions
4.1 Smart Management (Web/App Interface)
The switch can be managed and configured effortlessly via a comprehensive web interface or a mobile application. This allows for remote monitoring and management of your network.

Image 5: Depiction of the management utility accessible via web browser and a mobile application, showing network configuration options.
Video 1: An overview of the Goalake 5-port managed switch, demonstrating its features and compact design.
4.2 VLAN Support (802.1Q)
The switch supports IEEE 802.1Q VLAN, allowing you to create secure, high-performing network segments. VLAN division helps reduce network broadcast storms and makes network transmission more efficient.

Image 6: Illustration of VLAN features, segmenting the network for different purposes like surveillance, office, and guest access.
4.3 Quality of Service (QoS)
Utilize QoS optimization to manage network traffic and prioritize devices for optimal performance, ensuring a lag-free experience for critical applications.

Image 7: Screenshot of the QoS management interface, displaying uplink and downlink rate controls for various ports.
4.4 AI Extended Mode
The AI Extended Mode allows for power and data transmission over longer distances. When activated, the PoE port will intelligently determine whether to enter ultra-long distance mode (10/10Mbps) extending up to 250 meters (820 feet). This requires Category 5e or higher Ethernet cables.

Image 8: Comparison of normal mode (max 330ft at 10/100Mbps) and AI Extended Mode (max 820ft at 10/10Mbps) for PoE devices.
Video 2: A short demonstration of the Goalake 4-port AI PoE Switch, highlighting its AI features and power capabilities.
5. Maintenance
5.1 General Care
- Keep the switch in a cool, dry environment.
- Avoid exposing the switch to direct sunlight or extreme temperatures.
- Clean the exterior with a soft, dry cloth. Do not use liquid or aerosol cleaners.
5.2 Fanless Design
The fanless design ensures silent operation and reduces the need for internal cleaning, contributing to the device's reliability and longevity.
6. Troubleshooting
If you encounter issues with your Goalake PoE Switch, consider the following general troubleshooting steps:
- No Power: Ensure the power cord is securely connected to both the switch and a working electrical outlet. Check the PWR LED indicator.
- No Network Connection: Verify that Ethernet cables are properly connected to both the switch and the devices. Check the LAN and port-specific LEDs for activity.
- PoE Device Not Powering On: Confirm that the connected device is PoE-compatible (IEEE802.3af/at). If it's a passive PoE or non-PoE device, ensure it has an independent power supply or an active PoE splitter. Check the PoE port LEDs.
- Slow Network Speed: Ensure all cables are Category 5e or higher. If using AI Extended Mode, note that data speed is reduced to 10/10Mbps for extended range. Check QoS settings if configured.
- Accessing Management Interface: Ensure your computer is on the same network segment as the switch. Refer to the full user manual for default IP addresses and login credentials.
7. Specifications
| Feature | Detail |
|---|---|
| Brand | Goalake |
| Model Number | 5 Port | 52W 4x PoE+ |
| Number of Ports | 5 (4 PoE+, 1 Uplink) |
| PoE Standard | IEEE802.3af/at |
| Max PoE Power per Port | 30W |
| Total PoE Power Budget | 52W |
| Data Transfer Rate | 100 Megabits Per Second (PoE Ports), 1000 Megabits Per Second (Uplink) |
| AI Extended Mode Distance | Up to 250 meters (820 feet) at 10/10Mbps |
| Voltage | 44 Volts (DC) |
| Case Material | Metal |
| Product Dimensions | 4.1"L x 3.7"W x 1.1"H |
| Item Weight | 0.4 Kilograms (14.1 ounces) |
| Upper Temperature Rating | 60 Degrees Celsius |
| Compatible Devices | IP cameras, access points, IP phones, computers, printers, and more. |
8. Warranty and Support
Goalake provides a comprehensive one-year after-sales service plan. Should any issues arise within the first year from your order date, replacements and technical support are available to ensure customer satisfaction.
For technical assistance or warranty claims, please contact Goalake customer support.
Related Documents - 5 Port
 |
TP-Link TL-SG1005P-PD 5-Port Gigabit Desktop PoE Switch Installation Guide Official installation guide for the TP-Link TL-SG1005P-PD, a 5-port Gigabit desktop switch featuring PoE IN and PoE OUT capabilities. Learn about LED indicators, switch functions, connection setup, specifications, and FAQs. |
 |
AirLive POE-GSH420-60 Quick Setup Guide: 6-Port Gigabit PoE+ Switch This quick setup guide provides installation instructions and details on indicator lights and function switches for the AirLive POE-GSH420-60 6-Port Gigabit PoE+ Switch. It also mentions the related POE-GSH802M model. |
 |
Loocam PoE Switch Quick Start Guide: Installation, Features, and Troubleshooting Get started quickly with the Loocam PoE Switch. This guide covers package contents, product appearance, installation methods (desktop, wall-mount, rack-mount), connection diagrams, port specifications, and FAQs for Loocam Gigabit PoE switches. |
 |
TP-Link Easy Smart Switch User Guide Comprehensive user guide for TP-Link Easy Smart Switches, covering setup, configuration, management, and advanced features like VLAN, QoS, and PoE. |
 |
Dahua DH-CS4010-8ET-110-V2 Cloud Managed Switch: Features, Specifications, and Performance Explore the Dahua DH-CS4010-8ET-110-V2, a 10-port cloud-managed desktop switch offering 8-port PoE, high PoE budget (up to 90W), DoLynk Care cloud management, loop protection, and wide operating temperature. Ideal for small to medium businesses. |
 |
SMCGS18P-Smart 16-Port Gigabit PoE Web Managed Switch Detailed specifications and features of the SMCGS18P-Smart, an 18-port Gigabit Ethernet Smart Switch with 16 PoE ports and 2 SFP slots, offering advanced management, security, and performance for SMB and SOHO networks. |