Y&H BL912-100A-FR
Y&H 100A MPPT 12V/24V Dual USB LCD Solar Charge Controller User Manual
Model: BL912-100A-FR
1. Introduction
Thank you for choosing the Y&H 100A MPPT Solar Charge Controller. This device is designed to manage power flow from your solar panels to your battery bank, ensuring efficient and safe charging. It features an LCD display for easy monitoring and dual USB ports for convenient device charging.
This controller is suitable for various battery types, including lead-acid (Open, AGM, GEL) and lithium-ion batteries, and operates with both 12V and 24V systems. Its advanced MPPT (Maximum Power Point Tracking) technology optimizes solar energy harvesting, potentially increasing efficiency by 10% to 30% compared to traditional PWM controllers.
2. Safety Instructions
Please read these safety instructions carefully before installation and operation to prevent damage to the controller or injury.
- Ensure your battery has sufficient voltage for the controller to recognize the battery type before the initial installation.
- Keep battery cables as short as possible to minimize voltage loss.
- The charge regulator is designed for solar modules only. Never connect another charging source to the charge regulator.
- The controller provides protection against reverse polarity for both the battery and solar panels. However, always ensure correct polarity during connection.
- Avoid exposing the controller to water or moisture.
- Do not attempt to repair or modify the controller yourself. Contact qualified personnel for service.
3. Product Features
- Advanced MPPT Technology: Maximizes power extraction from solar panels, improving charging efficiency by 10-30%.
- Wide Battery Compatibility: Supports lead-acid (Open, AGM, GEL) and lithium-ion batteries.
- Automatic System Voltage Recognition: Automatically detects 12V or 24V battery systems.
- Integrated LCD Display: Provides real-time monitoring of battery voltage, charging/discharging current, cumulative power generation/discharge, and temperature.
- Dual USB Outputs: Two 5V/2.5A (Max) USB ports for charging mobile phones, tablets, and other USB-powered devices.
- Comprehensive Protection: Includes short-circuit protection, open-circuit protection, reverse polarity protection, overload protection, and reverse current protection.
- Adjustable Parameters: Customizable charge and discharge parameters with power-off memory function.
- Temperature Compensation: Automatically adjusts charging voltage based on ambient temperature.
- Multiple Load Working Modes: Supports 24-hour, dusk-to-dawn, and timed load control modes.
4. Setup and Connection
Proper connection sequence is crucial to prevent damage to the controller. Always connect components in the order specified below.
4.1. Connection Sequence
- Connect the Battery: First, connect the battery to the charge controller's battery terminals (positive and negative). Ensure the battery has sufficient voltage for the controller to recognize its type.
- Connect the Solar Panel: Next, connect the solar panel to the charge controller's solar panel terminals (positive and negative).
- Connect the Load (Optional): Finally, connect your DC load to the charge controller's load terminals (positive and negative).
Important: When disconnecting the system, reverse the order: first disconnect the solar panel, then the load, and finally the battery. Failure to follow this sequence can damage the controller.
4.2. Connection Diagram
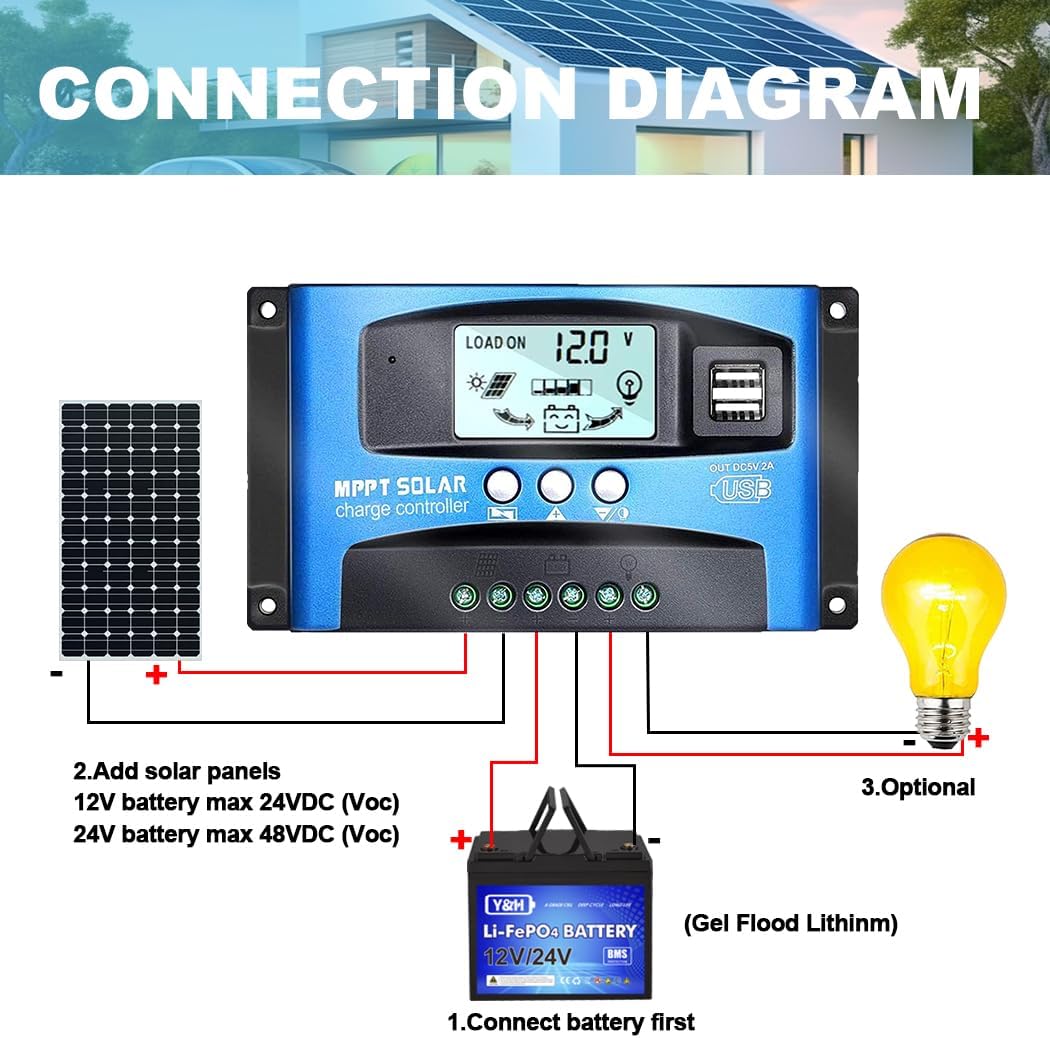
4.3. Battery Compatibility

The controller supports a range of battery types. While the manual image indicates suitability for lead-acid (Open, AGM, GEL) only, the product description and other features suggest compatibility with lithium-ion batteries as well. Always verify your battery type and set parameters accordingly.
4.4. UPS Connection
If using an Uninterruptible Power Supply (UPS), connect it directly to the battery terminals, not to the controller's load or charging terminals.
4.5. Battery Capacity Guidelines
While there are no strict minimum capacity requirements, it is recommended that the battery capacity matches the solar panel's current output. For example, a 5A solar panel should ideally be paired with a 50AH battery, and a 10A panel with a 100AH battery. Using a small battery with a large solar panel can be dangerous due to potential overcharging.
5. Operating Instructions
5.1. LCD Display and Buttons

The controller features an LCD screen and three buttons for navigation and setting parameters:
- MENU Button: Press to browse different interfaces. Press and hold to enter parameter setting mode.
- UP Button: Used to increase values or navigate up in menus.
- DOWN Button: Used to decrease values or navigate down in menus.
5.2. Browsing Interfaces
Press the MENU button to cycle through the following display interfaces:
- Main Display (Battery voltage, solar input, load status)
- Float Voltage
- Discharge Reconnect Voltage
- Discharge Stop Voltage
- Load Work Mode
- Battery Type
- Work Parameter Display (e.g., cumulative power)
5.3. Setting Parameters
To set parameters (available in interfaces 2-8):
- Navigate to the desired parameter interface using the MENU button.
- Press and hold the MENU button until the displayed value starts flashing.
- Use the UP and DOWN buttons to adjust the value.
- Press the MENU button again to save the setting and exit the flashing state.
5.4. Load Working Modes
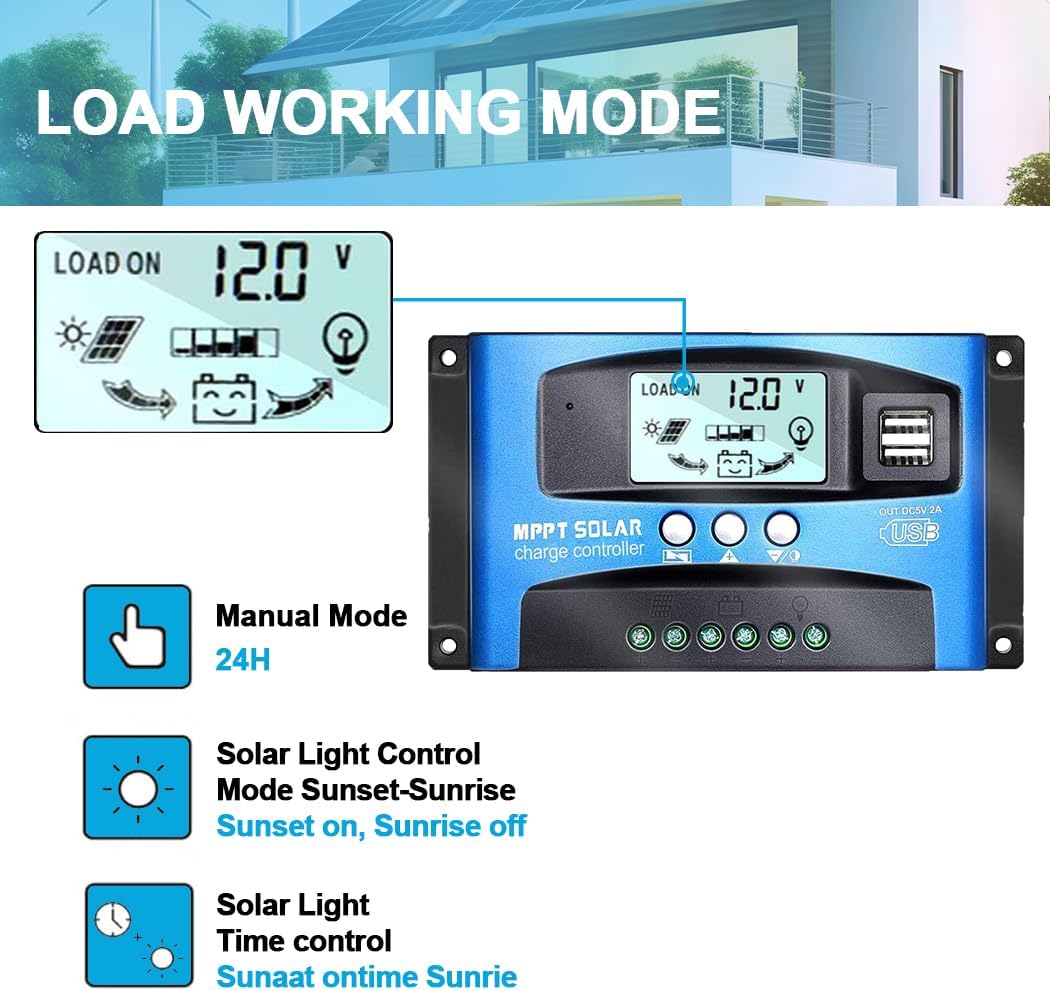
The controller offers several load working modes, which can be set in the 'Load Work Mode' interface:
- 24H (Manual Mode): The load output is continuously ON for 24 hours.
- 1-19H (Solar Light Time Control): The load output turns ON at dusk and remains ON for the set number of hours (1 to 19 hours), then turns OFF.
- 0H (Solar Light Control / Dusk-to-Dawn): The load output turns ON at dusk and turns OFF at dawn.
6. Maintenance
To ensure optimal performance and longevity of your Y&H Solar Charge Controller, follow these maintenance guidelines:
- Regular Inspection: Periodically check all connections for tightness and corrosion. Loose connections can cause voltage drops and overheating.
- Cleanliness: Keep the controller clean and free from dust and debris. Use a dry cloth to wipe the surface. Do not use liquid cleaners.
- Ventilation: Ensure adequate airflow around the controller to prevent overheating. Do not block ventilation openings.
- Environmental Conditions: Operate the controller within its specified temperature range. Avoid extreme temperatures and high humidity.
- Battery Health: Regularly check the health and charge level of your battery bank. A well-maintained battery contributes to the overall efficiency and lifespan of your solar system.
7. Troubleshooting
This section provides solutions for common issues you might encounter with your solar charge controller.
| Situation | Reason | Solution |
|---|---|---|
| Charge icon not on when sunny | Solar panel opened or reversed | Reconnect solar panel |
| Load icon off | Mode setting wrong | Set load mode to 24H |
| Load icon off | Battery low | Recharge battery |
| Load icon slow flashing | Overload | Reduce load wattage |
| Power off | Short circuit | Check connection for short circuits |
| Power off | Battery low | Check battery/connection |
8. Specifications
The following table outlines the technical specifications for the Y&H 100A MPPT Solar Charge Controller (Model BL912-100A-FR).
| Parameter | Value |
|---|---|
| Model | BL912-100A-FR |
| Battery Voltage | 12V/24V Auto |
| Charge Current | 100A (as per product title) |
| Discharge Current | 100A (as per product title) |
| Max Solar Input Voltage (Voc) | 23V (for 12V battery), 46V (for 24V battery) |
| Equalization Voltage | 14.4V (adjustable) |
| Float Charge Voltage | 13.7V (default, adjustable) |
| Discharge Stop Voltage | 10.7V (default, adjustable) |
| Discharge Reconnect Voltage | 12.6V (default, adjustable) |
| USB Output | Dual USB, 5V/2.5A (MAX) |
| Self-Consume | <10mA |
| Operating Temperature | -35°C to +60°C |
| Dimensions | 170 x 92 x 45 mm |
| Material Type | Plastic |
| Display Type | LCD |
| UPC | 746608318900, 746608838408 |
Note: Product specifications are subject to change without prior notice. The manual image provided appears to be a general guide for a series of controllers, and some current ratings listed in the image's table may not directly correspond to this 100A model. The 100A rating is derived from the product title.
9. Warranty and Support
Specific warranty details are not provided within this manual. For warranty information, technical support, or service inquiries, please contact the manufacturer, Y&H, directly or refer to the product packaging and purchase documentation.
Manufacturer: Y&H
Manufacturer Part Number: BL912-100A-FR
First Available Date: July 17, 2021
Related Documents - BL912-100A-FR
 |
Y&H BL912 MPPT Solar Charge Controller Wiring Tutorial A comprehensive guide on wiring the Y&H BL912 MPPT Solar Charge Controller, covering battery connection, solar panel connection, and load connection with detailed instructions and safety precautions. |
 |
SY-SLCD Charge Controller User Manual User manual for the Y&H SY-SLCD charge controller, detailing its features, operation, and fault codes for 12V, 24V, 36V, and 48V systems. |
 |
ECGSOLAX SY Series MPPT Solar Charge Controller User Manual User manual for the ECGSOLAX SY Series 100A MPPT Solar Charge Controller, detailing specifications, operation modes, display functions, protection features, and important safety notes. |
 |
Batguard MPPT Solar Charge Controller User Manual Comprehensive user manual for the Batguard MPPT Solar Charge Controller, covering installation, operation, features, protections, troubleshooting, and technical specifications for 12/24/48V models (60A, 80A, 100A, 120A). |
 |
MPK Series MPPT Solar Charge Controller User Manual Comprehensive user manual for the Rayfey MPK Series MPPT Solar Charge Controller, detailing installation, operation, functions, safety, technical specifications, and after-sales service. |
 |
Batguard MPPT Solar Charge Controller User Manual Comprehensive user manual for the Batguard MPPT Solar Charge Controller (60A, 80A, 100A, 120A models). Covers installation, operation, safety, technical specifications, and troubleshooting for efficient solar energy management. |
Ask a question about this manual
Ask about setup, troubleshooting, compatibility, parts, safety, or missing instructions. Manuals+ will review the question and use this page’s manual context to help answer it.