1. Introduction
Thank you for choosing the Suttik Professional Cordless Hair Clippers and Trimmers Set. This manual provides essential information for the safe and effective use, maintenance, and care of your new grooming tools. Please read all instructions carefully before first use and retain this manual for future reference.
2. Safety Information
Warning: Avoid using near face/eyes. Children should be supervised during use.
For your safety, always ensure the devices are turned off before cleaning or attaching/detaching accessories. Keep the devices dry and away from water. Do not attempt to repair the devices yourself; contact qualified personnel for service.
3. Package Contents
Your Suttik Professional Cordless Hair Clippers and Trimmers Set includes the following items:
- 1x Cordless Hair Clipper
- 1x Detail Hair Trimmer
- 8x Hair Clipper Guide Combs (various sizes)
- 3x Detail Trimmer Guide Combs (1mm, 2mm, 3mm)
- 1x Barber Cape
- 1x Cleaning Brush
- 2x USB Charging Cables
- 1x Barber's Comb
- 1x Protective Cover
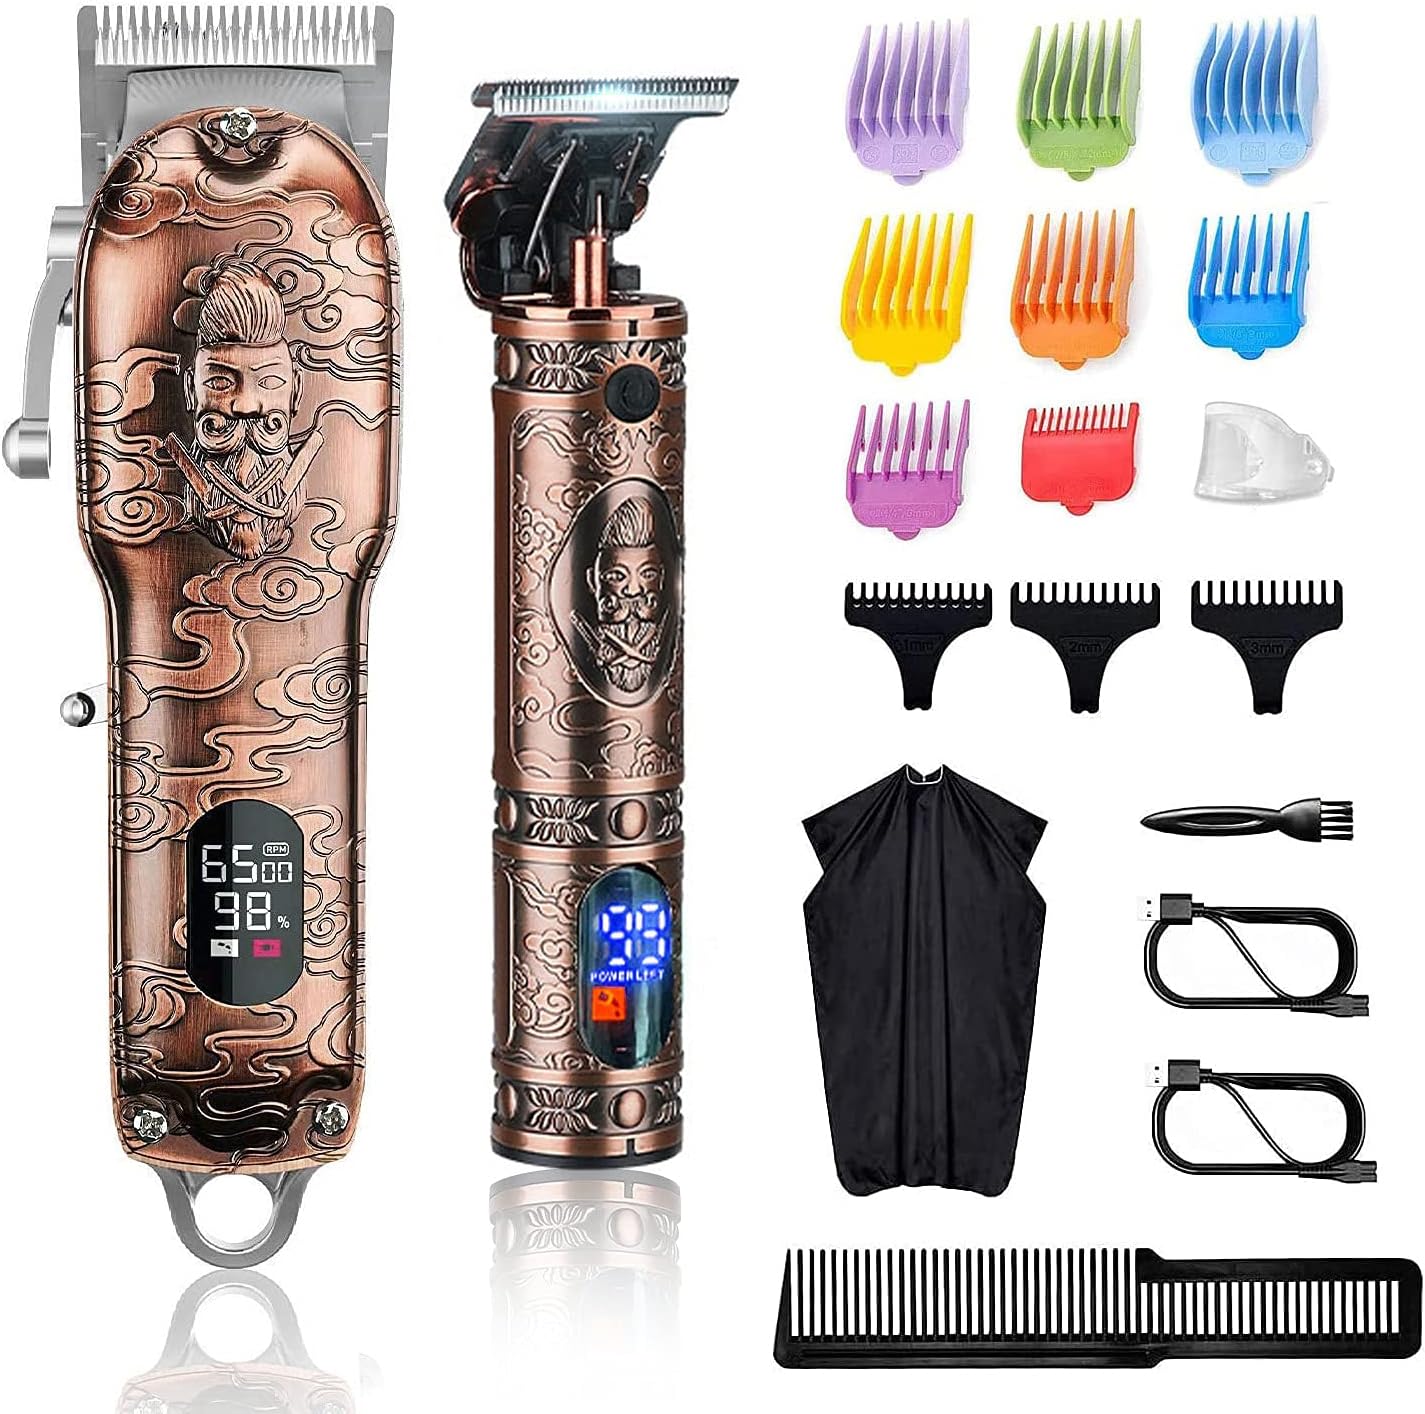
Image 3.1: Complete Suttik Hair Clippers and Trimmers Set with all included accessories.
4. Product Overview
4.1. Powerful Rotary Motor
Both the hair clipper and detail trimmer are equipped with a 10W powerful rotary motor. The tightly knit teeth on the blade ensure efficient hair removal without snagging, providing a smooth haircut experience.

Image 4.1: Illustration of the powerful rotary motor and its specifications.
4.2. Smart Digital Display
The devices feature a built-in digital display that shows the remaining charge level, charging status, and lubrication reminder indicators. This helps prevent unexpected power loss during use.

Image 4.2: The smart digital display showing battery percentage and maintenance reminders.
4.3. High Capacity Battery
The hair clipper is equipped with a rechargeable battery providing up to 240 minutes of running time after a 2.5-hour charge. The detail trimmer offers up to 120 minutes of running time with a 1.5-hour charge.

Image 4.3: Battery specifications and run times for both devices.
4.4. Ergonomic Design
Suttik professional cordless hair clippers are constructed from stainless steel, offering scratch resistance and protection from mechanical damage. Their design ensures a comfortable grip during use.

Image 4.4: The ergonomic design of the hair clipper for comfortable handling.
5. Setup
5.1. Charging the Devices
Before initial use, fully charge both the hair clipper and the detail trimmer using the provided USB charging cables. The digital display will indicate the charging status and battery percentage. A full charge for the hair clipper takes approximately 2.5 hours, and for the detail trimmer, 1.5 hours.
Video 5.1: Demonstrates the charging process and digital display functionality for the Suttik Hair Clippers and Trimmers.
Video 5.2: Provides an overview of the Suttik Hair Clippers and Trimmers Set, including charging and basic features.
6. Operating Instructions
6.1. Using the Hair Clipper
Select the desired guide comb from the 8 available sizes (3mm, 6mm, 10mm, 13mm, 16mm, 19mm, 22mm, 25mm) and securely attach it to the hair clipper blade. The clipper also features an adjustable taper lever for fine-tuning cutting length between 0.8mm and 2mm. Turn on the clipper using the side lever switch and begin cutting hair. The digital display will show the current speed and battery status.

Image 6.1: The hair clipper with its range of guide combs for different cutting lengths.

Image 6.2: The hair clipper with a guide comb in place, ready for use.
6.2. Using the Detail Trimmer
For precise trimming and detailing, use the smaller detail trimmer. Attach one of the three guide combs (1mm, 2mm, or 3mm) for desired length, or use without a comb for a close cut. Press the power button to activate the trimmer. The digital display will show battery life and oiling reminders.

Image 6.3: The detail trimmer with its guide combs for precise trimming.

Image 6.4: The hair clipper used for general cutting and the detail trimmer for precise lines.
7. Maintenance
7.1. Cleaning the Blades
After each use, turn off the device and remove any attached guide combs. Use the provided cleaning brush to remove loose hair from the blades. For thorough cleaning, the blades can be carefully detached and rinsed under running water, ensuring they are completely dry before reattaching.

Image 7.1: The sharp carbon stainless steel blade, which should be cleaned regularly.
7.2. Oiling the Blades
Regular oiling of the blades is crucial for optimal performance and longevity. Apply a few drops of clipper oil (not included) to the blades after cleaning, especially when the digital display shows a lubrication reminder. Turn on the device for a few seconds to distribute the oil evenly.
Video 7.2: Demonstrates the oiling process for the clipper blades to maintain performance.
8. Specifications
| Brand | Suttik |
| Model Name | JM-2022 |
| Item Model Number | JM-2022 |
| Batteries | 1 Lithium Ion batteries required. (included) |
| Battery Description | Lithium-Ion |
| Charging Time (Hair Clipper) | 2.5 Hours |
| Running Time (Hair Clipper) | Up to 240 minutes |
| Charging Time (Detail Trimmer) | 1.5 Hours |
| Running Time (Detail Trimmer) | Up to 120 minutes |
| Power | 10W (Rotary Motor) |
| Blade Material | Stainless Steel / High Carbon Steel |
| Included Components | Hair Clipper, Detail Trimmer, Guide Combs, Barber Cape, Cleaning Brush, USB Cables, Barber's Comb, Protective Cover |
9. Troubleshooting
If you encounter any issues with your Suttik Hair Clippers and Trimmers Set, please consider the following:
- Device Not Turning On: Ensure the device is fully charged. Check the digital display for battery level.
- Reduced Performance/Pulling Hair: Clean the blades thoroughly with the provided brush. Apply a few drops of clipper oil to the blades. Ensure no hair is caught in the motor mechanism.
- Charging Issues: Verify that the USB cable is securely connected to both the device and a working power source. Check the charging indicator on the digital display.
- Blades Loose/Detached: Carefully reattach the blades, ensuring all screws are tightened. If a screw is stripped or damaged, do not attempt to force it; contact customer support.
For persistent problems not resolved by these steps, please refer to the Warranty and Support section.
10. Warranty and Support
This Suttik product comes with a standard manufacturer's warranty. For detailed information regarding warranty coverage, claims, or technical support, please refer to the contact information provided in your product packaging or visit the official Suttik website. Keep your purchase receipt as proof of purchase.


