X AUTOHAUX 5.5 Inch HUD Head Up Display Speedometer
X AUTOHAUX 5.5 Inch HUD Head Up Display Speedometer User Manual
1. Introduction
This manual provides detailed instructions for the installation, operation, and maintenance of your X AUTOHAUX 5.5 Inch HUD Head Up Display Speedometer. Please read this manual thoroughly before using the product to ensure proper function and safety.

Image 1.1: The X AUTOHAUX 5.5 Inch HUD Head Up Display Speedometer with its included cable and non-slip mat.
2. Product Features
The X AUTOHAUX HUD offers a comprehensive display of vehicle information directly on your windshield, enhancing driving safety and convenience. Key features include:
- 5.5 Inch 5-Color Screen: Large, multi-color display for clear and abundant information.
- Multiple Display Contents: Shows speed, engine speed (RPM), water temperature, battery voltage, instantaneous fuel consumption, average fuel consumption, and mileage measurement.
- Alarm Functions: Includes high temperature alarm, speed alarm, fatigued driver reminder, and engine fault alarm.
- Fault Code Elimination: Ability to clear engine fault codes.
- Unit Switching: Free switching between kilometers (KM) and miles (MPH).
- Automatic Adjustment: Light sensor for automatic brightness adjustment.

Image 2.1: Detailed diagram of the HUD display, showing indicators for speed, RPM, fuel consumption, voltage, water temperature, and various alarm icons.
3. Package Contents
Please verify that all items listed below are included in your package:
- 1 x HUD Head Up Display Unit
- 1 x Reflective Film
- 1 x OBDII Cable Wire (172cm / 67.72 inches)
- 1 x Non-slip Mat
- 1 x English User Manual

Image 3.1: All components included in the product package: Head Up Display, Protective Film, Cable Line, Sticker (non-slip mat), and Instruction Manual.
4. Specifications
| Feature | Specification |
|---|---|
| Overall Size | 13 x 7.7 x 1.4 cm (5.12" x 3.03" x 0.55") |
| Screen Size | 5.5 inches (14 cm) |
| Work Voltage | 9V-16Vdc (12Vdc/400mA) |
| Alarm Volume | >=30dB(A) |
| Cable Wire Length | 172 cm (67.72") |
| Material | Metal, Plastic |
| Color | Black |
| Item Weight | 10.2 Ounces |
5. Installation
Follow these steps to install your HUD unit:
- Check OBDII Compatibility:
- Locate the area under your steering wheel for an OBD plug.
- Consult your vehicle manufacturer or search online for compatibility information.
- Some vehicles may have an OBDII compatible sticker under the bonnet, but this is not a universal indicator.
- Locate the 16-Pin Diagnostic Link: This port is typically found under the steering wheel or near the dashboard. For Japanese cars, it's usually under the steering wheel; for German cars, near the dashboard; and for American pickup trucks, within the inspection cover.
- Connect the HUD: Plug the provided OBDII cable into the vehicle's 16-pin diagnostic link and then into the HUD unit.
- Position the HUD: Place the HUD unit on your dashboard using the non-slip mat. Ensure it is positioned where the display is clearly visible on the windshield without obstructing your view of the road.
- Apply Reflective Film (Optional): If the display is not clear or has a double image, apply the reflective film to the windshield where the HUD projects. Clean the windshield thoroughly before application.
- Start Vehicle: Start your vehicle's engine and ensure the power switch on the HUD is in the 'on' position. The HUD should power on automatically with the engine.
- Verify Functionality: If the HUD displays vehicle voltage, fuel consumption, speed, and rotational speed, the unit is installed correctly. If not, wait up to one minute for the software to sync and confirm the OBD cable is properly connected.

Image 5.1: The HUD unit placed on a car dashboard, showing the projected display on the windshield during daytime and nighttime driving conditions.
6. Operation
The HUD unit is designed for intuitive operation. It features a three-way wave button and a power button for control.
6.1 Button Functions
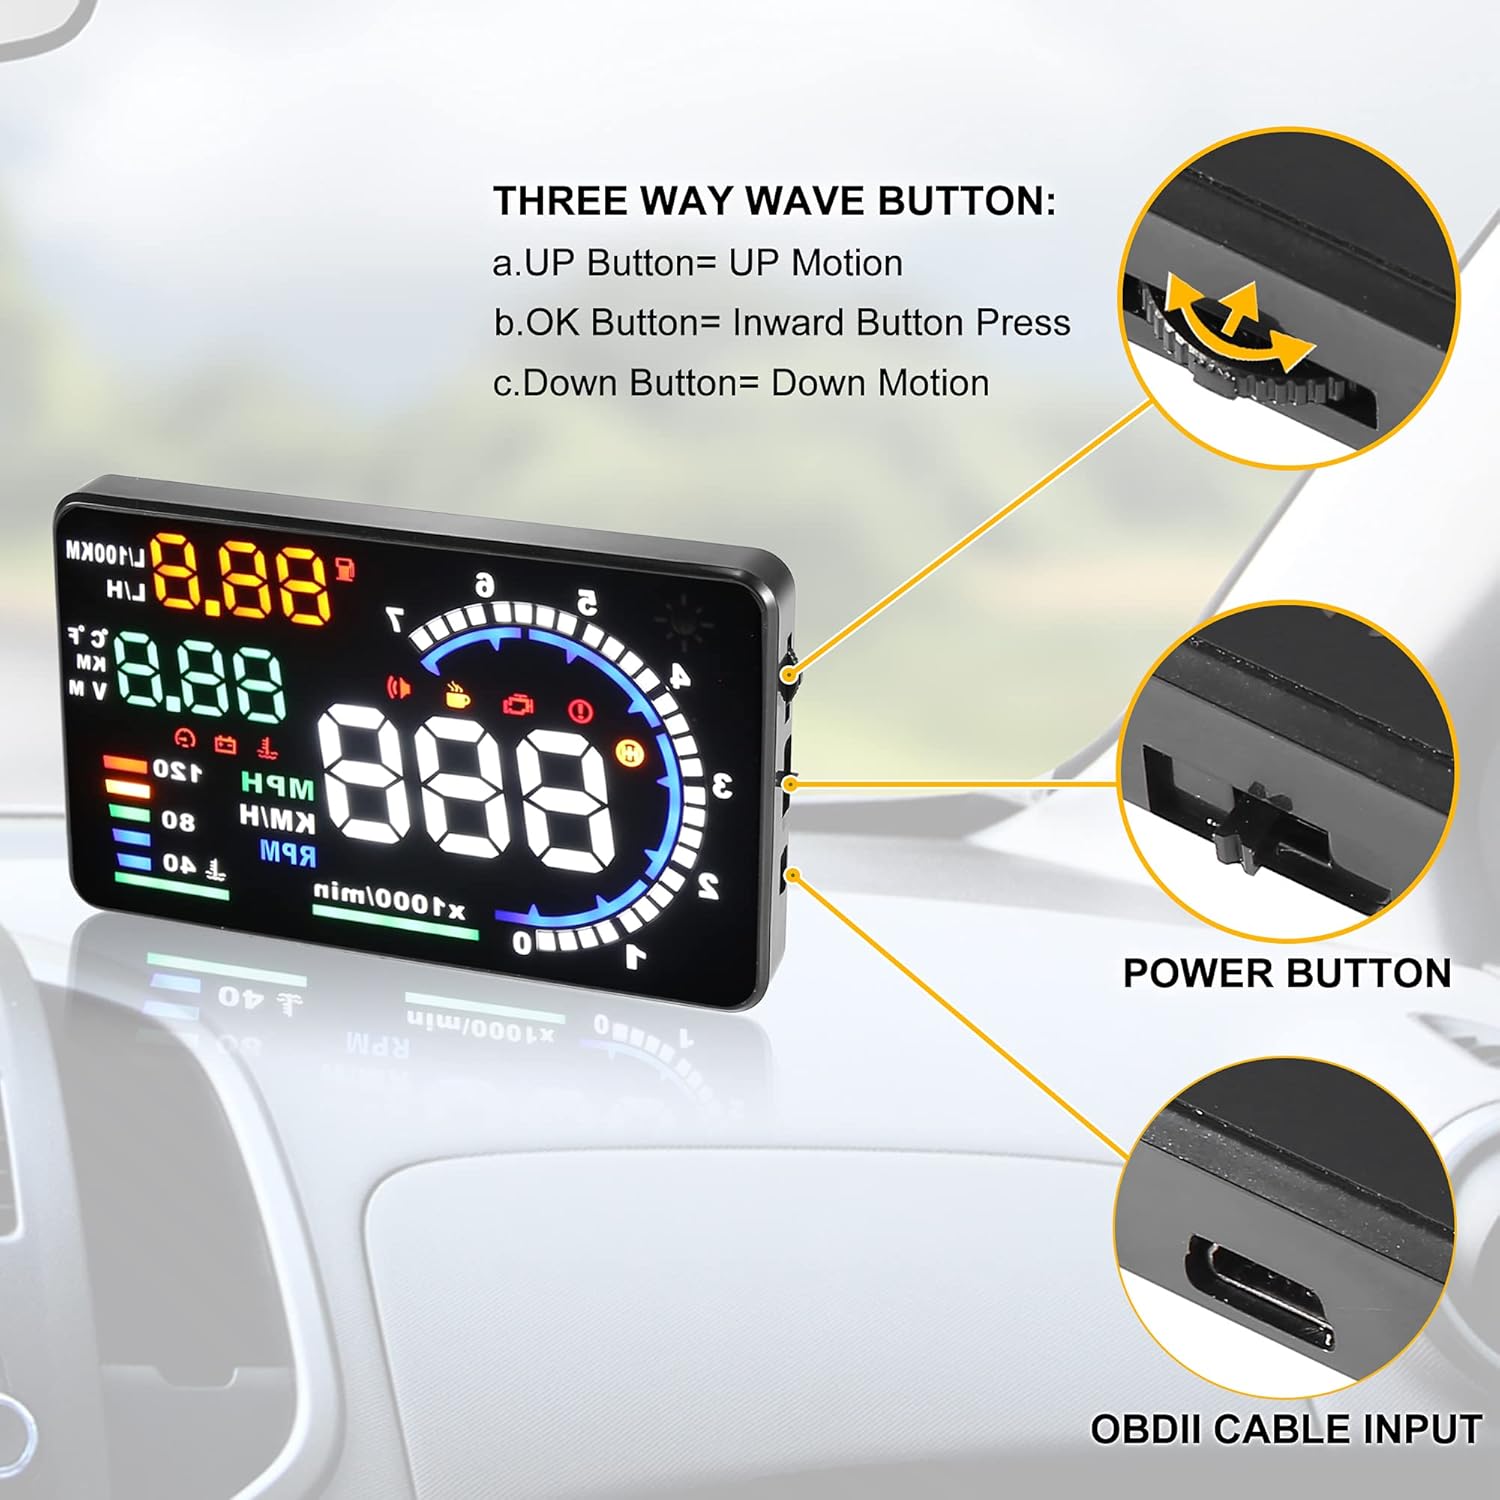
Image 6.1: Close-up view of the HUD unit's side, highlighting the three-way wave button (Up, OK, Down) and the power button, along with the OBDII cable input port.
- Three-Way Wave Button:
- UP Motion: Navigates upwards through menu options or increases values.
- OK Button (Inward Press): Confirms selections or enters menus.
- DOWN Motion: Navigates downwards through menu options or decreases values.
- Power Button: Turns the unit on or off.
6.2 Display Modes
The HUD offers various display modes to suit your preferences, showing different combinations of information.

Image 6.2: Examples of the four main display modes: Mode 1 (Speed, RPM, Fuel Consumption, Voltage, Water Temperature), Mode 2 (Speed, RPM, Fuel Consumption, Mileage, Water Temperature), Standard Mode (Speed, RPM, Fuel Consumption, Water Temperature, Degrees), and Simple Mode (Speed, Fuel Consumption).
You can switch between these modes using the wave button to find the display that best meets your needs.
7. Maintenance
To ensure the longevity and optimal performance of your HUD unit, follow these simple maintenance guidelines:
- Cleaning: Use a soft, dry cloth to clean the display screen and the unit's exterior. Avoid using abrasive cleaners or solvents, which can damage the surface.
- Storage: If the unit will not be used for an extended period, disconnect it from the OBDII port and store it in a cool, dry place away from direct sunlight.
- Cable Care: Ensure the OBDII cable is not pinched or excessively bent, as this can damage the internal wiring.
8. Troubleshooting
If you encounter issues with your HUD unit, refer to the following common problems and solutions:
- No Display/Power:
- Ensure the OBDII cable is securely connected to both the vehicle's port and the HUD unit.
- Verify that the vehicle's engine is running and the HUD's power switch is on.
- Check your vehicle's fuse box for any blown fuses related to the OBDII port.
- Inaccurate Speed/Readings:
- The HUD may require calibration. Refer to the advanced settings in the user manual for calibration procedures (if available).
- Ensure the correct unit (KM/MPH) is selected.
- Double Image on Windshield:
- This is common on some windshields due to their layered construction. Apply the included reflective film to the windshield where the display is projected to eliminate the double image.
- HUD Displays Vehicle Voltage Only:
- This indicates the HUD is powered but not receiving data from the OBDII system. Ensure your vehicle is OBDII compatible and the connection is secure. Wait for the unit to sync with the vehicle's ECU.
- Engine Fault Alarm:
- If an engine fault alarm appears, consult your vehicle's manual or a qualified mechanic. The HUD can display and clear some fault codes, but the underlying issue should be addressed.
9. Vehicle Compatibility
The X AUTOHAUX HUD is designed to be compatible with vehicles equipped with OBDII or EUOBD systems. Please note the following:
- Universal Fit (OBDII/EUOBD): Compatible with most cars manufactured after 2003 (European and North American) and after 2007 (Asian). This includes models from Dodge, Jeep, Chrysler, Ford (before 2004 by OBDII), Suzuki, Subaru, Mazda, Infiniti QX50, Q50, Q501, IS250, EX250, ES300H, HIACE, RAV4, Jazz, CRV (before 2008 by OBDII), Fiat, Peugeot, and Citroen (by EUOBD).
- Incompatible Models: The indicator does not support the J1850 protocol. Therefore, it is not compatible with vehicles from Buick, Chevrolet, Cadillac, and GMC.
10. Warranty and Support
For warranty information or technical support, please refer to the documentation included with your purchase or contact X AUTOHAUX customer service through their official channels. Specific warranty terms and conditions may vary.
Ask a question about this manual
Ask about setup, troubleshooting, compatibility, parts, safety, or missing instructions. Manuals+ will review the question and use this page’s manual context to help answer it.