NuFlush 27749
NuFlush Dual Flush System User Manual
2.5 inch Top Button Dual Flush Valve & Glacier Bay Fill Valve Replacement
Introduction
The NuFlush complete dual flush system is designed to replace existing flush and fill valves in two-piece toilets. This system includes a 2.5 inch diameter, 8 inch tall flush valve and a Glacier Bay fill valve with an adjustable height from 7 to 14 inches. It provides both half and full power flushes for water efficiency. This manual will guide you through the installation, operation, and maintenance of your new toilet components.
Components Included
Before beginning installation, please ensure all the following components are present:
- 2.5 inch Dual Flush Valve (for 2.5 inch diameter, 8 inch tall, two-piece toilets)
- Glacier Bay Fill Valve (7 to 14 inch Adjustable Height)
- Rubber Grommet
- Nylon Bolts (2)
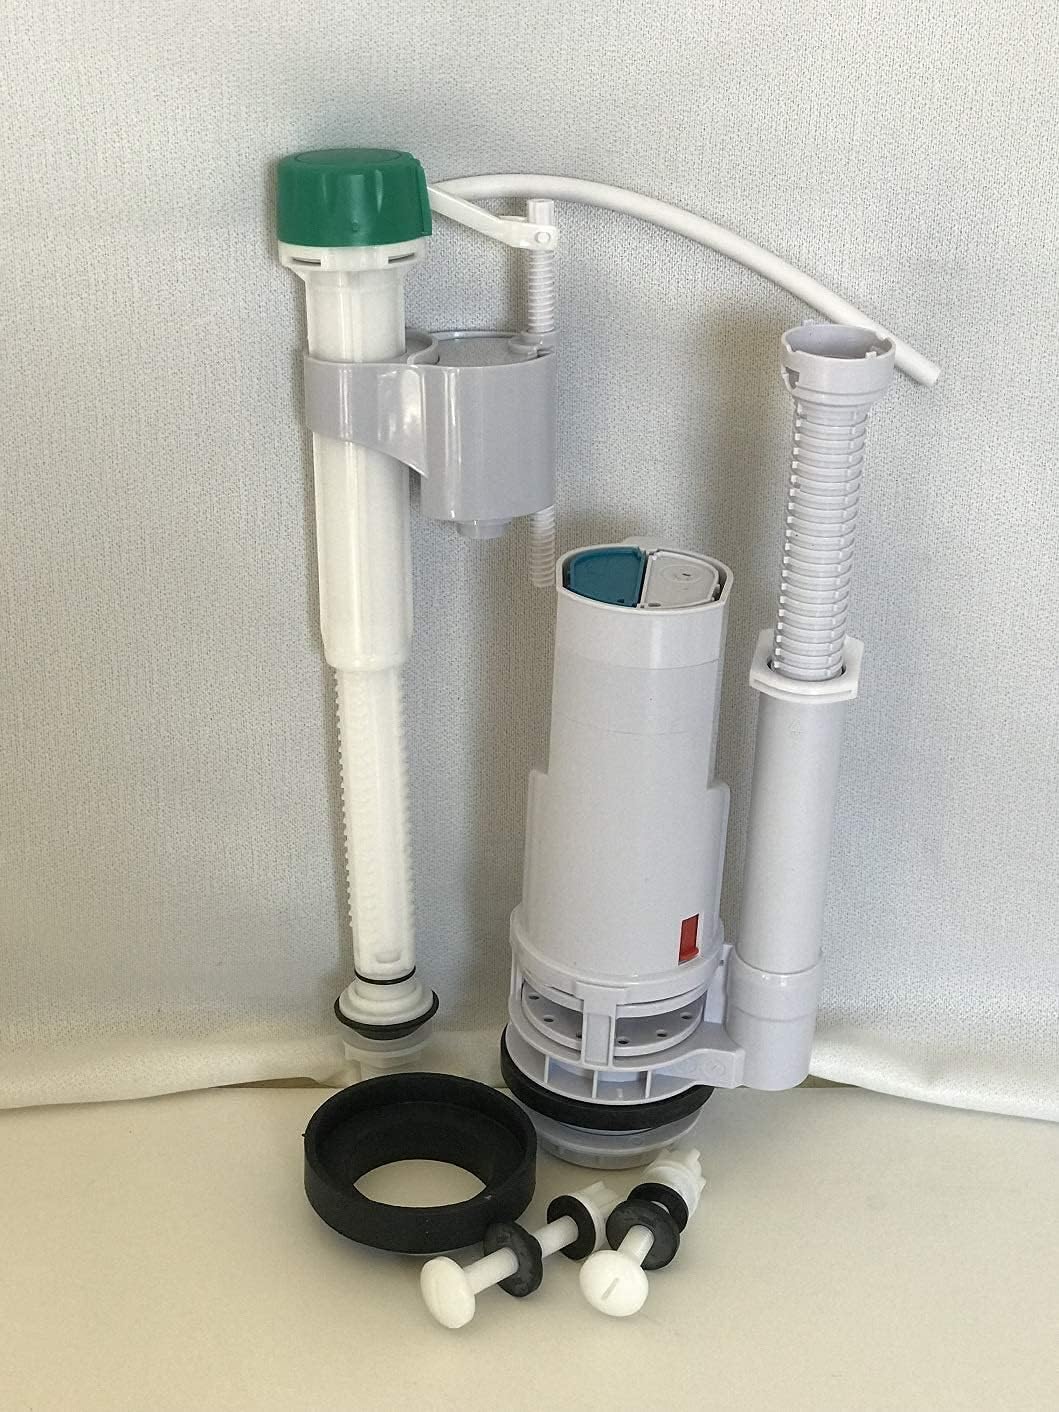
Figure 1: All components of the NuFlush Dual Flush System.

Figure 2: Another view of the NuFlush Dual Flush System components.
Setup and Installation
Installation of the NuFlush dual flush system requires basic plumbing knowledge. If you are unsure, consult a professional plumber.
Preparation:
- Turn off the water supply to the toilet at the shut-off valve, usually located behind or near the base of the toilet.
- Flush the toilet to empty the tank. Hold the handle down to drain as much water as possible.
- Use a sponge or towel to remove any remaining water from the tank.
- Disconnect the water supply line from the bottom of the fill valve.
- Remove the old flush valve and fill valve from the tank. This typically involves unscrewing nuts from underneath the tank.
Installing the Dual Flush Valve:
- Ensure your toilet has a 2.5 inch flush hole. The NuFlush dual flush valve is designed for this specific size.
- Place the rubber grommet onto the base of the new dual flush valve.
- Insert the flush valve into the flush hole from inside the tank.
- From underneath the tank, secure the flush valve with the large plastic nut provided, tightening it by hand until snug. Do not overtighten.
Installing the Glacier Bay Fill Valve:
- Insert the Glacier Bay fill valve into the fill valve hole in the toilet tank.
- From underneath the tank, secure the fill valve with its plastic nut, tightening by hand.
- Adjust the height of the fill valve as needed. It is adjustable from 7 to 14 inches. Ensure the critical level mark on the fill valve is above the overflow tube.
- Connect the refill tube from the fill valve to the overflow tube of the flush valve.
- Reconnect the water supply line to the bottom of the fill valve. Tighten by hand, then use a wrench for a quarter turn to ensure a leak-free connection.
Securing the Tank:
- Place the tank onto the bowl, aligning the bolt holes.
- Insert the nylon bolts through the tank and bowl holes.
- Secure the tank to the bowl using the washers and nuts provided with the nylon bolts. Tighten evenly to prevent cracking the porcelain.

Figure 3: The Glacier Bay Fill Valve, demonstrating its adjustable height feature.
Operating the Dual Flush System
The NuFlush dual flush system offers two flushing options for water conservation:
- Half Flush: For liquid waste, press and release the smaller button on the top of the flush valve. This uses less water.
- Full Flush: For solid waste, press and release the larger button on the top of the flush valve. This uses the full tank of water.
Ensure the buttons are properly aligned with the flush valve mechanism for correct operation.
Maintenance
Regular maintenance will help prolong the life of your NuFlush system:
- Cleaning: Periodically clean the inside of the toilet tank to prevent mineral buildup and mold, which can affect the performance of the valves. Use non-abrasive toilet tank cleaners.
- Check for Leaks: Regularly inspect the connections for any signs of leaks. Tighten connections if necessary, but do not overtighten.
- Inspect Components: Annually check the rubber grommet and other seals for wear or deterioration. Replace if cracks or hardening are observed.
Troubleshooting
Here are some common issues and their potential solutions:
- Toilet Runs Continuously:
- Check if the fill valve height is set correctly and not interfering with the tank lid.
- Ensure the refill tube is properly inserted into the overflow pipe and not too far down.
- Inspect the flush valve seal for debris or wear. Clean or replace if necessary.
- Weak Flush:
- Verify the water level in the tank is at the recommended fill line. Adjust the fill valve if needed.
- Check for obstructions in the flush valve or the toilet bowl's rim jets.
- Toilet Not Flushing:
- Ensure the top buttons are correctly engaging the flush valve mechanism.
- Check if the water supply is turned on.
- Leaking from Tank Base:
- Tighten the nuts securing the flush valve and fill valve from underneath the tank.
- Ensure the rubber grommet for the flush valve is properly seated and not damaged.
- Check the nylon bolts securing the tank to the bowl for proper tightness.
Specifications
| Feature | Detail |
|---|---|
| Brand | NuFlush |
| Model Number | 27749 |
| Material | High Impact ABS, Nylon Bolts, Rubber Gasket |
| Exterior Finish | Rubber |
| Inlet Connection Size | 2.5 Inches |
| Inlet Connection Type | Compression |
| Outlet Connection Size | 2.5 Inches |
| Outlet Connection Type | Compression |
| Number of Ports | 2 |
| Valve Type | Flush Valve |
| Fill Valve Adjustable Height | 7 to 14 inches |
| Compatibility | Two-piece toilets with 2.5 inch flush hole |
Warranty and Support
This product is subject to a 30-day return policy for refund or replacement. For specific warranty details or technical support, please refer to the NuFlush store on Amazon or contact NuFlush LLC directly.
Visit the official NuFlush Store for more information: NuFlush Amazon Store
Ask a question about this manual
Ask about setup, troubleshooting, compatibility, parts, safety, or missing instructions. Manuals+ will review the question and use this page’s manual context to help answer it.