iTOMA CKS507-US
iTOMA Bluetooth Clock Radio CKS507 User Manual
Model: CKS507-US
1. Introduction
This manual provides comprehensive instructions for the iTOMA Bluetooth Clock Radio, Model CKS507. Please read this manual carefully before operating the device to ensure proper use and to maximize its features.
1.1 Package Contents
- iTOMA Bluetooth Clock Radio (CKS507)
- Power Adapter
- User Manual
2. Product Overview
Familiarize yourself with the main components and controls of your iTOMA Clock Radio.

Figure 2.1: Front view of the iTOMA Bluetooth Clock Radio. The display shows the current time, day, and indicators for alarm, Bluetooth, and FM radio. The top panel features control buttons for time setting, alarm, snooze, dimmer, and volume.

Figure 2.2: Dimensions of the iTOMA Clock Radio. The compact size makes it suitable for various placements.
3. Setup
3.1 Power Connection
Connect the provided power adapter to the DC IN port on the back of the clock radio and then plug it into a standard wall outlet. The display will light up.
3.2 Battery Backup Installation
The clock radio requires 1 Lithium Metal battery (included) for backup. This battery preserves time and alarm settings during a power outage. Locate the battery compartment on the bottom of the unit, open it, and insert the battery according to the polarity markings. Close the compartment securely.
3.3 Initial Time Setting
Upon first power-on, the clock may automatically set the time. If not, or if you need to adjust it:
- Press and hold the TIME SET button located on the top panel.
- Use the VOL+ or VOL- buttons to adjust the hour. Press TIME SET again to confirm and move to minutes.
- Use the VOL+ or VOL- buttons to adjust the minutes. Press TIME SET again to confirm and exit time setting mode.
- You can also set the 12/24-hour format by pressing the 12/24H button during time setting.
4. Operating Instructions
4.1 Display and Dimmer Control
The iTOMA Clock Radio features a 1.4-inch white LED display for clear visibility. You can adjust the display brightness manually or set it to auto-dim.

Figure 4.1: Display brightness levels and auto-dimmer function. The clock offers three manual brightness levels and an automatic adjustment mode.
- Press the DIMMER button (often combined with SNOOZE) repeatedly to cycle through brightness levels (e.g., Level 1, Level 2, Level 3, OFF).
- To activate auto-dimmer, continue pressing the DIMMER button until "AU" appears on the display. The clock will then adjust brightness based on ambient light.
4.2 Alarm Functions
The clock radio supports dual alarms with various wake-up options.

Figure 4.2: Dual alarm clock feature. Set two independent alarms with different wake-up times and sources.
- Setting Alarms:
- Press and hold AL1 or AL2 button to enter alarm setting mode.
- Use VOL+ or VOL- to set the alarm hour, then press the alarm button again to confirm.
- Repeat for minutes.
- Select wake-up source (FM radio or buzzer) and alarm volume using VOL+ or VOL-.
- Press the alarm button one last time to save and activate the alarm.
- Snooze Function: When the alarm sounds, press the SNOOZE button (often combined with DIMMER) to temporarily silence it for 9 minutes.
- Stopping/Disabling Alarm: Press any button other than SNOOZE to stop the alarm for the day. To disable an alarm permanently, press the corresponding AL1 or AL2 button until the alarm indicator disappears from the display.
4.3 FM Radio Operation
Enjoy your favorite FM radio stations with digital tuning and station memory.

Figure 4.3: FM Radio function with digital tuning and station presets. The clock can store up to 20 programmable radio stations.
- Turning On/Off: Press the RADIO button to turn the FM radio on or off.
- Tuning:
- Press TUNE+ or TUNE- buttons to manually tune the frequency.
- Press and hold TUNE+ or TUNE- to auto-scan for the next available station.
- Saving Presets:
- Tune to your desired station.
- Press and hold the MEM button until the preset number flashes.
- Use TUNE+ or TUNE- to select the preset number (up to 20).
- Press MEM again to save.
- Recalling Presets: Press the MEM button repeatedly to cycle through saved stations.
- Volume Control: Use the VOL+ or VOL- buttons to adjust the radio volume.
4.4 Bluetooth Connectivity
Stream audio wirelessly from your Bluetooth-enabled devices.

Figure 4.4: Bluetooth audio streaming. Connect your mobile device to play music through the clock radio.
- Press the MODE button until "BT" appears on the display, indicating Bluetooth mode. The clock will enter pairing mode automatically.
- On your mobile device, enable Bluetooth and search for available devices.
- Select "CKS507" from the list of devices to pair. Once connected, a confirmation tone will sound, and the "BT" indicator will stop flashing.
- You can now play audio from your device through the clock radio. Use the VOL+ or VOL- buttons on the clock or your device to adjust volume.

Figure 4.5: App Control for iTOMA Clock Radio. The iTOMA app allows for convenient control of various functions via Bluetooth.
Note: The iTOMA app can be used to control certain functions of the clock radio via Bluetooth. Download the "iTOMA" app from your device's app store (Google Play or Apple App Store) and follow the in-app instructions to connect to CKS507.
4.5 USB Charging Port
The clock radio features a 1A/5V USB charging port on the back for convenient charging of your mobile devices.
Figure 4.6: USB charging port in use. Connect your smartphone or other USB-powered device for charging.
Simply connect your device's USB charging cable to the port. Charging will begin automatically.
4.6 Night Light
The clock radio includes a built-in night light feature for soft illumination.
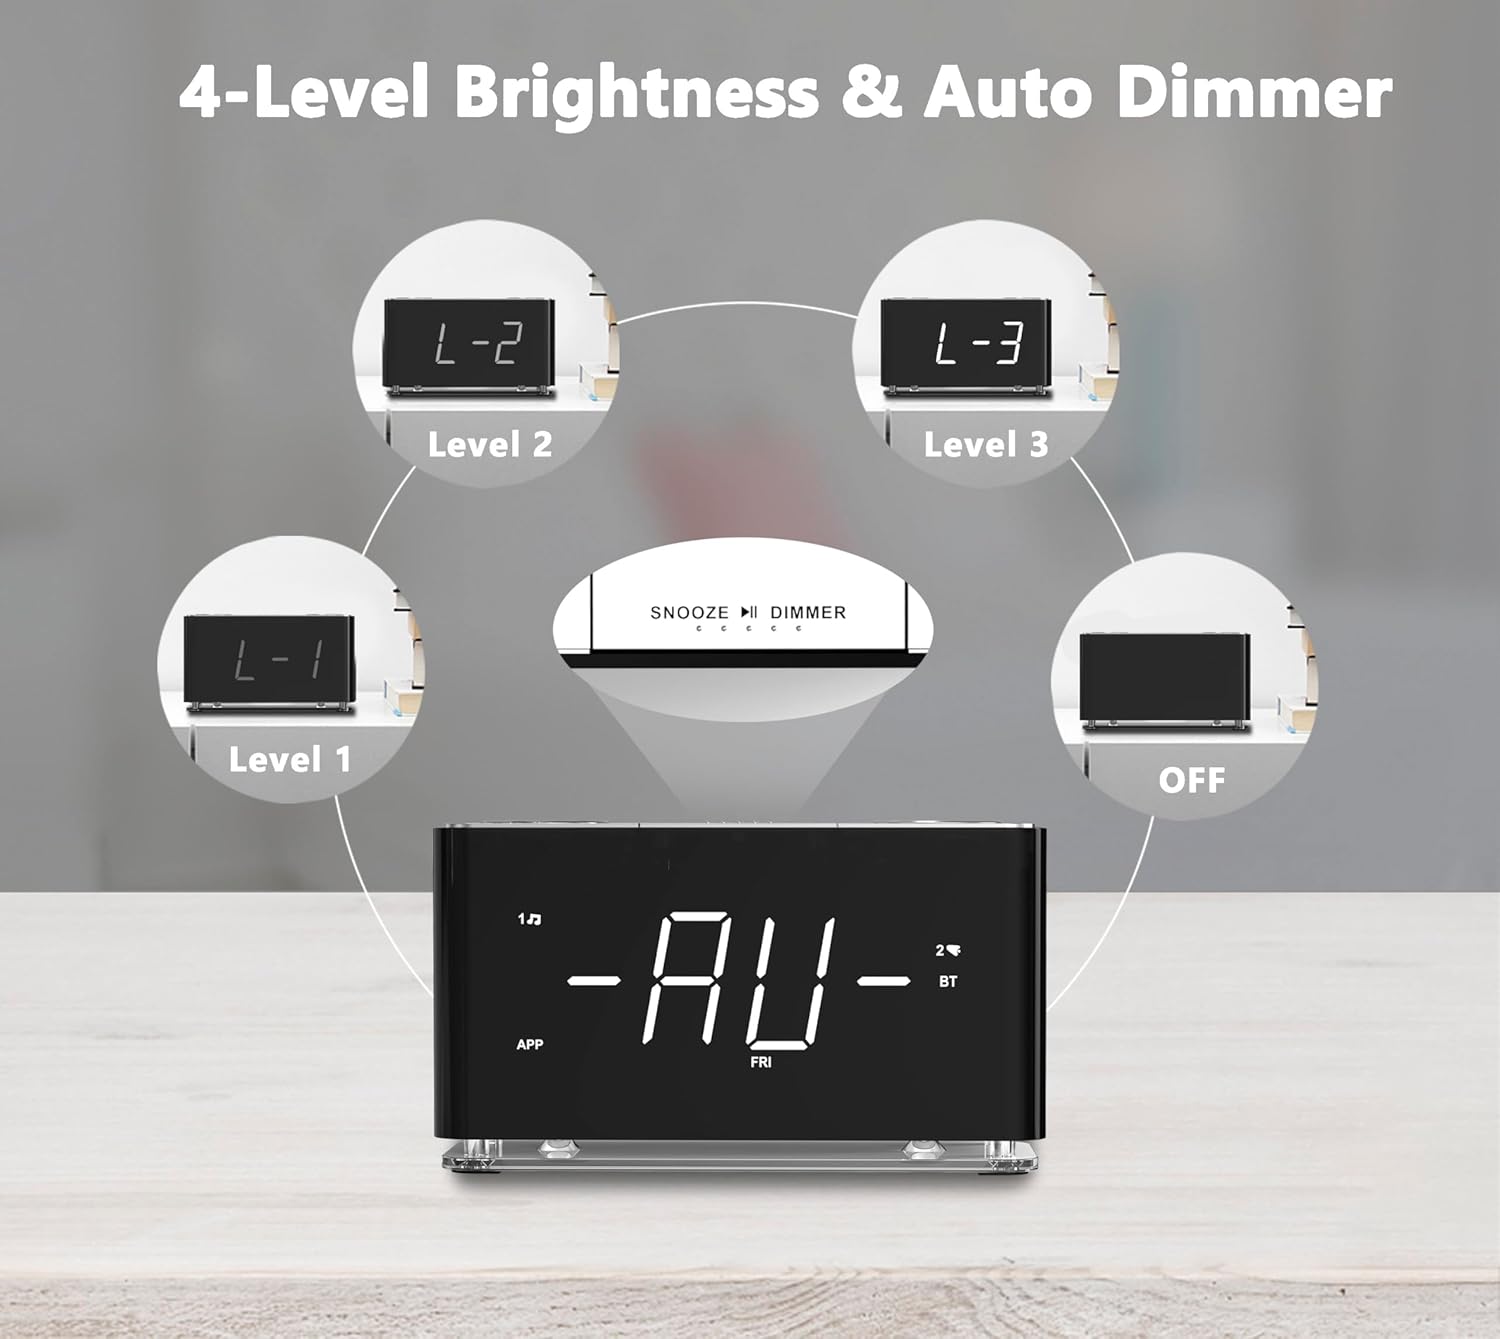
Figure 4.7: Night light feature providing subtle illumination. The night light has two levels of brightness.
Press the NIGHT LIGHT button to turn the night light on or off, and to cycle through its two brightness levels.
5. Maintenance
- Cleaning: Use a soft, dry cloth to clean the surface of the clock radio. Do not use liquid cleaners or abrasive sprays.
- Placement: Place the unit on a stable, flat surface away from direct sunlight, heat sources, and excessive moisture.
- Power Disconnection: If the unit will not be used for an extended period, disconnect it from the power outlet.
6. Troubleshooting
| Problem | Possible Cause | Solution |
|---|---|---|
| No power/Display off | Power adapter not connected or outlet is faulty. | Ensure the power adapter is securely plugged into the unit and a working wall outlet. Check if the outlet has power. |
| Alarm does not sound | Alarm not set or volume too low. | Verify alarm settings and ensure the alarm indicator is visible on the display. Increase alarm volume. |
| Poor FM radio reception | Antenna not extended or interference. | Fully extend the FM wire antenna. Try repositioning the unit to improve reception. |
| Bluetooth pairing failed | Device too far or not in pairing mode. | Ensure the clock radio is in Bluetooth pairing mode ("BT" flashing). Move your device closer to the clock. Try unpairing and re-pairing. |
| USB charging not working | Cable faulty or device not compatible. | Try a different USB cable. Ensure your device is compatible with 5V/1A charging. |
7. Specifications
- Model: CKS507-US
- Brand: iTOMA
- Display Type: 1.4" White LED
- Power Source: Corded Electric
- Battery Backup: 1 Lithium Metal battery (included)
- USB Charging Port: 5V/1A
- FM Frequency Range: 87.5-108 MHz
- Product Dimensions: 6.22" (W) x 3.54" (H) x 2.17" (D)
- Item Weight: 1.26 pounds
- Material: Plastic
- Color: Black
8. Warranty and Support
For warranty information or technical support, please contact iTOMA customer service. Refer to the product packaging or the official iTOMA website for the most up-to-date contact details.
Website: Visit the iTOMA Store on Amazon
Ask a question about this manual
Ask about setup, troubleshooting, compatibility, parts, safety, or missing instructions. Manuals+ will review the question and use this page’s manual context to help answer it.