1. Introduction
This manual provides essential information for the safe and effective operation, assembly, maintenance, and troubleshooting of your Rock&Rocker Von3.2 Electric Pressure Washer. Please read all instructions carefully before use to ensure proper function and to prevent injury or damage.

Figure 1.1: Rock&Rocker Von3.2 Electric Pressure Washer and included accessories.
2. Safety Instructions
Always observe basic safety precautions when using electrical appliances to reduce the risk of fire, electric shock, and personal injury.
- Ensure the power cord is connected to a grounded outlet. The unit is equipped with a 35ft power cord with an inline GFCI for safety.
- Never direct the water jet at people, pets, or electrical devices. High-pressure spray can cause serious injury.
- Wear appropriate personal protective equipment, including safety glasses, gloves, and protective footwear.
- Do not operate the pressure washer in the rain or near standing water.
- Before performing any maintenance or cleaning, always disconnect the power supply.
- Keep children and bystanders away from the operating area.
- Do not use the appliance if the power cord or other important parts are damaged.
3. Package Contents
Verify that all items are present upon unpacking:
- Rock&Rocker Von3.2 Electric Pressure Washer Unit
- High-Pressure Spray Gun
- Spray Wand
- 26ft High-Pressure Hose (with built-in reel)
- 35ft Power Cord with GFCI Protection
- 4 Quick-Connect Nozzles (0°, 15°, 25°, 40°)
- 16.9oz (500ml) Foam Tank / Soap Bottle
- Water Inlet Connector
- Nozzle Cleaning Pin
4. Assembly and Setup
Follow these steps to assemble your pressure washer:
- Attach the Wheels: Securely attach the wheels to the main unit if not pre-assembled.
- Connect the High-Pressure Hose: Connect one end of the 26ft high-pressure hose to the pressure washer's outlet and the other end to the spray gun. Ensure connections are tight. The hose reel facilitates storage and deployment.
- Assemble the Spray Gun and Wand: Attach the spray wand to the high-pressure spray gun.
- Connect Water Supply: Attach a garden hose (not included) to the water inlet connector on the pressure washer. Ensure the garden hose is free of kinks and has a steady water supply. The unit supports dual water intake methods, allowing connection to a spigot or drawing water from a bucket (ensure the hose is primed when drawing from a bucket).
- Select and Connect Nozzle: Choose the desired quick-connect nozzle and insert it into the end of the spray wand until it clicks into place. Store unused nozzles in the integrated nozzle holder.
- Connect Power: Plug the 35ft power cord with GFCI into a suitable grounded electrical outlet.
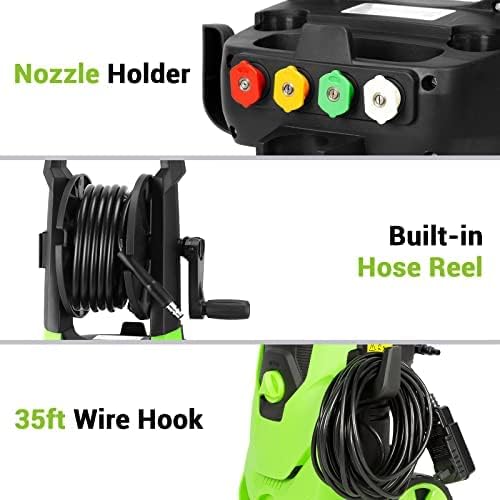
Figure 4.1: Integrated nozzle holder, hose reel, and power cord hook for organized storage.
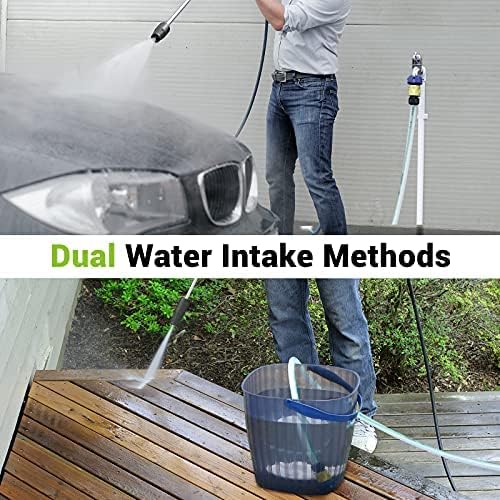
Figure 4.2: The pressure washer can draw water from a standard spigot or a bucket.
5. Operating Instructions
5.1 Initial Start-Up
- Ensure all connections are secure and the water supply is turned on.
- Squeeze the trigger on the spray gun to purge air from the system until a steady stream of water emerges. This primes the pump.
- Turn the pressure washer ON using the main power switch.
- The Total Stop System (TSS) will automatically shut off the pump when the trigger is not engaged, conserving energy and extending pump life. The pump will reactivate when the trigger is squeezed again.
5.2 Using Quick-Connect Nozzles
The Rock&Rocker Von3.2 includes four quick-connect nozzles for various cleaning tasks. Always turn off the pressure washer and engage the safety lock on the spray gun before changing nozzles.
- 0° Red Nozzle: Provides a concentrated, pencil-point jet for intense cleaning of small, stubborn spots. Use with extreme caution as it can damage surfaces.
- 15° Yellow Nozzle: Delivers a narrow, powerful spray for heavy-duty cleaning of hard surfaces like concrete, brick, or metal.
- 25° Green Nozzle: Offers a wider spray for general cleaning of decks, patios, and driveways.
- 40° White Nozzle: Produces a broad, gentle spray for cleaning delicate surfaces such as vehicles, boats, or windows.

Figure 5.1: Quick-connect nozzles and their recommended applications.
5.3 Using the Soap Tank (Foam Cannon)
The 16.9oz (500ml) foam tank allows for the application of cleaning detergents.
- Fill the foam tank with an appropriate pressure washer detergent. Do not use bleach or abrasive cleaners.
- Attach the foam tank to the spray gun.
- Ensure a low-pressure nozzle (e.g., 40° white nozzle) is attached to the wand for optimal soap application.
- Squeeze the trigger to apply foam. After applying detergent, switch back to a high-pressure nozzle for rinsing.

Figure 5.2: Applying detergent using the foam tank for car washing.
6. Maintenance
Regular maintenance ensures the longevity and performance of your pressure washer.
- After Each Use: Disconnect water and power. Squeeze the trigger to release any residual pressure. Run the unit for a few seconds to clear water from the pump.
- Nozzle Cleaning: Use the provided nozzle cleaning pin to clear any blockages from the nozzle tips. Always remove nozzles from the gun and store them in their holders to allow them to dry, preventing rust.
- Hose and Cord Storage: Wind the high-pressure hose onto the built-in reel and coil the power cord around its hook for neat storage.
- Winter Storage: If storing in freezing temperatures, drain all water from the pump and hoses. Consider using a pump protector/antifreeze solution.
- Filter Cleaning: Periodically check and clean the water inlet filter to prevent debris from entering the pump.
7. Troubleshooting
Refer to this section for common issues and their solutions.
| Problem | Possible Cause | Solution |
|---|---|---|
| Unit does not start | No power, GFCI tripped, power switch off | Check power connection, reset GFCI, turn power switch ON. |
| Low pressure | Insufficient water supply, clogged nozzle, air in pump, incorrect nozzle | Ensure full water flow, clean nozzle, purge air by squeezing trigger, select appropriate nozzle. |
| Water leaks | Loose connections, damaged O-rings | Tighten all connections, inspect and replace O-rings if damaged. |
| Motor stops frequently (TSS not engaged) | Overheating, voltage drop | Allow unit to cool, ensure proper voltage supply. |
8. Specifications
- Model: Von3.2
- Brand: Rock&Rocker
- Maximum Pressure: 2150 PSI
- Flow Rate: 2.6 GPM (Gallons Per Minute)
- Power Source: Corded Electric
- Power Cord Length: 35 ft (with GFCI)
- High-Pressure Hose Length: 26 ft
- Soap Tank Capacity: 16.9 oz (500ml)
- Weight: 8.9 kg (approximately 19.6 lbs)
- Dimensions: 53.34 x 33.02 x 33.02 cm (21 x 13 x 13 inches)
- Certification: CSA Certified

Figure 8.1: Rock&Rocker Von3.2 in action, demonstrating its cleaning capability.
9. Warranty and Support
The Rock&Rocker Von3.2 Electric Pressure Washer comes with a one-year warranty. For technical assistance, warranty claims, or general inquiries, please contact Rock&Rocker customer support.
Customer Support:
- Email: support@rockrocker.com
- Toll-Free (US): (877)-756-8666

Figure 9.1: Contact information for customer support.

