
1. Introduction
Thank you for choosing the CT Copper Tailor SH1-2TRM Stainless Steel Island Mount Range Hood. This manual provides essential information for the safe installation, efficient operation, and proper maintenance of your new range hood. Please read this manual thoroughly before installation and use, and retain it for future reference.
This range hood is designed to effectively remove smoke, grease, moisture, and odors from your cooking area, enhancing your kitchen environment.

Image 1.1: Front view of the CT Copper Tailor SH1-2TRM Stainless Steel Island Mount Range Hood. This image displays the elegant design of the range hood, featuring brushed stainless steel with brass accents.
2. Safety Information
WARNING: To reduce the risk of fire, electric shock, or injury to persons, observe the following:
- Installation work and electrical wiring must be done by qualified person(s) in accordance with all applicable codes and standards, including fire-rated construction.
- Sufficient air is needed for proper combustion and exhausting of gases through the flue (chimney) of fuel-burning equipment to prevent back-drafting.
- When cutting or drilling into wall or ceiling, do not damage electrical wiring and other hidden utilities.
- Ducted fans must always be vented to the outdoors.
- Do not use this unit with any external solid-state speed control device.
- To reduce the risk of fire, use only metal ductwork.
- This appliance is UL listed and ETL approved for your safety.
3. Package Contents
Verify that all components are present and undamaged upon unpacking:
- Metal Range Hood Cover
- Range Hood Insert (with 4-speed exhaust fan and LED lights)
- Baffle Filters (Stainless Steel, Dishwasher-safe)
- Grease Tunnel
- User Manual (this document)
4. Product Specifications
| Feature | Detail |
|---|---|
| Model Number | SH12TRM424827 |
| Mounting Type | Island Mount |
| Dimensions (D x W x H) | 27" x 42" x 48" |
| Material | 16 Gauge Stainless Steel |
| Air Flow Capacity | 1150 CFM (Cubic Feet Per Minute) |
| Number of Speeds | 4 |
| Noise Level | 69 Decibels |
| Lighting | LED (Adjustable) |
| Filter Type | Baffle Filters (Dishwasher-safe) |
| Voltage | 120 Volts |
| Wattage | 240.00 Watts |
| Certifications | UL Listed, ETL Approved |
| Special Features | Delay Shutdown, Oil Collector |

Image 4.1: Product dimensions for the SH1-2TRM Island Mount Range Hood. This image illustrates the depth, width, and height measurements of the unit.
5. Installation
5.1 Pre-Installation Checklist
- Ensure power is disconnected at the circuit breaker.
- Confirm all necessary tools and materials are available.
- Review local building codes and ordinances.
- A shop drawing will be provided upon order placement; refer to it for precise measurements and mounting details.
- Consider ductless or remote blower ventilation system options if applicable to your setup.
5.2 Mounting the Range Hood
This is an island mount range hood, designed to be suspended from the ceiling above a cooking island.
- Prepare the Ceiling: Locate and mark the center point above your cooking surface. Reinforce the ceiling structure as required to support the weight of the range hood.
- Install Mounting Bracket: Secure the provided mounting bracket to the reinforced ceiling using appropriate fasteners. Ensure it is level and securely fastened.
- Ductwork Connection: Connect the ductwork from the range hood to your external ventilation system. Ensure all connections are sealed to prevent air leaks.
- Electrical Wiring: Connect the electrical wiring according to local codes and the wiring diagram provided in the shop drawing. This should be performed by a qualified electrician.
- Attach Hood Cover: Carefully lift and attach the metal range hood cover to the mounting bracket. Secure it in place as per the shop drawing instructions.
- Install Baffle Filters: Insert the baffle filters into their designated slots within the hood insert.

Image 5.1: Example of the range hood installed in a kitchen setting. This image demonstrates the typical appearance of the island mount range hood above a cooking area.

Image 5.2: Visual representation of the range hood's ventilation function. This image shows steam being drawn into the hood from cooking pots.
6. Operation
Your CT Copper Tailor range hood features intuitive push-button controls for fan speed and lighting.

Image 6.1: Control panel and feature overview. This image highlights the push-button controls, adjustable LED lights, and removable baffle filters.
6.1 Fan Speed Control
- The range hood is equipped with a 4-speed fan.
- Press the fan speed buttons to cycle through the available speeds (Low, Medium, High, Max) to suit your ventilation needs.
- For heavy cooking, use higher speeds to quickly remove smoke and odors. For lighter cooking, lower speeds are sufficient and quieter.
6.2 LED Lighting
- Press the light button to turn the LED lights on or off.
- The LED lights provide illumination for your cooking surface.
6.3 Delay Shutdown Feature
The delay shutdown feature allows the fan to continue running for a set period after cooking to ensure all residual odors and steam are cleared, then automatically turns off. Refer to the specific controls on your unit for activation.
7. Maintenance
7.1 Cleaning Baffle Filters
The stainless steel baffle filters are designed to trap grease and can be easily removed for cleaning.
- Removal: Gently pull down the latch on each baffle filter and slide it out of its slot.
- Cleaning: The filters are dishwasher-safe. Alternatively, wash them by hand with hot water and a degreasing detergent.
- Reinstallation: Ensure filters are completely dry before reinserting them into the hood. Slide them back into place until the latch clicks securely.
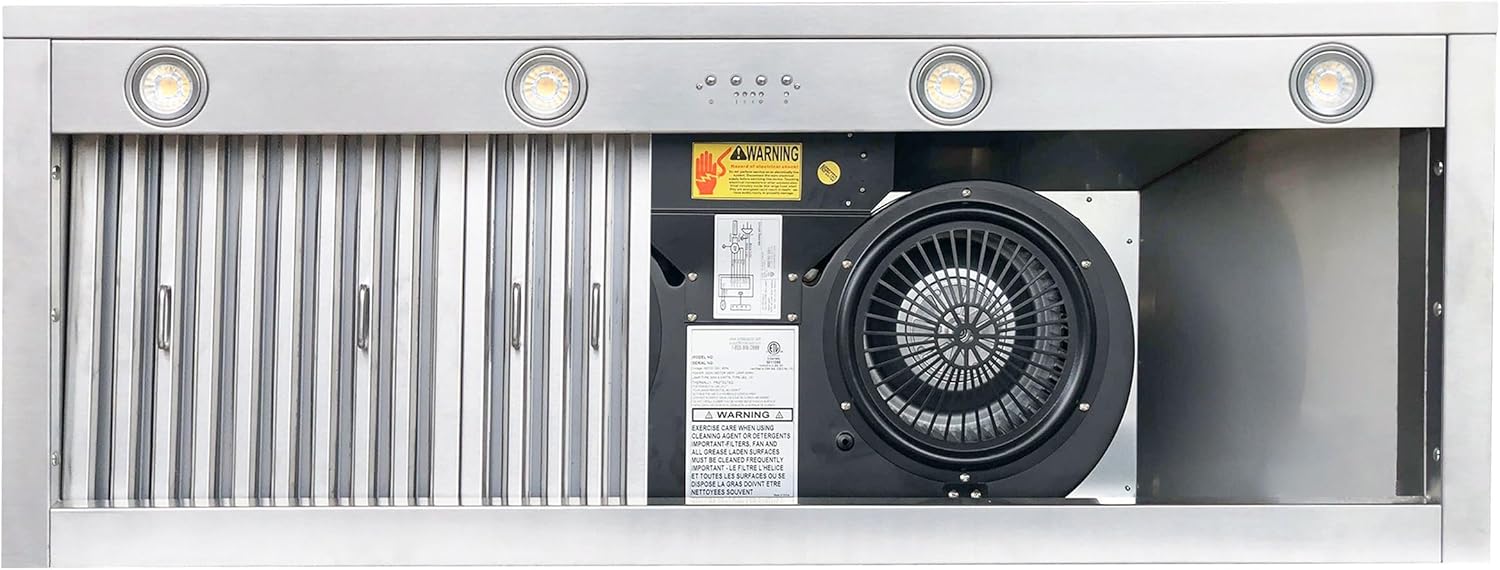
Image 7.1: Internal components of the range hood, including the baffle filters and fan. This image shows how the filters are positioned for easy removal.
7.2 Cleaning the Exterior
- Wipe the stainless steel exterior with a soft cloth and a non-abrasive stainless steel cleaner.
- Avoid using abrasive pads or cleaners that could scratch the surface.
- The surface is designed to be fingerprint resistant, simplifying cleaning.
8. Troubleshooting
Before contacting customer support, please refer to the following common issues and solutions:
| Problem | Possible Cause | Solution |
|---|---|---|
| Hood does not operate | No power supply | Check circuit breaker or fuse. Ensure unit is properly plugged in. |
| Poor suction | Clogged filters, improper ductwork, fan motor issue | Clean baffle filters. Check ductwork for obstructions or leaks. Contact support if motor issue is suspected. |
| Excessive noise | Loose parts, fan obstruction, improper installation | Ensure all components are securely fastened. Check for foreign objects in the fan. Verify correct installation. |
| Lights not working | Faulty LED bulb, wiring issue | Check light switch. If bulb is replaceable, replace it. Contact support for wiring issues. |
9. Warranty and Support
Your CT Copper Tailor range hood comes with the following warranty:
- One-Year Parts Warranty: Covers the range hood insert components for one year from the date of purchase.
- Lifetime Hood Cover Warranty: Covers the metal range hood cover for its lifetime against manufacturing defects.
For warranty claims, technical support, or any questions not covered in this manual, please contact CT Copper Tailor customer service.
Contact Information:
Please refer to your purchase documentation or the official CT Copper Tailor website for the most current contact details.
Visit the CT Copper Tailor Store on Amazon